 Dragon Rider 500
)
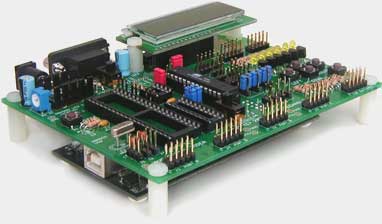
The ECROS Technology Dragon Rider 500 turns the Atmel AVR Dragon into a Development and Prototyping System comparable to the STK500. With the Dragon attached safely and snugly underneath, the Dragon Rider presents the familiar array of sockets for a variety of microcontrollers, 10-pin headers for the general-purpose I/O ports, a reset button and jumpers for various options.
More about the AVR Dragon
The AVR Dragon is a low-cost programming and debugging interface for a wide range of Atmel microcontrollers. As well as the older ISP and High Voltage programming methods and the JTAG programming/debugging interface, it supports the new debugWIRE debugging interface. All-in-all, it offers a sub-set of the features of the JTAG ICE MkII at one sixth of the price. A small drawback is the open board format. However, it is only a programming / debugging interface and falls far short of the flexibility of the older STK500. The "prototyping area" mentioned by Atmel in the literature is only a place to put a socket to carry a device being programmed. A separate target board is needed to get anything running. The Dragon Rider 500 is intended to add to the AVR Dragon the features that Atmel users have been accustomed to on the STK500.
Dragon Rider 500 Features
NOTE FOR EXISTING OWNERS: The Parts Kits have been reorganized to better reflect what people are buying and in an attempt to avoid a price increase for the majority of new buyers (more information ...).
Basic Features (Included in the Basic Parts Kit)
- Connects to AVR Dragon power, ISP and JTAG headers
- Supplied with pillars for support and "bumpon" feet for the AVR Dragon
- AVR Dragon STATUS LED carried to top via a light pipe
- Target sockets for 40-, 28-, 20- and 8-pin DIP microcontrollers
- 10-pin, STK500-style headers for Ports A, D, B and C
- Switchable power from AVR Dragon VCC header
- Decoupling for VCC, AVCC and AREF
- Reset button with pull-up and series resistor
- LM431 precision voltage reference
- Oscillator crystal with socket and loading capacitors
- Jumpers connect RESET, XTAL1 and XTAL2 to reset button and crystal OR to general purpose I/O port headers (28-, 20- and 8-pin targets)
- Jumpers route ISP to appropriate port pins (no need for ribbon cable)
- Jumpers route JTAG to appropriate port pins (no need for ribbon cable)
Refer also to the Parts & Assembly page.
High-Voltage Programming (Requires High-Voltage Programming Parts Kit)
- Connects Dragon Rider to AVR Dragon High-Voltage Programming headers
- High Voltage Programming via headers and ribbon cables (as with STK500)
- High Voltage Programming configured by STK500-style PJUMP and BSEL2 jumpers
Add-On Features (Require Add-on Parts Kits)
- Power Supply - power the target system independent of the Dragon
- Serial Interface - "RS-232" level COM port interface with female DE9 connector
- 2 x 16 LCD - 2 line by 16 character LCD with contrast adjustment
- LED and Switch - six buffered LEDs and five push-button switches
Other Features (Require Individual Components)
- Sub-regulation of AVR Dragon supply for 3.3 volt target operation
- Small prototyping area
User's Guide
For more information, please download the Dragon Rider 500 User's Guide (Current revision: Preliminary, D, March 2, 2008).
Compatible Microcontrollers
- ATmega16/32(A), ATmega164/324/644(P/V/A) read more ...
- ATmega8, ATmega48/88/168/328(P/A)) read more ...
- ATtiny2313
- ATtiny13, ATtiny25, 45 and 85
For detailed information on using these microcontrollers with the Dragon Rider, please click a link in the navigation bar at the top left of this page or refer to the appropriate section in the User's Guide.
No Longer Available For Purchase
ECROS Technology has closed down and the Dragon Rider 500 is no longer available for purchase. These pages are maintained for the benefit of existing owners.