|
Projects
Processes
Power Tools
Resources |
Converting the Drill Press into a Wood Lathe  NOTE : This Page is OBSOLETE and MAY NOT BE WHAT YOU WANT.Here I document my do-it-yourself "micro" wood lathe. Using this I found, somewhat to my surprise, that I could make simple but attractive turned items such as screwdriver handles, "fake" pepper grinders and even a segmented bud vase (see picture). When a friend offered to give me the midi lathe he inherited from his father, I said yes. I made a bench for it, bought the essential accessories on eBay and so I now have a "real" lathe. I'm leaving this page here for the historical record. But, I won't be adding anything. So, if I've told you to check out my Wiki with regard to wood turning, it's probably the new page that you want.
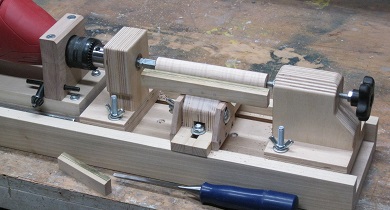 Why Do I Need a Wood Lathe?Well, I don't actually need a wood lathe. I made Opus One cylindrical without a lathe. I don't have in mind any projects that would require a lathe. But, I'm making a drill press that can be converted into a drum sander and many of the YouTube videos I've looked at for guidance also show conversion into a lathe. It looks like an interesting project, with some challenges, but nothing I don't think I can handle. I'm also curious to know what it's like to turn a piece of wood on a lathe. It's something I've never done, although I have quite a lot of experience with a metal lathe. Maybe I'll like it and find some turning projects to keep me busy. The photograph at right is a general view of the lathe. The bed is what would otherwise be the column of the drill press. The bed can be screwed down to the bench in the same way that the drill press column can be screwed to any suitable vertical surface, such as the side of a bench or cabinet. The corded drill can be seen at the left. It is still on its sliding platform, but this is now prevented from moving. The drill table has been removed and replaced with a headstock, toolrest and tailstock (left to right). These will be described in detail in the following sections. It takes about five minutes to convert between the drill press and the lathe. Since making the lathe cost me almost nothing (being retired, I can disregard time), I planned to use one of my chisels and not spend several hundred dollars on turning tools unless I decide to take this further. I think this works reasonably well, although I don't really know what to expect. The glued-up piece of curly maple and walnut that you can see in the lathe in the picture started out octagonal and now it's round. The surface is not great; it would need a lot of sanding if I thought of something to do with it.  HeadstockThe purpose of a lathe's headstock is to support one end of the workpiece and to spin it with enough force for the tool to cut the wood. This can be done in many ways. A plate with a drive spindle attached can be screwed to the workpiece. Or, it can be gripped in a chuck somewhat in the manner of a metal lathe. I chose the simplest method, which is a spur drive (also known as a drive center). This is made from a 5/16" bolt, a coupling nut and a jam nut. I sawed off the head of the bolt and cleaned up the end on the bench grinder. The plain (unthreaded) shaft of the bolt is gripped in the chuck of the drill. The threaded end is ground to a point. The jam nut is placed first on the threaded part of the bolt. Then the prepared coupling nut is run on until it is in the correct alignment with the point and the jam nut is run back and tightened against it to hold it in place. The end of the coupling nut has been cut to form four spikes spaced at 90° around the axis. These can be just pressed into the end of the workpiece when axial pressure is applied from the tailstock (see below). I plan to cut a shallow cross on the end of the workpiece with a thin kerf handsaw to give the spikes something to grip. This means that I will have to take some care to drill a hole for the point to enter and check that the point supports the work and the spikes enter the saw cuts. I will still be able to apply pressure from the tailstock to seat the drive.  The headstock bears the horizontal pressure of the spur drive against the workpiece (applied by the tailstock) and the (mostly upward) radial reaction force against the tool. Power drills are designed to withstand substantial axial pressure using, for example, thrust bearings, so all I need to do is prevent the sliding platform on which the drill is mounted from moving. This is done with a simple wood bar across the left end of the bed (the top of the drill press column) held in place by #12 screws. However, drills are not usually designed for radial forces. So, the spur drive passes through a bearing block borrowed from the drum sander that holds it on axis against these forces.  Tailstock (a.k.a. Foot Stock)The purpose of a lathe's tailstock is to support the non-driven end of the workpiece. This is usually done with a spike pressed into an indentation in the center of the piece, which may be a drilled hole. The spike needs to be on the lathe's axis. Its position must be adjustable and lockable so that it can be advanced into the indentation and firmly held there. The tailstock bears the horizontal pressure of the spike into the workpiece and the (mostly upward) radial reaction force against the tool. My design is typical of home-built wood lathes. A more sophisticated variation would include a sliding and lockable barrel, to provide coarse horizontal adjustment, with the threaded rod inside that. I did not need nor have room for this. So, what I have is basically a wood block through which a 5/16" threaded rod runs. This rod is ground to a point at one end. It runs in a coupling nut recessed and epoxied into the block on the side closer to the workpiece. A jam nut is threaded onto the rod on this side and must be tightened against the coupling nut to lock the spike in position after adjustment. On the other end of the threaded rod, a star knob is held in place by another jam nut. Turning this knob advances and retracts the spike. The block is glued and screwed to a platform that slides in the lathe bed (originally the drill press column) and this serves as the coarse horizontal position adjustment. To bear the reaction force of the spike's pressure, the platform is held down by two T-bolts on the workpiece side and extends as far away from this point as I though was reasonable. For longer work, I may have the tailstock partly hanging off the end of the bed, if it seems secure enough.  Tool RestThis part gave me by far the most trouble. My decision to have everything bolt down to the bed / column in two places, one on each side, rather than just in the center, backfired in this one case. One of these bolt positions is right where the tool rest needs to stick up. I thought of ignoring the bolt here and just relying on the one at the back. But, if the tool rest should move and contact the workpiece things could get really bad, especially if it has not yet been turned to a cylinder. In the end, I figured out how to have bolts at both the front and the back by making the tool rest mount rise up and flip over to give access to the nut that tightens the front bolt. It works very well and it's only a little inconvenient. Blah Blah Blah Cutting ToolsA lathe is useless without appropriate cutting tools. I didn't think about this much when I was building the lathe as I was doubtful about what use I would find for it. Having spent almost nothing on the lathe, I knew I wasn't going to turn around and spend several hundred dollars on a set of tools. I had this vague idea that I would use my chisels. Somehow, it came to my notice that there is this thing called the "skewchigouge" which does the work of the two most important lathe tools (a gouge and a skew chisel) and costs only fifty dollars (less on sale). So I bought one. Then it occurred to me that I had no idea how to sharpen and hone it. So, except for turning a test piece, which got smaller and smaller every time I played with it, I left the lathe alone. Small ChiselI have four chisels. My 20 mm chisel came with me from England in 1984 and I've looked after it. I got two Stanley "contractor grade" chisels for Christmas a decade or so ago and they are now in pretty rough shape. I bought a 1/4" wide chisel from Rockler because I needed it for the toothbrush holder project. For no reason that I can now justify, I decided to try at first using the lathe with the 1/4" chisel. I knew enough to turn the chisel upside-down and "rub the bevel", but apart from that I was making it up as I went along. I made an octagonal piece of wood into a cylinder. Then I made the cylinder smaller. And smaller. I had no idea where I was going, took it all apart and put it away.  Crown SkewchigougeThe breakthrough came when I had a bad idea about how to sharpen my skewchigouge and nearly ruined it. I'd bought the tool from Woodcraft (Item # 140474) at a small price reduction in the vague hope that it would be the only tool that I would need.  Home-Made Skew ChiselWhile trying (unsuccessfully) to find information on sharpening the skewchigouge, I came across videos in which people make skew chisels from old metal files. Here is one and here is another. It just so happens that I have an old file which is a) clogged with aluminum and b) and duplicate of another one that still works. It also has a ridiculously small handle. But, considering that I liberated it from an aerospace / defense company where I worked in the 1970s, it is probably really good steel. So, off I go. Once you have the idea, what you have to do is pretty obvious. I have a bench grinder, so I spent a couple of hours removing the teeth of the file and reducing it to a metal bar. I cleaned up the faces somewhat with my belt sander using a 220 grit belt, but that was mainly to improve its appearance. Then I used the same sharpening methods that I use for ordinary wood chisels, starting with another half hour at the bench grinder, except that I ground angles on both sides instead of leaving one side flat. Sharpening NotesTed's Turnings in this video explores the use of the vari-grind jig. He identifies three jig settings : 1 - the tool protrusion, 2 - the vari-grind arm angle and 3 - the distance from the wheel to the pivot point. He seems to claim that these will effect 1 - the nose bevel, 2 - the flute wing sweep and 3 - the flute wing shape, but doesn't really follow through with this. My thinking is that the nose bevel angle is affected by all three jig settings by simple triangle geometry. But, I'm having trouble figuring out what else is affected. Turning NotesUsing a SkewchigougeI've found two YouTube videos, this one from Woodcraft and this one from Timbecon (skip to 7:15), but they're both useless. Allan Beecham provides a single page of cryptic diagrams on how to use his invention, which Woodcraft omit from the instructions that they provide to buyers. Adding this to the lack of information on how to sharpen and hone the tool, I can't recommend this product. Armed only with the principle of "rubbing the bevel" I was able to make some tool handles by trial and error, but it was frustrating. Using a Skew Chisel, GeneralBrian Havens describes himself as a "skew fanatic". He asserts that there are only three cuts that you can make with skew chisel, the peeling cut, the planing cut and the point cut. He has a video for each (see below). The Craft Supplies USA channel has a long video "master class" entitled The Skew Chisel with Allan Batty (Woodturning How-to). In this video, "Screw the Skew", a beginner turner learns the skew chisel by making screwdriver handles. (Lots of this is largely irrelevant to turning, so skip.) After researching skew geometry, he "finally ended up" with a "flat, straight bevelled, three-quarter inch skew [because] it was the only one [he] could reliably get sharp. However, he does not grind the bevel flat, so I'm skeptical of his sharpening. At 10:12 he finally spins the wood, starting with a "roughing cut", which looks to me like a planing cut. He more-or-less admits this toward the end — "... blade at 45 degrees and the shavings are coming off the lower half ... riding on the bevel". At 11:46 he begins practicing a vee cut. At 12:43 he starts to "do [his] beads". At 13:46 he starts a shearing cut. This looks to me like a peeling cut. He makes the important point that 'to maintain bevel contact you have to push the tool forward. At 14:10 he does a slicing cut. At 14:50 he's doing a scraping cut and makes the point that this "really does dull your tools". John C Lucas has a couple of relatively short videos about the skew chisel. In skew practice he experiments with long-point-down end-grain cuts and vee cuts. The "practice" part is seeing how thin you can make a disk by cutting on alternate sides before it falls off. In skew practice 2 he starts with a cylinder and turns first barrels, then balls and finally beads. He also makes vee cuts and a small shallow cove. At 7:00, he makes the observation that when turning the left side of a ball you're having to make three movements, "rotate the tool" (anticlockwise), "move it to the left" (by which he means swing the handle to the left) and "lift up the handle". (I observe that there are two more movements necessary, sliding the tool to the left along the rest and sliding it inward towards the axis of the lathe.) Scraping Cut with a Skew ChiselBlunts tool rapidly. Peeling Cut with a Skew ChiselBrian Havens devotes this whole video to this subject. He first talks about how spiral catches occur when other cuts are being make with the skew and only one edge of the tool is on the rest. At 3:34 he says that for a peeling cut the whole width of the tool is on the rest and that's what makes this cut so easy and so tame. At 5:58 he makes a tenon for a tool handle, using the skew "just like you would a parting tool". At 8:46 he uses a peeling cut to remove a lot of material and reduce the diameter of a cylinder by moving from side to side. I don't know if this would work without the curved edge. At 11:15 he shows how to improve the quality of the surface with a very light peeling cut. This probably wouldn't work at all without the curved edge. He also explains his grip, which has his fingers over the workpiece. This would not work for me because my lathe is too small. At 15:13 he moves on to "shallow curves" (tapers, coves and beads). The taper starts at 16:07. He goes back and forth, not following the downhill rule. At 18:43 he starts coves (concave curves), but he clearly states that you can't do this with a straight-across skew like mine. Beads (convex curves) start at 20:00. He finishes up the video by using the skew more freely to finish up the tool handle, cutting much steeper curves. Overall, I'm not sure what use I can make of this unless I grind my skew on a curve, which I don't want to do because of the difficulty. Planing Cut with a Skew ChiselBrian Havens devotes this whole video to this subject. As compared to the peeling cut, to get a narrower cutting angle, we're going to have to pick up one end or the other off of the tool rest. We want to use a part of the cutting edge that isn't to far from the fulcrum. Because of the smaller bevel angle of 20° (as compared to a gouge) the tool rides higher on the work and we're going to have to raise up the tool rest. So, we can afford to cut a bit further away from the fulcrum as there is less downward pressure on the cutting edge. Only use the bottom third of the edge. Demonstration from 5:10 to 5:50 (with short point leading). Note that he cuts in both directions across a very broad bead and doesn't only go "downhill". For removal of material, he goes as far as half way along the edge, but uses a grip to counter rolling of the tool. Next, Brian explains and demonstrates what causes the spiral catch, both with the gouge and with the skew. It is a narrow cutting angle in combination with the lack of bevel support. So, be extra-diligent about bevel contact. At 9:40, Brian reaches the end of the "essentials" and begins to talk about variations. Leading with the long point instead of the short has no effect other than to reposition the handle. He claims more precise cylinders and reduced vibration. Second ( at 12:30), dig the corner in. This gives faster removal of material but a finish almost as good. It also combats vibration. At 14:19 Brian moves on to the planing cut for curves. Beads and outside curves are traditionally taught separately, but it's still the planing cut. The difficulties are the smaller contact area between the bevel and the wood and the need to rotate the tool and raise the handle in a coordinated manner. When the corner digs in, it seems to me that we've got the second variation discussed earlier. But, he points out that over-rotation is the cause of catches because bevel contact is lost (what, exactly, does he mean by "rotation", here, twisting the tool or tipping it forward?). Under-rotation simply results in you stopping cutting. Don't use a third of the edge, work right at the corner (so, I think he means tipping it forward). So far, he has led with the short point, but he also switches to lead with the long point, again changing the angle of the handle but otherwise doing the same thing. At 19:17 there is a slow-motion of a spiral catch. Point Cut with a Skew ChiselBrian Havens devotes this whole video to this subject. He demonstrates the cut, explains where bevel support comes from and shows what happens (a catch) when bevel support fails all by making a shoulder cut (paring back the end of a stubby cylinder held in a chuck). The cut begins with a "hard entry", which is basically poking the tool into the workpiece so as to cut a very narrow vee. At 8:11 he switches to demonstrating the use of a point cut to make a pommel, which is used in the transition between the square part of a furniture leg and the turned (round) part. The difference is that he's in the square part and therefore cutting air, but he makes the hard entry and is light on the bevel and proceeds just like a shoulder cut. At 9:39 he introduces the final profile that can be made with a point cut, which is the vee-groove. At 11:10 he shows how a bead is started by making a vee-groove on either side. He ends the video with tips on honing, making shoulder cuts right to the center of the piece, using peeling cuts to remove bulk material before forming the shoulder (for example, in a tenon) and making curved end-grain cuts (which I think I'm already doing when making the rounded end of tool handles). Rolling a Bead with a Skew ChiselIn this video, Brian Havens explores the topic of cutting curves in detail, but using a gouge, not a skew. It's interesting because he justifies the rotation of the tool in terms of cutting angle, which should start wide for face grain and transition to narrow for end grain. At about 12:02 he leaves spindle work and moves on to face work. Brian Havens considers shaping beads and outside curves to be part of the planing cut. Use the short point, briefly see Brian Havens. Allan Batty Makes a Cabriole Leg (Kind-Of)
|