|
Projects
Processes
Power Tools
Resources |
Small Wood Boxes Why Small Boxes?At the time I decided to try making small boxes ("keepsake" boxes, "gentleman's valet" boxes, etc.), I had been woodworking for about three months and had made mostly coasters. My first three projects, a toilet roll holder spindle, a toothbrush holder and a platform for my wife's cast bronze pears were not really things that could be repeated as gifts. But I had made coasters for friends, my mother-in-law and the lady we buy our fish from and all were gratefully received. I had just completed a set of four coasters with a holder for a friend who is a RISD alumna and has exquisite taste in interior design. Admittedly, she had not seen them yet (this was during the COVID-19 lockdown), so I had no feedback from her, but I was rather proud of them. I was not sure what to do next, coaster-wise. A neighbor, when I told him that I'd taken up woodworking and listed my projects, pointed out that coasters were a step backwards being, basically, "squares". Making the coaster holder had forced me to design and fabricate something that wasn't a square. So, I was ready for something new. But, for reasons I've explained, I wanted to stay small. YouTube suggested I watch other people make boxes and miter / spline jigs and I was obedient to my master. Some new woods had arrived by mail and so the stars aligned for small wooden boxes with mitered and splined corners.  My First Small Box - a "Keepsake" BoxThe first question you have to answer when you're going to make a box is - how am I going to join the sides together? Butt joints, rabbet joints and box joints are utilitarian. Dovetail joints were a bit beyond my skills at the time and require equipment I don't have. A good compromise (in other words, something that looks good but is only of modest difficulty) is a splined miter joint. Basically, you start with a miter joint (cutting both ends of each side piece at a 45° angle and gluing these faces together) and then you reinforce this (end-grain glue joints are intrinsically weak) by cutting slots and inserting thin strips of wood called splines. In addition to strengthening the joint, choosing a spline of a contrasting wood species can make the box more attractive. The second question you have to answer is - how am I going to attach the lid? The obvious answer is with a hinge of some sort. I rather liked the alternate answer of - I'm not going to attach the lid at all! The combination of splined mitered corners and a hinge-less lid came together in a YouTube video Making Small Keepsake Boxes with Various Lid Designs by Adrian Preda. The basic design comes from "Box with Slab Lid" in the book Box Making Basics by David Freedman. Adrian's contribution is using the lid as a major design element. I liked this because the "slab" lid is just a rectangle of wood - rather like a coaster! By the way, it turns out that you can read the whole section on this box in the preview of the book. The basic dimensions of my first small box are more-or-less as David Freedman proposes in his book. I followed Adrian Preda in making the lid more interesting. My own contribution was the use of three splines in each corner. David Freedman writes "You need only one key [spline] ... because of the relatively large glue surface ... you can use two keys ... for a decorative effect". Adrian Preda uses a single basswood spline in a walnut box. After mocking this up in SketchUp, I decided first on two splines and after more work changed my mind to three. I really like the way the top spline, on the beveled edge, visually pulls back towards the corner. The carcass of the box is curly maple. I took this from the worst piece in my first delivery of mail-ordered wood (so if the project didn't work out, I wouldn't lose much). It was horribly bowed, but cutting it into short pieces and processing them individually through my drum sander fixed that. The grain figure was not good, but I managed to maximize it by paying attention to the growth rings and the effect that the bevel cut would have. The splines and lid are purpleheart. The decoration in the lid is an inlay of wenge flanked by very narrow strips of maple. Here (mainly for my own records) is the "recipe" for a box of this general design. I did not do things in the order given by David Freedman in his book. I followed Adrian Preda's sequence of steps, but used power tools rather than hand tools as he does. This recipe page also describes special equipment needed, specifically a jig to cut the slots for the splines, and discusses things I learned and changes I made to make the build process easier as I progressed to the second, third and subsequent boxes of this design.  Variations on the Slab Lib Keepsake BoxMy first small box met with an enthusiastic reception from friends reading about it here. I decided to make sure that I could repeat my success before offering boxes as gifts. In addition, I wanted to 1) reduce the time to build each box, 2) refine the recipe to avoid minor mistakes on the first box, 3) experiment with different wood species, especially some bird's eye maple that I had obtained by mail from Woodcraft, and 4) experiment with finishes other than urethane. To reduce the time to build, I made two boxes alongside each other. I cut the wood pieces for the carcases of both boxes (from different wood species), sanded them all to the exact same thickness, sawed them to the same height, cut the corner miters, made the bottom dado and the top rabbet, glued them up, etc. This resulted in two boxes that are identical except for the wood and very small differences due to my lack of perfect quality control. Then I made the lids for each box in turn. Since I only have one pair of hands, one box was finished slightly before the other and so I've called that my "second" slab lid box and the other one my "third". A photograph of the second is above / right. The carcase is made from Bolivian rosewood and the corner splines are maple. The ¾"-thick rosewood that I obtained for this project was paler than the rosewood I had for coaster making and had a darker stripe though it. As I was setting out the pieces where they would go after glue-up, I thought that the stripe would be an attractive feature, but looking now at the finished box I'm not so sure. Oh, well. For the lid, I cut a piece from the best-looking end of my bird's eye maple. I felt that the figure alone would make it interesting enough and so I added no other decoration. If I had changed my mind, I suppose that I could have added an insert or inlay, but this would have been tricky with the lid already cut to the exact final size. Fortunately, I think I was right.  The carcase of the third box (photograph on the right) is jatoba, also known (without justification) as Brazilian cherry. The splines are again maple; I need to experiment with other species that will contrast / complement middle- and dark-toned woods. The color and grain pattern of jatoba are very even so I didn't have to think at all about the order of the pieces around the carcase. After cutting up my precious (and expensive) bird's eye maple for the second box's lid, I had a piece with slightly less figure that was about 3/16" too narrow to make another lid. Both problems could be solved by inserting a decoration. I used a strip of the carcase wood (jatoba) flanked by very thin strips of wenge, which is now my go-to wood when I want something very dark. I had stupidly not calculated the new width of the piece, allowing for the additional loss of 3/32" when cutting the maple in two, and I was extremely lucky that it came out OK. Even so, it the lid of this box is very slightly looser than the others. Another lesson learned (one hopes). The "recipe" for boxes of this general design includes updates that I made after making these two. There you can read about how, with a change to the order of the steps, cutting the corner miters before the dado and rabbet, I avoided chip out that occurred with the first box on the inside of the ledge on which the lid rests. You can also read about using an oil finish rather than urethane.  A More Difficult Box, Still With a Lift-Off LidHaving developed a bit of confidence in my work, at this point I was looking at sources of more interesting wood. Lots of people are selling woodworking lumber on eBay. It's not cheap; the sellers and buyers seem to know what they're doing. But, there are really beautiful pieces available that won't show up at the local store. Plus, unlike mail-order lumber from Rockler and Woodcraft, many sellers (but not all) provide pictures of exactly the piece of wood that you are buying. I soon found that I had made several purchases without much of an idea of what I would make. One was a pair of small bookmatched curly claro walnut slabs intended to make knife scales (the two sides of a knife handle) or a gun stock (photograph at right). I had no idea how I would show the beautiful, mirror-imaged grain patterns to full advantage, except, perhaps, just as a rectangle hanging on the wall like a picture. However, there is something else that you can do with bookmatched wood slabs and that is make a box on which the grain pattern appears to be continuous around all four corners. Making a box carcase (or any kind of frame) with wrap-around grain is, in principle, quite simple. Take a chunk of wood with an interesting grain pattern or figure and cut it in half, through its thickness, using a blade with a very thin kerf (this had been done by the eBay seller). Open up the two pieces just like opening a book (hence the term) so that they are mirror images of each other. If you do this with the grain running up-and-down, you'll get what is usually thought of as a bookmatched pair. (The idea then is to glue them up as a single board.) But, if you do it with the grain running side-to-side, you'll see that the grain flow matches both in the "fold" of the book and again at the outer edges. If you cut the sides of the box or frame, two from the left piece and two from the right, when you fold up them into a rectangle, the grain pattern will wrap around all four corners. You must make sure to cut the long and short sides in the correct order, which should be obvious when you think about it, and also to cut each of the two pieces apart using a blade with as thin a kerf as you can manage so as to destroy the smallest possible amount of wood and get the best match. Here's a short YouTube video in which the presenter tries, with mixed results, to show how this works. My curly claro walnut seemed ideal for this application, more than the conventional edge-to-edge bookmatching. But the pieces were a little over ½" thick and about 2¼" wide. The "slab-lid" boxes I've been making have a carcase made from wood that is ¾" thick and 1¼" wide. In addition, if the point is to show off the flow of the grain pattern around the corners, exposed splines are going to be a distraction. Clearly, I need a new box design.  Locating the Box Lid with a "Liner"If the lid doesn't drop into a recess in the top of the box and I don't want to fix it with hinges, then it will have to fit over the top edge. This is usually achieved by lining the box with thin sheets of wood that rise slightly above the top of the body. The lid then locates over the projecting liner. This should be clear in the photograph on the right. The liner is of a contrasting wood species (cherry) to the claro walnut of the carcase. The fit of the liner into the lid is obtained by making the lid and body of the box in one piece, then sawing them apart and adding the liner to the body. Usually, the liner is the full height of the body plus the projection. An alternative that I discovered in this video by Dave Harshberger is to fit the liner into a groove cut in the box walls only in the area where the lid and body are separated. I adopted this because a) it won't reduce the size of the box interior as a full liner would, b) it will display the wood chosen for the carcase on the inside as well as the outside of the box, c) if the carcase isn't that interesting, a contrasting liner will be a nice design feature and d) I imagined that it would be easier to cut a narrow liner with mitered corners from thin material than one that was the full height of the body. The carcase, which now includes a frame around a top panel that will be sawn off to make the lid, must use miter joints at the corners if I want to feature a wrap-around grain pattern. Unreinforced miter joints are weak because they are on the end grain of the wood. With the equipment I have I can make them stronger by adding a spline that runs vertically inside the miter rather than across the corner. This will be hidden, except at the top and bottom, and so will not distract from the wrap-around grain. If I chose a wood with a slight contrast to the carcase it won't look as if I tried to hide the splines completely and failed, but also it won't be jarring where they are visible. Although many woodworkers on YouTube glue the top and bottom panels in the boxes, the correct approach is to let them float in grooves. When the panels and the carcase move as a result of temperature and humidity changes, they just slide around each other very slightly. If this cannot happen, there is a risk that stresses will cause the joints to break open. This is why furniture made from real wood often features framed panels. (It's also why cheaper furniture is made from manufactured wood products, such as particle board, that are ugly but more stable.) The slab lib box, above, includes a floating bottom panel. It is not difficult, except, perhaps, keeping glue out of the groove during assembly. Allowing the lid to float is, of course, achieved by the slab lid itself, which is one of the reasons why this design is a good starting point for a box maker. A floating top panel in the lid of this new box could be just about as easy if it was just a thin sheet of material, like the bottom, or was reduced in thickness around the edge to fit in the groove. However, I decided to complicate things by concealing the corner splines on the upper face of the lid frame. The top panel therefore must have a ridge around the bottom to locate in the grove, then a slot to clear the frame material above the groove and then a sort of shelf around the top that projects over and hides all or part of the frame (follow the link to the "recipe" if you're interested in details).  So, I have a basic design for a new box. The bookmatched claro walnut pieces were 8" long by 2¼" wide by 9/16" thick. I can cut the front and back to 4½" and the sides to 3 3/8", leaving 1/8" for the saw kerf. That sets the size of the box. It will be 2" high, giving me ¼" to trim off. The carcase will be ½" thick, giving me 1/16" to sand off to level and finish the wood. The corners will have miter joints reinforced with an internal spline made from cherry. This will be visible on the bottom of the box and where the lid and body separate but not on the top. The bottom panel will be 1/8" Baltic birch plywood floating in a groove. The top panel will also float in a groove, but will be 3/8" thick so as to rise above the carcase frame and reach outwards almost to the edge and hide the splines. I selected a piece of mildly-figured curly maple, but because it was not quite wide enough I had to add a narrow border. I made this from African padauk, which was risky because of the strong color contrast, but I think it works. The liner will be 3/8" tall, extending ¼" down into the body and 1/8" up into the lid. It will be 3/32" thick and made from cherry, like the splines. When I saw the box apart to separate the lid from the body I will necessarily remove a 1/16" band of wood. To keep the grain pattern of the carcase in alignment, I will leave this as a gap (an alternative would be to fill it with a contrasting species as Dave Harshberger did in his video). Having pulled all this together, I got cold feet. There were so many things to go wrong. In particular, although I had designed and built my miter joint jig to make splines that run along the joint as well as across, I had not yet used it in that way. I became fearful of making new cuts in my precious claro walnut and the project ground to a halt. I solved this by planning to make a second box along with the walnut one but using more easily replaceable wood. The carcase would be canarywood and the lid, splines and liner would be African padauk (both recent acquisitions by mail order from Woodcraft). I would perform all operations on this "test" box before I moved to the "real" one. This worked incredibly well. I had to first catch up with the test box by preparing the carcase pieces and cutting the miters before moving on to cutting the slots for the splines. While doing this, my attention wandered and I cut one of the miters pointing the wrong way. On the down side, to recover from this I had to make the test box ½" smaller in width and depth (and ¼" smaller in height to maintain the same proportions). On the plus side, this mishap apparently used up my entire quota of stupidity and everything else went very well. Although I wasn't really expecting the test box to have much merit, it actually turned out rather well. When I applied the oil finish, the canarywood surprised me with reddish streaks that pick up the tone of the padauk. The photograph (above right) shows the one corner of the box that the grain pattern wraps around. Here (mainly for my own records) is the "recipe" for a box of this general design. "Mass" Production of Keepsake Boxes as GiftsAs the holiday season looms in 2020 and gatherings of family and friends will be severely limited by the threat of COVID-19, hand-made gifts seem like a good way to feel connected. A lot of coasters have already been distributed, but I've only made a few keepsake boxes. Perhaps it's time to make some more.  Slab Lid Keepsake Box with Purpleheart Carcase.This keepsake box is very similar to my very first small box. David Freedman's design is fairly quick to put together, largely because the lid is so simple. I have made it a bit more time consuming by insisting on three splines at each corner, but I really think that this looks better than versions with fewer splines. I especially like the way that the 30° bevel at the top of the carcase intersects the top spline, shortening it and making the end angle back towards the top corner. This box has a purpleheart carcase and maple splines. I first gave it a quilted maple lid. However, the particular piece of wood that I used took on a darker brown tone than I expected and I became unsure of its suitability. So, I made a new lid from curly maple that finishes to a lighter color. The bottom of the inside of the box has a liner of adhesive-backed black felt.  Slab Lid Keepsake Box with Osage Orange Carcase.For reasons I don't understand, dimensional lumber at Woodcraft isn't always the same price. Various species of wood go on sale or enter "clearance" status. This is often when I notice a species that I've not previously used. This was the case for osage orange. The piece that Woodcraft sent me had a very even grain and finished to a strong orange/ yellow tone, darker than yellowheart. I paired it with African padauk splines and lid. The result rather echoes the yellowheart and padauk coasters that I made, which proved so popular that I had to make more. Neither wood has a strong grain pattern, but the colors are arresting. I'm considering adding an inlay decoration to the lid to break up the large expanse of a single color, as I did on the purpleheart lid of my first box. Another advantage of this box design is that you can put the lid on either way up, so you could chose at any time whether to display the inlay or hide it. The bottom of the inside of the box has a liner of adhesive-backed black felt.
 Slab Lid Keepsake Box with Leopardwood Carcase.Leopardwood has an ordinary redish-brown "wood" color but a striking appearance due to flecks formed by the medullary rays when the wood is sawn appropriately. I decided to see how this property would interact with the 30° bevel of the carcase. In the photograph at right, you can see that the flecks are small around the bottom of the box but much larger along the bevel. This is because on the bevel the surface of the wood is more nearly perpendicular to the growth rings (and so parallel to the rays). It took me a while to figure out how to make this happen and I was lucky to have the right piece of wood on hand. The lid of this box is bookmatched maple burl, part of a piece that also made a wall clock. The bottom of the inside of the box has a liner of adhesive-backed green felt.
 Slab Lid Keepsake Box with Bird's Eye Maple Carcase.I've previously used bird's eye maple in the lids of slab-lid keepsake boxes, but here it appears in the carcase. The splines and lid are in sharp contrast the the pale maple, having a dark red-brown color. The lid has a striking grain pattern which changes according to the direction of the light. I'm embarrassed to disclose that I'm not entirely sure what this wood is. I bought it in a special-price "3 Piece Combo Pack" from Woodcraft. I know which piece is the canarywood, so this should be either goncalo alves or macacauba, but it doesn't match the description of either on the wood database. It is very dense (1,200 kg/m3 by my estimate) and very hard (it ruined a sleeve on my belt sander). It could be an unusual sample of either species or Woodcraft could have sent me something else. Either way, it is very beautiful! The bottom of the inside of the box has a liner of adhesive-backed black felt.
 Keepsake Box with English Walnut Carcase.This box is a design variation of the "lift lid" keepsake box. It improves the display of grain pattern continuity around all four corners by not having the upper part separated from the bottom part by a shadow line where the wood has been sawn away. Instead of the lid being the upper part of the box, it is a completely separate piece of wood, as with the "slab lid" boxes. There is not, however, a thumb relief that you can use to prise up the lid. Instead, there is a handle on the top of the lid that you just take in your fingers and lift. This box shows one way that I have figured out to make the handle. The lid is quilted maple (with a rather dark tone after application of the finish) and a thin strip of English walnut, the same material as the carcase is made from, runs across the middle. A depression in the maple slab provides space to pinch this strip between first finger and thumb and use it to lift the lid. The bottom of the inside of the box has a liner of adhesive-backed green felt. 
 Another Keepsake Box with English Walnut Carcase.This box is very similar to the one above. The carcase has a somewhat different character. The lid finished to a lighter color, for which I have no explanation as it was cut from the same block and finished in the same way. The bottom of the inside of the box has a liner of adhesive-backed green felt. 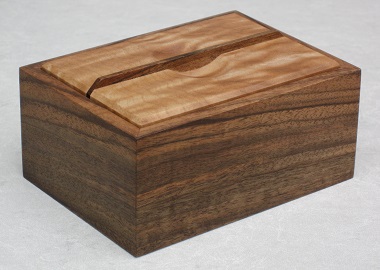
 Keepsake Box with Curly Claro Walnut Carcase.As with the English walnut boxes, above, this box and the one below are a variation of the "lift lid" design. Not having to saw apart the top and bottom improves the four-corner wrap-around display of the grain pattern. The curly claro walnut used in these boxes has a less distinct grain than the English walnut (above), but is interesting because of the figure (curl). I've used a different design for the handle that allows the lid to be picked off of the box (although I confess that I didn't really plan which box would have which handle design, it just turned out this way). The lid of this box is bookmatched maple burl, part of a piece that also made a wall clock. The bottom of the inside of the box has a liner of adhesive-backed green felt.
 Another Keepsake Box with Curly Claro Walnut Carcase.This box is very similar to the one above, but the lid is made from figured maple. Although maple is described with the words "curly", "tiger" and "quilted" there is no sharp distinction between these figure patterns. I purchased some "curly" maple on eBay at a good price because of significant bark inclusions. When I began to mill pieces for this application I discovered very complex figure patterns which, I hope, appear to good advantage in this box lid. The bottom of the inside of the box has a liner of adhesive-backed green felt.
 Keepsake Box with Quilted Maple Carcase.Here's a box that is something of a "negative" of the boxes with walnut carcases. It still features a wrap-around grain pattern on all four corners (because the sides were made from a bookmatched pair of slabs) but uses quilted maple. Although the grain of the maple wanders around quite a lot, I think you can still appreciate that it appears to flow around each corner. The overall effect is a combination of this flow and the quilting. It's the lid now that is made from walnut. This piece was milled from a large block of curly claro walnut that I bought on eBay and has caused me all kinds of grief because it was nowhere near dry. Whenever I would cut a piece from it, that piece would be a different shape the next day as the moisture in it dried out. However, patience paid off and this lid works well. As you can see in the photograph, it has a strip of the carcase material inserted which, in conjunction with the depression, forms a handle to grab and raise the lid. The bottom of the inside of the box has a liner of adhesive-backed green felt.  Keepsake Box with Spalted Quilted Maple Carcase.When I discovered that on eBay I could buy bookmatched slabs of all kinds of exotic woods, I went a bit crazy for a week or two. Most of my purchases worked out well, but some gave me unexpected problems. The spalted, quilted maple in the carcase of this box is an example. I unpacked the wood and found that it weighed almost nothing. The Spalting process is basically decay, so I should not have been surprised, but this was way beyond anything I had encountered before. The wood was so fragile there was no way that I could make anything from it. So, I looked up on the Internet what needed to be done to "stabilize" it. Of the options available, I decided to try Minwax wood hardener. I poured almost half a can of this stuff over the wood (in stages) and let it set up. I suppose that what I ended up with is more plastic than wood, but it looks like a darker version of what I expected, so I pressed ahead. Except for gumming up cutting tools and still having a few fragile areas, the material cooperated with the rest of the box-making process. Both the quilting pattern and the spalting are clearly visible. The "zone" lines make the "wraparound" construction worthwhile. I gave this box a lid made from macacauba. The bottom of the inside of the box has a liner of adhesive-backed black felt.
 Keepsake Box with Curly Maple Carcase.I milled the material for the carcase of this box from a chunk of wood that I purchased on eBay. It is curly maple, but after finishing with Danish oil it takes on a darker tone than I am used to with maple from other sources. The curl fades out towards the bottom. I cut off two sequential slabs with a narrow kerf blade so as to bookmatch the grain pattern, which is therefore continuous around all four corners. This has not turned out to be particularly distinct. To be honest, this is the box that went first into each processing step so that if I made a mistake it would not ruin one of the "better" boxes. However, there were no mistakes, so I decided to jazz this box up with the choice of leopardwood for the top with a shallow bevel all around. It is a "lift-lid" box, so the top and bottom parts of the box are separate. The cut line does not adversely affect the appearance, given the muted grain and figure of the carcase. The liner that locates the top / lid back onto the bottom / body is made from claro walnut, as are the concealed corner splines (see the inset in the photograph). There is adhesive-backed, black felt inside the box on the bottom.
 Keepsake Box with Claro Walnut Carcase.This "lift-lid" box is similar to the first that I made in that it has a claro walnut carcase and a figured maple lid. However, there the similarity ends. Instead of using a purchased pair of wood slabs, I cut the carcase pieces myself from a large block. The direction of cut is mostly parallel to the growth rings (flat sawn), so the overall appearance is quite different. I cut the slabs for front / left and back / right sequentially and used a narrow kerf blade so the pattern in the wood wraps around all four corners, but the effect is more subtle than with rift sawn wood. The figure in the maple of the top is more quilted than curly and much stronger and the tone has come out a deeper brown than the first box. Again, I milled this piece myself from a large block. It was large enough to hide the splines in the corner of the carcase and so I did not have to add a border, which was necessary for the first box. The splines and the liner are made from maple (see the inset in the photograph). There is adhesive-backed, green felt inside the box on the bottom..
|