|
Woodworking
Projects
Processes
Power Tools
Resources
Back to Wiki Home
edit this SideBar
|
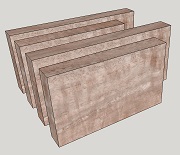
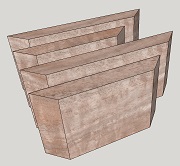
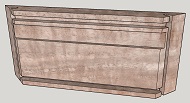
Recipe for Boxes with a "Lift Lid"
(Go Back to the Small Boxes Main Page)

This recipe is suitable for boxes of various sizes and proportions, both larger and smaller than described, whatever seems pleasing and/or functional. The key dimensions are the overall width (from side to side), the overall depth (from front to back) and the height, which is measured from the bottom to the top edge of the carcase (and therefore excludes the projection of the top panel above the frame of the lid). The Ingredients and Instructions, below, are for a box 4½" wide by 3¼" deep by 2" high. Also important is the thickness of the material from which the carcase is made. Below, this is ½". These numbers come from the original desire to build a box from two bookmatched pieces of claro walnut purchased on eBay (see the description of this box on the Small Boxes page, link above). These were each 8" long (hence the width plus the depth of the box is ¼" less than this) by about 2¼" wide (hence the height is ¼" less) and 9/16" thick (hence the thickness of the carcase walls is 1/16" less). The original box of this design was actually 3 3/8" deep, but this has been reduced here to 3¼" because of two difficulties. First, it is hard to cut the 8" pieces into a front/back piece and a side piece with only 1/8" to spare for the saw kerf plus any additional loss when the miters are cut on each end. Second, to cover the tops of the splines in the corner joints, the top panel needed to be slightly deeper than 3" and to make it from 3" wide stock I had to add a border. Reducing the depth by 1/8" doubles the leeway available to cut up the carcase pieces and makes it possible to use a top panel made from 3" stock. So, to repeat this point, here we are making a box that is 1/8" less deep than the first box that I made using this design. In the Instructions I will try to point out the changes that are needed for boxes with different key dimensions.
Ingredients (Makes One Box, 4½" wide by 3¼" deep by 2" high)
- For the carcase, 16" of material 2" wide, when finished, and ½" thick, when finished (therefore slightly wider and thicker if you need to trim and sand it yourself). If you want a four-corner, wrap-around grain pattern, you'll need two bookmatched pieces each 8" long (by 2" wide and ½" thick).
- For the lid, ... about 4¼" long, 3" wide and 3/8" thick.
- For the bottom, a piece of 1/8" thick baltic birch plywood or similar material ...
- For the splines,
- For the liner,
- Wood glue, such as Titebond III, with a long assembly time.
- Urethane, Danish oil or other wood finish.
- Adhesive-backed felt to place in the bottom of the box.
Instructions
- Prepare the material for the carcase and plan the layout.
- Joint and plane and/or sand the faces so that they are flat and parallel and the wood is as close as possible to ½" thick. If you're starting with nominally ½" thick lumber, you may end up significantly thinner. The adjustments that you'll have to make to compensate (described below) are minor until you get below 7/16". If you change the design to target a different carcase thickness then you'll have to make more significant changes.
- Make sure one edge is straight and perpendicular to the faces. Depending on how bad things are when you start, you may need to use a jointer, if you have one. If either edge will run true along the table saw's rip fence, then you can just skim the opposite edge.
- On the table saw, rip down to the 2" width. This is not by any means a critical dimension. Within a broad range, the box will just end up taller or shorter. You may, in fact, want to make the carcase material very slightly wider than 2", perhaps by 1/64" or even 1/32", to allow for what you will remove when you sand the bottom of the box and the faces between the lid and the body. If you are going for a four-corner wrap-around grain pattern, then you will be working with two bookmatched pieces. Put them end-to-end, first at one matching pair of ends and then the other, and note how the grain flows. If you can get a better match by offsetting the pieces with respect to each other and there is some extra width available, then consider removing a different amount of material from each side.
- Look closely at the material and decide which face will be the outside of the box and also which edge will be the top. So that you can keep track of this decision, mark the wood in some way that you won't regret later. If you're following the basic design and the top panel will cover the corner splines, then it is safe to make any kind of marking on the top edge away from the outer face as it will also be covered. For a wrap-around grain pattern you'll obviously select the bookmatched faces for the outside, but you still have a free choice of which edge will be up and which will be down. Next line the pieces up end-to-end and decide from which end to cut the long front/back and which end will then be the shorter right/left sides of the box. Make sure that long and short pieces alternate along the matched grain. Mark the wood to record your decision. If you aren't going for wrap-around grain you are less limited in your choices but you still might want to match the grain around some of the corners. Just think this through carefully. If you decide not to match around any corner, then simply chose the most attractive faces and edges for the outside and the top. You may even decide to flip the wood around at a cut to get the best effect. Make sure your markings remind you of this.
- You won't be able to sand the inside face nor the top edge of the carcase after assembly (you will be able to sand the outside and the bottom). Consider sanding the inside and top now. If you're confident that you won't mar these faces in the following steps, you can go all the way to the finest grit that you'll be using (320 or 400) to get the final, super-smooth finish. You can touch this up at any time before assembly, or put the whole thing off, but consider that after the next step you'll be working on individual pieces.
- Whenever you decide on final sanding, you might as well apply the finish as well. The advantage of putting the finish on early is that it will make it easier to remove squeeze-out after the glue-up. Unfortunately, it's not quite as clear cut as that, as, for a similar reason, you may later want to put finish in the grooves in which the bottom and top panel fit. But, you also don't want to get finish on the ends that will be glued together, so it's a tough call. If you're using an oil finish it will be OK to reapply it later as it doesn't build up.
- Cut the carcase pieces to length.
- The usual way to do this would be with a crosscut sled. A stop block would make sure that the front and back are exactly the same length and, after adjustment, so are the left and right sides. However, this is actually not the cut that will set the final dimensions of the carcase; that is coming up in the next step. This cut is merely to make it possible to fit the pieces on the miter jig. If you're going to cut the miters in a different way, you may not even need this step. So let's discuss.
- If you make a cut with the blade at 45° to the workpiece, then the width of the kerf along the length of the workpiece will be about 141% of the actual saw kerf. For example, a thin-kerf, 10", table saw blade with an actual kerf width of 3/32" (0.094") will destroy 0.133" (more than 1/8") of length. If you're trying to conserve material or, especially, if you're trying to match the grain pattern, this is not a good idea. So my approach is to separate the pieces with perpendicular cuts, using the thinnest kerf blade available, and then cut the miters. That's why this step is here. If I use the table saw, I install a 7¼" blade with a 1/16" kerf. For minimum loss of wood, I use my japanese ryoba saw, which has a kerf of 0.7 mm (less than 1/32"). Dozuki saws are available with kerfs of 0.4 mm (about 1/64").
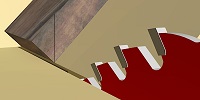
- Having cut the carcase pieces to length, the challenge is going to be to cut the miters while a) losing a minimum of additional wood and b) ending up with the desired end-to-end dimension. The figure at right (rendered from SketchUp) shows an idealized setup of a workpiece in the miter jig. The miter cut (shown by a black line) is made exactly at the corner of the crosscut. No unnecessary wood is lost. The final end-to-end dimension is the same as the starting end-to-end dimension. This is achievable within practical tolerances if some kind of spacer is used to position the workpiece in the jig. The spacer is placed below the workpiece and the two are slid down the sloping face of the jig until the spacer contacts the far side of the kerf slot in the crosscut sled. The workpiece is then clamped and the spacer removed. This will, at minimum, produce a consistent loss of length. If the width of the spacer is exactly right, it can be close to zero. If the spacer is too thin, the length of the workpiece will be reduced. If it is too thick, the 45° cut will not reach the end of the workpiece, which will be a problem later on. So, the spacer should be made very slightly on the thin side and the amount of "unnecessary" wood removed should be known. Since miter cuts are going to be made on both ends, the workpiece should, in this step, be cut long by twice this amount. Suppose, for example, that 1/64" is lost from each end. To make a box of the nominal dimensions (above), the front and back should be cut to 4 17/32" and the sides should be 3 9/32".
- Cut the 45° miters on both ends of all four carcase pieces.
- It's possible to do this on a router table with a chamfer bit, but it's far more usual to use a table saw. Either the blade can be set at 45° and the workpiece held flat to the table or the blade can be left in the normal position and a jig used to hold the workpiece at 45°. As with all crosscuts, there is a risk of tear-out. This step appears early in the recipe to try to minimize this.
- I use a jig that I have made following the design shown by Young Je in his YouTube video Multi spline jig. He shows how this works in the video from 3:15 to 3:30. Significantly, the workpiece is supported at the back of the cut. As mentioned in the previous step, it may be necessary to cut the carcase pieces a little long to allow for additional wood removed here. Young Je does not use a spacer and slides the workpiece down the angled face of the jig until the corner sits in the kerf of the sled. Therefore, he looses 141% of the blade kerf width, in total, of length from the workpiece. This may not be acceptable, so consider using a spacer as explained above.
- After cutting the miters, you should test-fit the carcase pieces together to check that the joints are going to be tight. If they are not, well, at least you'll minimize wasted effort.
- If you've had trouble keeping track of the pieces and which way up they do, you'll be able to find places on the ends now where you can put markings that will last until assembly and then will be covered up. For example, mark the two halves of each corner with a letter, A, B, C and D, that is the right way up when the top is up and the bottom down.

- Cut the slots for the hidden splines.
- It's possible to do this on a table saw without a jig by leaning the blade over at 45° and running the "point" of the miter against the fence. This does not seem entirely safe to me as you're supporting the workpiece along a short side. Also, it's tricky to set the fence and the height of the blade to get the slot in exactly the place you want and at exactly the right depth. I think it's better to use a jig. This could be little more than a miter gauge with an auxiliary fence to locate and support the workpiece or a cross-cut sled with the kerf at 45°. I use a more complicated jig which also cuts the miters (link above) and can be used for exposed corner splines. This jig holds the workpiece at 45° so that the blade can stay upright, simplifying the adjustment of the position and depth of the slot. A single pass over the saw with a thin kerf blade produces a slot about 3/32" wide, which works just fine. The slot runs all the way across the joint so the spline is only hidden from the sides of the finished box and is visible on the top and bottom.
- A suitable position for the spline slot is starting 3/16" from the inside corner. For a width of 3/32", this will result in the other side of the slot being about 27/64" from the outside corner of the box.
- A suitable depth for the slot is 3/16", resulting in a spline width of 3/8". The spline comes only within about 11/64" of the outside of the box, so the carcase walls could be 1/16" thinner and there would still be almost 1/8" of material left. If the carcase is thinner than 7/16", you should move the spline closer to the inside corner.
- With an ATB or combination (ATBR) blade, the bottom of the slot will not be flat. You can try correcting this, filling the gaps where they show or just leaving them alone. I have found that I can remove the ridge using an old pruning saw. This has a very wide kerf for a hand saw (to cut green wood) and a more-or-less flat kerf bottom (for ease of manufacture). I clamp the saw in a vice with the teeth facing up. Then I take the workpiece, drop it over the blade and, holding it carefully level and at 45°, work it back and forth a few times, inspecting the slot, until I get what I'm looking for. In the future, I may try taping cardboard shims to the side of the blade to keep it in the middle of the slot.
- You could make the splines now, while you're thinking about them, or leave it until you first dry-fit the carcase. Of course, if there is a problem it would be better to make the splines and perform a dry-fit now before you waste any more effort.
- In theory, the wood grain should run across the width of the spline so that inside the joint it bridges the two carcase pieces. In practice, a small box is unlikely to come under a lot of stress and a strip of wood with the grain along the length will be just fine.
- Assuming you want to do it the "proper" way, you'll probably start with a piece of wood 2" square that you've planed or sanded to the required thickess of 3/32". It should fit into the spline slots freely but without being sloppy. If it is at all tight, then during glue-up when the wood swells you may have difficulty getting the box together before the glue grabs. You can always sand the individual splines a bit more after cutting them apart. Do this on a cross-cut sled or using the rip fence, but be sure that the grain runs across the 3/8" width and not along the 2" length. When you perform the dry-fit, check that the width of the spline matches the depth of the slots.
- Obviously, you want the miter joint to close completely. If, to do this, you have to make the splines narrower, it may be easier to sand them than use a table saw. If you can see a gap between the edges of a spline and the slots, you have the options of a) making new splines that are slightly wider, b) filling the gaps before final sanding and finishing or c) just letting it go.
- On the inside faces of all four carcase pieces cut the grooves for the top and bottom panels.
- These are 1/8" wide and begin 1/8" down from the top edge and up from the bottom.
- A suitable depth is 3/16" (if it is much different, you'll need to adjust the dimensions of the top and bottom panels to suit).
- These grooves can be cut with a router fitted with a 1/8" straight bit or on a table saw fitted with a flat-top grind blade with a 1/8" kerf.
- To cut them on a table saw fitted with a narrow-kerf combination blade (or similar), proceed as follows. Select one of the carcase pieces or, if you think you might mess up, find a piece of scrap that is of similar size and thickness with at least one true edge. Set the rip fence so that there is 1/8" or slightly more between the fence and the blade's teeth. Make sure that there is not less than 1/8". Also make sure that the far sides of the teeth are definitely not more than ¼" away. Set the depth of cut to 3/16" in the normal way and lock it in place if necessary. Make the first cut in the test piece. Make an accurate measurement of the thickness of the strip of wood left at the edge. Subtract 1/8" and this is how far you need to move the fence towards the blade. Make this adjustment if you have the means or, if you don't, do your best but move too little rather than too much. Also measure the depth of the cut and adjust the blade height if necessary (this is much less important than the width and position of the groove). Repeat the cut. Make a new measurement and try again until you are "close enough", whatever that means to you. When you're happy, make both top panel and bottom panel cuts in all of the carcase pieces. Now go back to the test piece. Let's assume you're using some stock material such as 1/8" plywood for the bottom and you'll later cut the top panel to fit. In this case, it makes sense to cut the grooves to fit the bottom and the top to fit the grooves, however they turn out. So, move the fence away from the blade aiming to have the far sides of the teeth at ¼" or slightly less but definitely not more. Cut the test piece. Measure the width of the groove and the thickness of the stock you're using for the bottom. The difference is how far the fence needs to move away from the blade. As before, make the adjustment in one step if you can or otherwise "sneak up" on the correct place.
- At any time that it helps, test fit the bottom panel. You're looking for a fit such that the panel doesn't rattle about but is able to slide easily to accommodate movement in the carcase. Once you have the fence in the right place, again make the two cuts in each of the carcase pieces. Without a flat-top grind blade, the bottom of the groove is going to be uneven. However, nobody will ever know once the box is assembled. You can trim down the top and bottom panels if necessary for a good fit. So don't worry about it.
- On the inside faces of all four carcase pieces cut the groove for the (partial) liner that will locate the lid.
- This is 3/8" wide and begins 11/32" down from the top edge (1 9/32" up from the bottom edge for a 2" high box).
- A suitable depth is 3/32" (whatever you choose, the liner material must be made to suit).
- These grooves should be cut with a router fitted with a 3/8" straight bit (or perhaps with multiple passes of a smaller bit or even on a table saw fitted with a flat-top grind blade). The bottom of the grooves must be flat so that the liner fits properly and can be glued into place, so using a table saw blade that does not have a flat-bottomed kerf is not a good idea. Set the router fence 11/32" from the cutting edge of the bit. This dimension is not all that critical; the liner can poke up a little more or less from the top of the box without ill effect. If you want to get it spot-on, it's probably best to make a test cut in a piece of scrap. Start with the depth on the shallow side and make a cut, either in the scrap or one of the carcase pieces. If the latter, be sure to place against the fence the edge that you decided would be at the top of the box. Measure the depth of the groove, raise the cutter as necessary and repeat the cut. If you have material already of the thickness you want to use for the liners, you'll need to test fit it. Otherwise, when you make the liners you'll be setting their thickness to whatever the depth of groove turns out to be here. Again, it won't be the end of the world if the liners are a little fatter or thinner than the groove is deep. If you're working with a piece of scrap, make any desired adjustment to the fence position. Now cut all the carcase pieces, being sure run the top against the fence, not the bottom.
- Cut the bottom panel to size from 1/8" Baltic birch plywood.
- With the nominal dimensions of the carcase (4½" by 3¼" with ½" thick walls) and the nominal groove depth (3/16") the space inside the groove will be 3 7/8" by 2 5/8". Therefore, a bottom panel of 3 27/32" by 2 19/32" will have a gap of 1/64" all around.
- Either adjust this for actual dimensions, measure the back edges of the grooves and subtract a bit or just deal with it later when it does or doesn't fit.
- To clear the splines, cut off each corner at 45°, measuring 3/16" back from the point. It's unlikely you'll need to alter this dimension.
- Check that the panel fits in the grooves that were cut for it and is free to move without being sloppy. If it's tight, you may be able to free it with a bit of sanding.
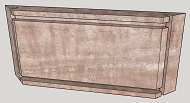
- Cut the top panel to fit in the groove.
- In the basic design, the top panel extends above the lid frame and far enough out over the top surface of the frame to hide the splines. To do this, it should be at least 4 3/16" wide (side to side), 2 15/16" deep (front to back) and 3/8" thick.
- These dimensions will leave 5/32" of the lid frame exposed around the panel. Obviously, a larger panel will leave less exposed; in fact, the entire top of the frame could be covered. This is mainly an aesthetic decision and no other dimensions will need to be adjusted. However, only the top third (1/8") of the panel is left at this size. Below this, the material must be cut back to clear the inside opening of the carcase, nominally 3½" by 2¼", and then increase in size again to locate the panel in its groove. This is all rather tricky to achieve. MORE HERE...
- Dry fit all the parts of the box except the liner.
- You're approaching the point where you'll glue together the sides of the box, permanently trapping the bottom and top panels in place. Before you apply any glue, you need to be sure that this will go smoothly, that is, all the parts fit together and will close up tightly without excess clamping pressure.
- Recheck the fit of the splines in the miter joints. They should slide right in without needing to be forced, but there should be little or no detectable wobble. A tiny bit of wobble is OK as the glue will cause the wood to swell and close any small gaps. This is better than a tight fit that becomes intractable once the glue is applied. If some of the splines fit better in some corners than others, mark them, but resolve to work more carefully next time as this is a burden you can do without.
- Recheck the fit of the bottom and top panels in the same way. As you won't be (deliberately) applying glue to them, it's not such a good idea to have wobble and not so bad if they require a bit of pressure to insert.
- Finally, put the whole box together - sides, splines, bottom and top. Check that the corners close up completely and that it's not a struggle to make this happen (if it's a struggle now, it will be impossible after applying glue). If the corners don't close, you have to figure out why. Is the spline to wide (or the dado for the spline to shallow)? Is either or both of the bottom and top panels too large? These problems are easily corrected. If the miters are not at 45° you'll need to recut them, which will make the whole box smaller and require other adjustments, so let's hope this doesn't happen (hence checking for it above).
- Complete the sanding of the inner surfaces.
- The inside surfaces of the box will be much more difficult, if not impossible, to sand after glue-up, so get this done now. If you've already done it, check that no damage to the surface has occurred and touch it up if it has. Otherwise, use your preferred sanding technique all the way to the finest grit that you use.
- I process my wood to the desired thickness with a drum sander and so end up with a 120 or 220 grit surface with deep scratches along the grain. My next step is usually a sheet of sandpaper stuck down to a flat board, but this can be a lot of work if the workpiece isn't already exactly flat. By the time I get to 320 and 400 grit, I'm using a sanding block with a compliant surface. The whole process is a delicate balance of removing all the scratches from the previous grit but not rounding over corners or messing up the flatness.
- Also, sand the top edge of the carcase wall pieces. You won't be able to get at these easily once the top panel is in place.
- Optionally, complete the application of finish to the inner surfaces.
- As long as you've chosen a finish that doesn't need sanding, for example oil rather than urethane, you can put off applying the finish until the box is complete and you can do it all at once. There are, however, advantages to applying finish to inner surfaces before glue-up. On the other hand, there are difficulties too.
- The main advantage is that the finish can help prevent glue sticking to parts of the box where it isn't supposed to be. Almost inevitably, squeeze-out will get on the inside faces of the walls and in the grooves cut for the bottom panel, top panel and liner and in between the top edge of the walls and the top panel. It will also get on the outer faces and the bottom, but you can wipe that away and/or sand it off later. You won't, however, be able to get at the inside until after the glue is dry and you've sawn the top from the body. Even then, you won't be able to remove glue from the grooves for the bottom and top panels. Ideally, you want finish on the inside faces and top edge of the walls and in the grooves for the bottom and top panels (but not the grooves for the liner).
- The main difficulty is that you need to avoid getting finish where glue is needed. You should be able to keep it away from the spline slots, but it's harder to protect the inside edges of the miter joints. This is why applying finish to the inner faces of the side pieces was mentioned before the miters were cut (see above). Since the joints are reinforced with splines, you might decide to reason that a little stray finish, and consequent loss of glue strength, won't be important.
- Optionally, apply some paste finishing wax in the grooves for the bottom and top panels. This will increase the resistance to an accidental glue bond and lubricate the movement of the panels in the carcase.
- Apply finish to the bottom and top panels.
- There's no reason not to finish the bottom panel. It is more accessible now than after glue up and the finish will help prevent the panel from getting glued into its grooves. Because it is recessed, it is unlikely to be damaged as the box is completed.
- There's only one reason not to finish the top panel and that is that the finish may be damaged at some future step. As for the bottom panel, the finish will keep stray glue at bay. If it's reasonably easy to repair scuffs and such in the finish that you've chosen, go ahead and apply the finish now.
- Now it's time to glue up the carcase.
- This is a race against the clock. You need to apply the right amount of glue to the eight faces of the corner miter joints and to all four sides of the four reinforcing splines, assemble the carcase with the splines in their slots, remembering to insert the bottom and top panels in their respective grooves (not swapped around), adjust the position of the splines so that they are exactly flush with the top edge (the bottom doesn't matter), close up the joints tightly and apply clamping pressure, making sure that the corners are exactly square, wiping off any excess glue that you can get at, all before the glue "grabs" and all the parts get locked in place wherever they happen to be at that moment.
- The "right amount of glue" is however much will ensure a firm glued joint but won't result in the squeeze-out of an excess. Good luck figuring out how much that is. If the joints are properly cut and are going to look good whether there is glue in them or not, then you may decide to err on the side of less glue, particularly towards the inside of the corners where you won't be able to wipe off any excess.
- My reason for putting glue on both faces of each miter joint is that it is an end-grain joint and glue will soak in more than on a face-grain joint. Applying glue on both faces helps ensure that there will be a film of wet glue on each when they are pressed together, rather than a film on one which is then immediately absorbed into the other.
- An advantage of having the splines inside the joints is that, assuming everything has gone well, the box will tend to come together with the corners square. You can concentrate on applying a firm clamping force and worry less about the shape.
- Final sand outer surfaces ... including bottom, to final height.
- Separate the carcase into the lid and the body.
- This can be done using a bandsaw or a table saw. As I don't have a bandsaw, I will describe how I do it with a table saw. I use a 7¼" diameter blade, rather than 10", because these have a 1/16" kerf, rather than 3/32" (bandsaw blades have much thinner kerfs, down to 0.014", which is less than 1/64").
- The saw cut needs to line up with the groove that was cut for the liner on the inside of the carcase pieces. Now that the carcase is assembled, this groove is hidden inside, so you need to know where you cut it, how deep it is and how thick the carcase is. We need to position the cut with most of the groove in the body, so that we can glue the liner pieces into it, but some in the lid, so that the lid will locate over the projecting liner. We also want the cut to almost, but not quite, reach from the outside of the carcase to the inner face of the groove. This is so that the two pieces remain attached and we can keep control of them as they pass over the table saw, even on the fourth face. The wood that is left to hold them together is then cut though with a hand saw. (An alternative is to saw completely though, insert shims as each side is cut, taping the carcase back together over the shims.)
- The nominal position of the groove is 11/32" down from the top edge of the carcase and the nominal width is 3/8" (see above). If the box is 2" high, the lower edge of the groove will be 1 9/32" up from the bottom. If you've used these dimensions, then set the rip fence 1½" from the blade and run the bottom of the box along the fence. Assuming a 1/16" kerf, the frame around the lid of the box will then be 7/16" high. Referencing the cut to the bottom of the box means that you don't have to worry about any changes you've made to how far the top panel sticks out of this frame. When the lid and body are separated and the facing edges are sanded flat, you will have 7/32" of groove in the body and 3/32" in the lid. The remaining 1/16" (3/8 - 7/32 - 3/32) has been lost to the saw kerf. Small errors in these dimensions won't matter. If, however, you're not using the nominal dimensions, then make changes as necessary. For example, if the box is 2½" high, but all the extra height is in the body, then set the rip fence at 2". If you've moved the liner groove down by 1/8" to increase the height of the lid frame from 7/16" to 9/16", then set the rip fence at 1 7/8".
- The nominal thickness of the carcase pieces is ½". The nominal depth of the liner groove (and hence the thickness of the liner) is 3/32". If the depth of cut is 3/8", then 1/32" of material will be left. This is enough to hold the lid and body together firmly. It takes very little effort to saw through this by hand to finally separate them. If the carcase is thinner or the groove is deeper be very sure to reduce the depth of cut. If you leave too much material, it's no big deal to saw thought it. But, if you cut all the way through, you may lose control of the lid when it separates and it may fall into the saw blade and be ruined. Check after the first cut that there is an appropriate amount of material left.
- A ryoba saw is ideal for the final separation of the lid and body. Its kerf will be much smaller than the table saw blade's. Use pieces of cereal-box cardboard on either side of the blade to keep it centered and avoid making scratches that will then have to be sanded out.
- Cut and insert adhesive-backed felt in bottom of body.
(Go Back to the Small Boxes Main Page)
|