|
Woodworking
Projects
Processes
Power Tools
Resources
Back to Wiki Home
edit this SideBar
|
Recipe for David Freedman's "Box with Slab Lid"
(Go Back to the Small Boxes Main Page)
Ingredients (Makes One 4¾" by 3½" Box)
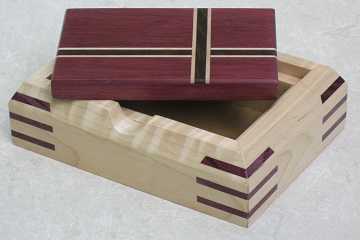
- For the carcase, 18" of material 1¼" wide by nominally ¾" thick (I selected curly maple for my first box, see the photograph on the right).
- For the lid, a slab at least 3¾" long by 2½" wide by 3/8" thick, probably of a wood that contrasts with the carcase (I selected purpleheart for my first box).
- For the bottom, a piece of 1/8" thick plywood at least 3¾" by 2½", or a similarly sized piece of some other material, up to about 3/16" thick (I selected 5 mm thick MDF, which is 13/64").
- For the splines, strips ¾" wide by 1/8" thick (or as you wish, see below) totaling 18" in usable length, of a wood species that contrasts with the carcase (I selected purpleheart, to match the lid). Note that the triangular shape of the splines means that you can get away with considerably less than 18" of actual length, but it is best not to cut it too fine.
- For the lid decoration, whatever your heart desires (I selected wenge and some kind of pale, soft maple, refer to the photograph).
- A urethane, oil or other finish (see the section in Discussion, below).
- Optional : 1/16" thick pressure sensitive cork sheet for bottom edge (I have not used this yet).
Instructions
- Cut the front and back of the carcase slightly longer than the desired width of the box. Cut the sides slightly longer than the desired depth. These four pieces must be straight, true and exactly the same height and thickness, nominally 1¼" by ¾" (but see below). Either make sure that the piece you're cutting up is uniform or process each part after cutting. (I do the latter, setting the 1¼" height with a rip cut on the table saw and the thickness with my drum sander, typically ending up a bit thinner than ¾"). The extra length is required for two reasons. First, it is usual to lose some length when making the 45° miter cuts. Second, the easiest way to get the splines to be precisely flush with the faces of the box is to run the entire, almost finished box through the table saw and skim a very small amount from the carcase itself. I cut the parts ¼" over length (therefore 5" and 3¾"), expecting to lose 3/32" on each miter cut, less than 1/16" skimming the faces and so end up with a box a little larger than nominal.
- Inspect the carcase parts and decide where they will go in the box and how they will be oriented. You may want to have the grain run continuously around three corners, in which case the mismatched corner should probably be at the back. The more attractive edges should be the top and the more attractive sides should be the outside. In the photograph of my first box of this type, you can see that I arranged for the top of the front to have the best grain figure. Mark the pieces clearly, but in some way that you won't regret later. If you're going to skim the box on the table saw to flush the splines, it's safe to use a pencil on the outside surface.

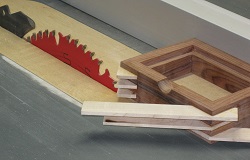
- Cut the 45° miters on both ends of all four carcase parts. There are many ways of doing this using either a table saw or a router. You should chose a method that minimizes tear-out. (The reason that this step comes this early is that any tear-out at the top inside edge, where it would be particularly conspicuous, will be removed when the lid rabbet is cut, see the section in Discussion, below.) I use a jig that I have made following the design shown by Young Je in his YouTube video Multi spline jig. He shows how this works in the video from 3:15 to 3:30. Note that the workpiece is supported at the back of the cut by his cross-cut sled. I have gone one step further by adding an auxiliary fence attached directly to the back of the miter jig. After cutting the miters, dry fit the carcase parts to check that the joints are tight. If they are not, well, at least you'll minimize wasted effort.
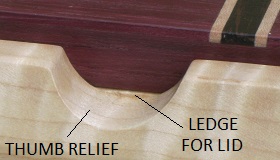
- Cut the thumb relief in the front piece, measuring carefully to get it in the center. I do this exactly as described by David Freedman using a piece of scrap material to steady the drill bit and setting the depth stop at ½" to avoid cutting into the ledge that the lid will rest on. It's hard to get this spot-on, but I err on the shallow side and end up with a sliver of wood standing up between the relief notch and the ledge which I remove carefully with a chisel. For more on the interaction of the thumb relief and the ledge that the lid will rest on refer to the Discussion section, below.
- Cut the 1/8" wide groove for the bottom panel of the box on the inside faces of all four carcase pieces, 1/8" up from the bottom. David Freedman wants this to be ¼" deep, but for no reason I can justify I aim for 3/16". If the material from which you are making the bottom is 1/8" thick, you'll need to be careful that the groove width is correct and allows for a fit that is neither tight nor sloppy. If the material is thicker, you're going to be cutting a rabbet around the edge and you'll be able to adjust the fit at that time. In either case, the depth of the groove is not critical as you'll later on cut the bottom to whatever size is needed. I chose to cut the groove with a couple of passes on the table saw using my thin-kerf combination blade. The ridges at the bottom of the cut don't matter as they will be completely hidden. You could also use a full-kerf blade to make the groove in one cut or use a 1/8" straight bit in a router.
- Make the ledge on which the lid will rest by cutting a rabbet at the top of the inside faces of all four carcase pieces. The depth measured down the inside face of the box should be ¼", so that the 3/8" thick lid protrudes by 1/8" above the rim. The depth measured from the inside face towards the outside of the box is nominally ¼", but the exact figure should be the thickness of the carcase pieces minus ½". This will allow for the upper rim of the carcase to be ¼" wide and for the 30° bevel cut to remove the other ¼" from the outer edge of the top (skimming the box faces will make this ever-so-slightly smaller). Both dimensions are chosen for appearance and differences, deliberate or accidental, won't affect the assembly of the box. I cut the rabbet on the table saw as described in the Discussion section, below.
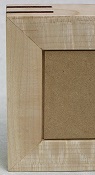
- Dry fit the pieces to visualize the carcase and check that everything lines up. Measure along the outer edge (back face) of the groove on either the front or the back piece and also on one side piece to establish the dimensions of the box bottom. Cut the bottom about 1/8" smaller than your measurements to allow a 1/16" gap all around. If the bottom fits in the groove, you're done with this step. If the material you have is thicker than the groove is wide, cut a rabbet around its edge to reduce the thickness as needed. The rabbet should be on the lower face, so the extra thickness is towards the bottom. Then you can cut a little further into that face than is strictly necessary and not have to worry about the bottom preventing the carcase from closing up. The gap created by this will be underneath the box, but to be tidy you can make sure it is even all the way around when you glue up (see the photograph on the right).
- Sand the inner faces of the carcase pieces, including the ledge for the lid, and both sides of the box bottom. It would be difficult to do this if you left it until after assembly. Note : Consider finishing the inside surfaces before gluing up.
- Now it's time to glue up the carcase. Find a straight edge with some height to it (i.e. not a thin bar) that is at least 18" long and fix it to a flat and clean workbench. You can use the rip fence and bed of your table saw. Stretch an 18" strip of blue painter's tape on the workbench, right next to the straight edge, with the sticky side up. Being sure to get them in the order on which you decided (and, obviously, all the same way around), set the carcase pieces on the tape using the straight edge to line them up precisely. The tips of the bevels must touch and not overlap. Spread wood glue on one side of each of the four joints (or both, if that's what you prefer. Place the bottom of the box in the groove in one of the longer pieces and carefully fold up the sides and wrap the other long side over to complete the box. Working quickly, use a square to make sure that the corners are at right angles, fix any alignment errors and, if possible, apply some additional clamping force. This could be more tape wrapped around, rubber bands, a band / strap clamp or some other types of clamps. Wipe away the glue squeeze-out from the bottom, top and inside corners. This will be tedious but is important (unless you have a strategy for removing the glue after it has dried). You can't get at the glue under the packing tape, but a) there should not be much because of the way the box sides were folded up and b) it will be removed when you skim the finished box sides to flush the splines. I didn't mention gluing the bottom in position. That's because I don't think it's necessary but I also don't think the project is ruined if it happens by accident.
- When the glue has set up firmly, sand the top and bottom of the carcase exactly flat. I suppose you could miss out this step if you've managed to line up the parts perfectly during the glue up, but this is beyond my skill. I have a sheet of sandpaper glued down (with spray adhesive) to a piece of ¾" MDF and I hold the box firmly and rub it in a circular motion. The grit of the paper is (of course) a compromise between speed of material removal and the effort required to get rid of the scratches later on. Also, sand off any lumpy glue at the corners where the sides meet, but be careful not to round any corners or edges over. The point of all this is to make sure that the carcase locates properly in the jig for the next step.
- The next step is cutting the slots for the splines. I'm going to have to assume that you have bought or made a box spline jig because I don't know how to complete this step without one. I might as well also assume that you know how to use it and skip the details. My jig follows quite closely the design shown by Young Je in his YouTube video Multi spline jig. I mark the centers of the splines on one corner of the box at ¼" from the top and from the bottom and the third in the exact center. I line these marks up with the center of the saw kerf in the jig and move the stop over to locate the box in this position. Then I cut the slot on this corner, rotate the box and cut the next corner and so on for all four. For the splines closer to the top / bottom, I flip the box around and cut the other four slots. The depth of the slot must be no greater than ¾", but 5/8" may be a better choice. Then you'll be able to cut the splines from nominal ¾" stock that is a little undersize. At this point, you have your spline slots cut to the width of your saw blade kerf, which for me is about 3/32". If you use an ATB or combination blade, the bottom of the slot will be a little ragged. This is probably OK, but I prefer the look of a wider spline and I happen to have a 1/8" straight router bit. It can only cut to a depth of a little over 5/8", which is another reason to set the saw-cut slots at this depth. So, I move my jig to the router, again line up the existing slots with the router kerf by eye and make another cut through each slot to widen it and flatten the bottom. Removing the bulk of the material on the table saw makes me feel better about the skinny and fragile looking router bit.
- Cut the spline material to thickness. You want to be able to slide it all the way down into the slot with zero effort, but you don't want it to wobble about. If you can't get this exactly right, err a little on the loose side as the wood will swell when you coat it in glue. If you're confident cutting thin strips on the table saw then you can "sneak up on" the required thickness. With my crummy table saw, I prefer to make the strips a little too thick and then slim them down bit-by-bit with my drum sander. Assuming your spline slots are 5/8" (or maybe 11/16") deep, a suitable width for the strips will be ¾". You can cut them into individual spline lengths, either straight across or at 45°, or you can leave them however they are and cut them off after gluing them into the box corners.
- Now glue the splines into place. Plan how you will deal with glue squeeze-out and also how you will hold the box steady with splines sticking out of all the corners. For my first box, I had not yet committed to skimming the box faces on the table saw to flush the splines, although I was considering it. Therefore, I had to carefully wipe off the excess glue with a damp rag. This meant that I had to fit and cut off the splines in such a way that I could get at the glue with the rag. My bench vise was busy with the glue-up of the inlay for the lid, which meant that I had to continually struggle to find a flat side of the box to rest it on. If you are definitely going to skim the faces, you can probably just mop up any glue that is threatening to drip and leave the rest to dry overnight. Work quickly once you've applied the glue in the slot and very quickly once you start to insert the spline. If the glue catches before the spline is fully home, you'll be in trouble. Press firmly, perhaps using a block of something for comfort. Make sure the spline fills the slot from end to end. Resist the urge to tap the spline in with a hammer or mallet because this can compromise the wood and result in it chipping out when cut flush on the table saw. If you get into dire straights it is probably OK to tap the spline at the sides away from the corner. If the splines are difficult to seat, maybe the best thing is to squeeze them into place with a vice.
- When the glue is completely dry on the splines it is time to trim them flush. It's not that the splines will come loose if you do this too early, but you could gum up your blade with glue and then have to clean it. You now need to establish a reference surface, exactly parallel to the box face, to run along your table saw's rip fence. I can think of three ways to do this, although I only tried two of them. The one I didn't try is to make a strip that fits below the bottom spline and is therefore less than 3/16" in thickness. Make sure that the long sides are exactly parallel. Set it against the rip fence and press the box up against it. Adjust the fence so that a very, very small amount of material is cut from the opposite side of the box. The splines will be cut flush with the new box face. Once you have a new face, you can turn the box around and flush cut the opposite one, for which you won't need the extra strip. I don't know whether the small thickness of the strip needed to fit under the bottom spline would make this a difficult or even dangerous procedure. If the box begins to tip over towards the fence or runs off the end of the strip while in the blade, you could be in big trouble. I used a block that was of similar height to the box but short enough to fit in between the protruding splines. This provides better support for the box against tipping, but less support against skewing right or left. Only as I write this do I realize how I actually pulled this off. And, my realization negates something I've already written. I glued in the splines a few at a time, making sure at all times that there was a large surface, free of splines, against which I could set my block and flush-cut the splines on the opposite side. Meticulously wiping off the glue squeeze-out allowed me to make these cuts before the glue was completely dry. The splines were tight in the slots and I trusted that they would not be dislodged. So, for the final skim cuts I just used the faces of the box which I had kept true throughout the process. I now have to think more carefully about how to do this for the second and subsequent boxes. Refer to Discussion, below.
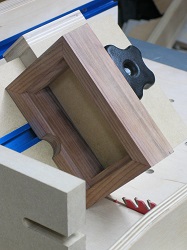
- With the splines flush to the box, the next step is to cut the decorative 30° bevel around the outer top edge. I did this on my table saw, but if you happen to have a 30° chamfer router bit you could use that. I swapped my table saw's zero-clearance throat plate for an almost-zero-clearance plate that allows me to tip the blade over and then I set the blade at 30°. I turned the box over, put one side against the rip fence and lined it up just short of the blade. Then I adjusted the fence so that the cut would leave a little more than ¼" on the box rim, therefore removing a little less than ¼" from the outer edge. This can be difficult to judge, so I made sure to err on the side of cutting away too little material and expected to make additional passes. That being said, the position and angle of the bevel are purely aesthetic (within reason) and you can change them according to your preference or, if you don't get what you wanted, just pretend that you did. Make the cut on two opposing faces. Measure (or just eyeball) the result and as many times as necessary scooch the fence closer to the blade and cut again on one side. When you're happy, re-cut the other side. Repeat the process for the remaining faces. Aim to have the bevel line up exactly with the first faces that you cut, otherwise it will not look right. Sliding the short side of the workpiece along the rip fence breaks a basic rule of table saw use, but I think in this case it is justified because the short faces of the box aren't that much shorter than the long faces. If you have a trusted means of crosscutting with the blade tipped over, by all means use that. Because I have a cheap, poor-quality table saw, I lack this capability.
- You can start making the lid as soon as you've glued up the box carcase, while you're waiting for the glue to dry. If you can't get a ruler in among your clamps to measure the opening, the next opportunity will be while the glue is drying on the splines. Check that the opening for the lid is square (in the sense of having right-angled corners). If it isn't, you'll either have to reproduce the angles on the lid or put up with a varying gap around it. My first box came out with precisely square corners, although whether that was due to skill or luck I've yet to determine. The best appearance results when the lid is just very slightly smaller than the opening so that it doesn't quite stick when you lift up the front edge using the thumb relief. It is probably best to "sneak up on" the exact size.
- You can leave the lid as a simple slab of wood or you can decorate it in various ways.
- Sand the outside faces of the box carcase and all faces of the lid. Starting at 220 grit will probably allow the removal of any saw marks, then progress to 320 and finally 400. Use a sanding block to avoid rounding over edges, but "break" the edges slightly for handling comfort. You can also fix the sandpaper down on an exactly flat surface and work the box to and fro over it, particularly for the top rim and the bottom.
- I finished my first box with urethane in the same way as for my coasters, largely out of habit. As the box is less likely to get wet than something you put a drink on, I used two coats rather than three to try to get closer to the feel of wood. Belatedly, it occurs to me that I should have considered other finishes. Note : Try something other than urethane for next box?
Discussion
Avoiding Chip-Out
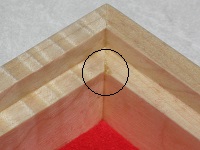
A perennial problem in woodworking is chip-out. This happens when a cutting tool (saw blade, router bit, etc.), on exiting the workpiece, tears the material away raggedly rather than shearing it cleanly off. Different wood species are susceptible to different degrees and sharp, clean tools are always important but sometimes you can rectify chip-out by carefully thinking through the order in which you will make cuts. In his book, David Freedman has you make the 45° miter cuts on the ends of the carcase pieces after cutting the groove for the box bottom and the rabbet for the ledge on which the lid will rest. This is what I did for the first box. It is impossible, however, to support the ledge as the blade passes through it, with the result that corners may chip out, as shown in the photograph at right.
For the second and third boxes, I solved this problem simply by mitering the ends before cutting the rabbets in the pieces. This works for two reasons. First, the face where the saw leaves the workpiece during the miter cut is now flat against the back of the miter jig and the wood is supported, therefore discouraging chip-out. Second, if chip-out does occur, the damaged area will be removed entirely when the groove is cut. The basic rule here is, where possible, to make crosscuts, which are more prone to chip-out, before rip cuts, which are less prone and often remove wood damaged by a crosscut.
The Thumb Relief
A notch in the upper rim at the front of the box carcase allows you to grip the box lid with your thumb and lift it up. The shape of the notch is a circular segment, so it is cut with a drill having the diameter of the circle. To keep the drill in place during this operation, a piece of scrap wood is clamped to the workpiece so that the drill "thinks" that it is cutting a complete circular hole. According to the original design, this thumb relief is deeper, measured down from the upper rim of the box, than the rabbet that forms the ledge on which the lid rests. Drilling the relief all the way through the front of the box will result in an unattractive gap extending under the lid. So, as described above in Instructions, above, be careful not to drill the notch so deeply that it will intersect the ledge. An alternative is to deviate from David Freedman's design and make the relief notch shallower so as not to intersect the ledge. Although this change is not acknowledged, you can see Adrian Preda taking this approach in his video. He positions the drill further into the scrap and drills from what will be the inside of the box, staying above the ledge as can be clearly seen at 2:32. (The video does, however, make the general method clear). The shallower notch may make it more difficult to pick the lid off the box if you have fat thumbs.
Getting back to the original design, after making my first slab lid box I had a piece of scrap MDF with the hole segment that was not part of the thumb relief notch. I could have thrown this out, but for some reason I kept it. When I came to make more boxes of this type, I re-used this same piece of scrap. The drill ran in the existing hole in the scrap while it cut the notch in the workpiece. This avoided using yet another piece of scrap wood and also simplified setup. More importantly, I used the bottom of the hole in the scrap to set the drill press depth stop. Knowing that for the first box I was left with a sliver that needed to be chiselled out, I lowered the depth stop a hair trying to get it to just reached the ledge. This worked perfectly. The piece of scrap is therefore now a "jig"!
Cutting the Rabbet for the Lid
A rabbet is just a recess cut into the edge of a piece of material (as opposed to a dado or groove, which is a slot in the face). There are a number of ways of making a rabbet, but the two available to me are the table saw (using multiple passes) and the router (mounted upside-down in a router table). Let's talk about the router first. A straight router bit will make up to three flat cuts at the same time - one on each side and one on the top. When set up for a rabbet, one side of the bit is outside the material, so you're cutting the two faces of the rabbet flat and perpendicular in one pass. This makes it the perfect tool for this job. However, I'm a bit concerned that all the material that is removed is chopped up in to shavings. This seems like a lot of work and results in a lot of power expended and considerable force on the tool. I could be wrong, and maybe my router is under-powered, but isn't a table saw a better tool for removing a lot of material? The saw blade has many more teeth and the forces involved in passing the workpiece through the tool are a lot easier to understand. So, my instinct is to rough out the rabbet on the table saw and then use the router to cut away just a small amount of additional material to reach the final dimension. By "rough out", I mean make two cuts, one from the face and the other from the edge, to remove most, but not quite all, of the wood. A lot of this wood ends up as sawdust, but some is just detached without being ground up and can just be discarded. In this way, I have the efficiency of the table saw at removing material followed by the router's ability to cut two flat and perpendicular faces at the same time.
But, why can't the table saw cut those two faces in their final positions rather than just roughing them out? The only reason is adjustment. The two cuts (remember, one is from the face and the other is from the edge) have to meet precisely at the inside corner of the rabbet. Because it forms the ledge on which the box lid rests, the rabbet is very visible. Both faces must be (or at least appear) perfect. Nevertheless, I have been successful in cutting the rabbet this way (and so eliminating the need to set up the router for the final pass). The previous step is cutting the groove for the bottom of the box. The groove ends ¼" up from the bottom edge of the carcase pieces. Although this measurement is not critical, I take the opportunity to get it exactly right, which gets the saw set up for the rabbet. I increase the depth of the cut slightly from the 3/16" of the groove, maybe to 7/32", but definitely less than ¼", and make the face and edge cuts. A thin strip is cut away and I have the ledge for the lid, except that there's a step where the two cuts didn't meet each other. Now it's just a matter of increasing the depth of the cut in small steps until the cuts do meet. This could be called tedious, but I only need to work with one of the four carcase pieces. As they are short, it takes only a moment to pass it twice through the saw (this is another advantage of putting this step late in the order). When this piece comes out right, the other three can be cut exactly in two passes each. I have not yet increased the depth too much and caused the blade to contact the adjoining face of the rabbet. If that were to happen, I would move the rip fence out very, very slightly and skim both faces to remove the flaw. The rabbet would be deeper and wider than the nominal ¼", but I would not have to throw everything out and start again.
Flush Cutting the Splines
(TO DO)
Finishing with Danish Oil Rather than Urethane
Everything I made before boxes was finished with General Finishes Enduro-Var urethane. In the case of Opus One, the toothbrush holder and coasters, this was justified as those things could be expected to get wet during use and urethane is good at protecting wood from moisture. In the case of the bronze pear platform, well, I just didn't know any better. After I completed the first slab lid box, I was pleased with its appearance but critical of how it felt when handled. Jewelry boxes and other fine woodworking products that my wife and I have seen at arts and crafts shows such as Paradise City have a wonderful "warm" feel to them that the first box, finished with urethane, lacked. As these small boxes should not really have to deal with water, here was my chance to try an oil finish.
From what I've learned (mainly by watching YouTube videos), boiled linseed (flax) oil and tung oil are the drying oils that are traditionally used in woodworking. In their pure form, however, they are difficult to use. The alternative is to use a mixture of drying oils, varnish and perhaps solvents and drying agents called either teak oil or Danish oil (nether of which have anything to do with teak or Danes). It just so happened that we have a quarter-full bottle of teak oil on the cleaning products shelf. So, I tried this out on the second and third boxes. Using a small piece of cotton rag, I wiped the oil on over and over again until some remained on the surface, then left it alone for 15 minutes and finally wiped it thoroughly with a clean rag. The wood now definitely had the feel that I hoped for. So soft and smooth. Just thinking about it makes me want to go and touch it again! But, the finish was without any sheen. That's OK, except that I wondered if the figure in the maple would not be brought out by a matt finish as much as by one with some gloss. Well, the difference between teak oil and Danish oil seems to be that "While Teak oil delivers a slight sheen, Danish oil leaves a more lustrous finish". OK, but we're in the COVID-19 lockdown! Home Depot, however, seems fairly normal, except that everyone is masked. So I applied Danish oil over the teak oil (the instructions say you should apply the finish a second time after waiting a day) and, sure enough, there is a little more shine. I think I am happy with this and I will continue to use Danish oil until and unless I come up against a problem. When the oil is newly applied, it appears to darken the wood (maple, for example, takes on an amber tone), but this seems to wear off when the finish dries.
Important : According to this article on the Rockler Web site, you should not use an oil (e.g. Danish oil) finish on aromatic cedar or any of the dalbergia woods (rosewood, cocobolo, tulipwood) because they contain an antioxidant that prevents the oil from curing.
(Go Back to the Small Boxes Main Page)
|