|
Projects
Processes
Power Tools
Resources |
A Glue-Up Jig for Coasters(Go Back to the Coasters Main Page) Edge Gluing BoardsIt is very common in woodworking to edge glue boards into larger panels. This would be done with the same wood species to make a table top. It would be done with contrasting wood species to make a cutting board. The boards are pressed together, edge-to-edge, while the glue dries, using bar clamps (or something similar). The assembly may be held flat and even by strips of material (called cauls or battens) clamped cross-ways over the boards. This works well for large workpieces, but gets less manageable for work that is similar in size to the clamps themselves. After you've put a couple of clamps across the edges of the work, there's no room to clamp things flat. It's even more difficult to clamp a band around all four edges. 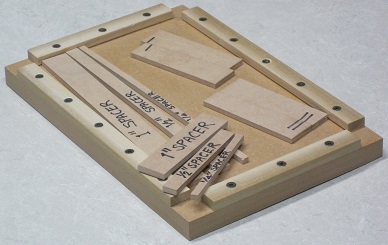 At the time I made my first coaster, I hadn't really thought this through. I took the cast-iron top of my old, defunct table saw, jammed scrap wood into the miter slots and used other pieces of scrap to just fill up the horizontal surface until the strips of wood were tightly squeezed together. When I came to glue on the edge band, things got really ridiculous and it became clear that I needed a better solution before I attempted even one more coaster. A Glue-Up Jig Specifically for CoastersDesigning a jig was not difficult. It seemed obvious to me that flat, sliding wedges should be used to provide the clamping force. They are compact, provide even pressure across a long edge and cost essentially nothing. I needed a flat base with two pairs of parallel rails firmly secured to it. The coaster would butt up against one rail with the wedges between it and the other rail. As the wedges were tightened, they would squeeze the wood strips of the coaster together. I had decided that my coasters would be about four inches square. I also knew that I wanted to be able to glue up strips that are eight inches or more long and then cut the result in half to get a pair of identical coasters. I allowed two inches for the combined width of the two parts of the wedges. This would provide plenty of space on their short sides to force them together (and then apart to release the work). So, I needed a work area in between the rails that was at least six inches wide and more than eight inches long. I cut a piece of ¾" MDF eight inches wide and twelve inches long. I cut the rails from some ¾" by 3/8" poplar which was scrap from a window casing project. For no reason I can explain, they stop one inch short of the board edges. Using a 45° chamfer/follower bit in the router, I put a narrow bevel on the bottom inside edge to act as a dust gutter. The rails are held to the base board with wood glue and one-inch wood screws. The work area between the rails is 6½" by 10½". I have some 5 mm MDF that arrived in the packaging of a bathroom vanity. From this, I can make spacers of any size to put between the rails, workpiece and wedges to adapt the jig to different needs. The wedges were also cut from this material. The angle of their sloped edges is ¼" in 4" (1 in 16, i.e. about 3½°), which was guesswork, but works very well. The wedges are nominally identical, but I marked each pair of pieces that resulted from a single cut across one rectangular piece of wood in case there should be any small difference. The thickness of the spacers and wedges is about 13/64", so they sit slightly below the face of a ¼" thick workpiece. This makes it easy to put a weight on top to keep things flat. 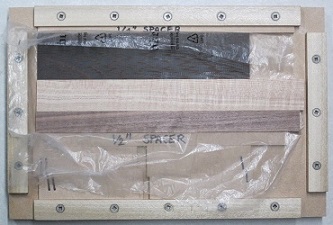 Edge-Gluing Strips for the "Core"The photograph on the right shows the setup for edge-gluing the ¼" thick strips that either form the complete coaster, or, if the coaster is to have an edge band, the middle part that I call the "core". It should be obvious what is going on, but I'll describe it anyway (I'm writing this during the COVID-19 lockdown). The strips are 8" or longer to represent making a pair of coasters of a single pattern (this isn't actually a coaster glue-up, the wood is just pretending). A ½" spacer and a ¼" spacer take up the extra width of the jig, leaving 3¾" total for the strips and 2" for the wedges. Both wedge pairs are used so as to apply pressure along as much of the glued edges as possible. Placing the wider spacer on this side helps to spread out the pressure. The thin plastic sheet prevents everything from getting glued down to the jig. I re-use the bags that our newspaper is delivered in because I'm a bit of a tree-hugger, but any kind of plastic wrap would work as well. Glue squeeze-out can be wiped from the top surface with a damp rag, but be wary of getting the top surface too wet as it may cause the wood to swell on this side, resulting in a curved coaster. Fold the plastic sheet over the work, put something on top that is about the same size and pile weights on top to hold it all flat. Be sure, before you tighten up the wedges, that all the strips are sitting fully down on the base board. It is all too easy to have one or more slightly up-in-the-air, perhaps sitting on a wrinkle in the plastic, so when you break down the glue-up jig you find gaps on the bottom of your coaster.
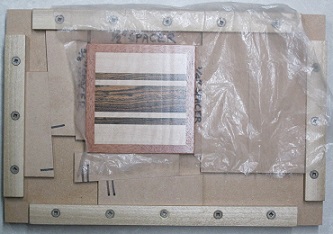 Gluing an Edge Band Around the "Core"The photograph on the right here shows the setup for gluing a band around the edge of the coaster core, if that is what you want to do. Aside from the aesthetic difference, a band has the disadvantage of being additional work but the advantage that, in conjunction with the cork on the bottom, it completely hides any shenanigans underneath the visible top surface. So, you can use a very thin layer of exotic wood on top of a cheap support, such as MDF (as I did in my bookmatching experiment). Again, you can see what is going on. Spacers fill the surface not occupied by the coaster and wedges. A large rectangular spacer at the right bridges the distance left for the glue-up of long strips so as to reach the rail. Wedge pairs squeeze the coaster from top-to-bottom and from side-to-side. Again, a thin plastic sheet buffers the glue that squeezes out on the bottom and glue on the top can be wiped off or allowed to dry and later scraped off. This is not a photograph of an actual glue-up; the coaster is completely finished and is just acting a part. I think you can see, in the reflected overhead light, some ripples in the top surface of the coaster. This pair was the first that I made using my home-made, drill-powered drum sander. I can't remember exactly what I did and didn't get right, but my guess is that I paid insufficient attention to feeding the workpiece through at a constant speed. In any case, I don't get these ripples any more.
Relevant LinksHere is somebody using a similar, but much larger jig, to glue up a cutting board. |