|
Projects
Processes
Power Tools
Resources |
Sharpening the SkewchigougeI am not the best person to tell you how to sharpening a skewchigouge. As I type this, I have been woodworking for less than a year and turning for just a couple of weeks. However, unless I am an Internet dunce, nobody else seems to be stepping forward to tell you (or me) how to do this, so here we are. I will try very hard not to be actually wrong.  What is a Skewchigouge? Why and Where Would I Get One?The skewchigouge is a lathe tool invented by English woodturner Allan Beecham. It is claimed that the tool can perform most of the functions of both a skew chisel and a spindle gouge. At the same time, it is free from the problem of "catches" when slightly mishandled, which is the bane of the skew chisel. In my opinion, these claims are entirely justified and I've found the tool to be a delight to use. Crown Hand Tools Ltd., in Sheffield England "proudly" manufactures the "Alan Beecham Skewchigouge" (it's a pity Crown couldn't "proudly" spell his name correctly). It looks as if you can only order them in packs of six. The product photograph (at right) looks exactly like what I have. Note the shape of the business end. From the reflected light, you can see that the upper face is concave and the edge is a smooth curve. We are assured that an "Instruction leaflet [is] included". It is probably Instruction for the use of the BEECHAM skewchigouge by Allan Beecham himself. The skewchigouge is available from Woodcraft (Item # 140474), which is where I bought mine. The shape of the business end is unclear from the photograph provided. The "Instructions" can be downloaded from the Web site. They are a prettied-up and cut-down version of Beecham's Instruction for the use ... but manage to contradict themselves on the one-and-only page. Photographs show a flat upper face right above Beecham's exhortation to make sure that the upper face is ground concave. 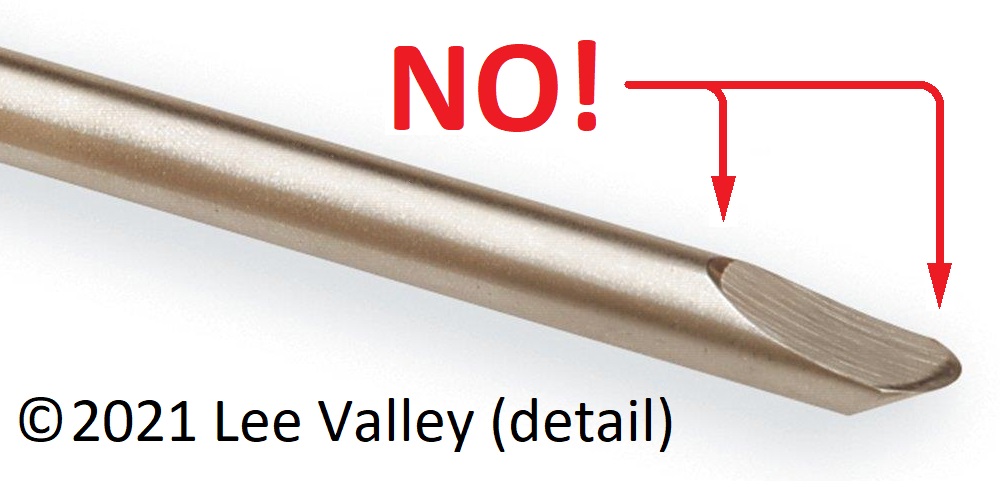 The skewchigouge is also available from Lee Valley Tools (Item 35B0107). Photographs generally agree with the manufacturer's, although the closeup of the tip suggests that someone has tried to hone the concave upper surface flat. The picture at right is a detail that I've edited to make very clear what I think is wrong. (As with all images, try right-click → View Image and you'll often get a larger version. Then use the browser's back button to return to the page.) 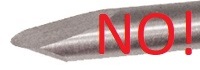 The skewchigouge is also available from Packard Woodworks, Inc. (SKU: 103338). The sharpening instructions given here completely contradict Instruction for the use ... and the accompanying photograph shows the upper face ground flat (at right, the big red NO! is my addition). So, Why the Lack of Information?If the skewchigouge is really easy to use (which it is, by the way) and easy to manufacture (nothing but a tool steel rod in a handle), then nobody who sells hundred-dollar lathe tools is going to be very motivated to promote it. They'll sell it, but keep it obscure so that people gravitate towards the more conventional tools, of which you need a whole bunch to do the same job, each of which can cost twice the price of a skewchigouge. OK, enough of the cynicism ... Instruction for the use of the BEECHAM skewchigouge includes Beecham's name, handwritten in upper case, and the date "SEPT 1996". There are two pages containing typed or printed text and hand-drawn images (1996, remember). I assume that Beecham himself prepared this document and handed it over to Crown along with the rights to manufacture and distribute his invention. I also assume that he had little interest in really explaining stuff to neophytes and just wanted to get back to his lathe. Beecham can probably sharpen any tool free-hand and doesn't bother to codify methods for those poor souls who can't. Nobody has since then checked the intelligibility of his instructions or produced a more carefully considered description of the product and its use. I'm not answering the question, am I? I have no idea why there is so little information available about this excellent wood turning tool.   Well, What Do We Know?Beecham clearly tells us that the top face of the tool must be ground concave, not flat. He gives two diagrams of this, but they show widely different radii of curvature. They do agree on one thing, that he doesn't otherwise mention, which is that the axis of the tool (the "Centre Line") should be tangential to the curve of the top face at the very tip. The tool I received from Woodcraft was ground more-or-less in this manner. The radius of curvature was a little over two inches. The axis was tangential slightly behind the tip, which was probably deliberate so that as the bevel is ground back during the life of the tool things remain close to Beecham's recommendation.   Beecham also clearly tells us that the top face of the tool must be round, not pointed. Again, he gives two diagrams, this time in agreement. However, I've not seen any picture of the skewchigouge on the Web that is anything like the smooth ellipse that he shows. Always the front edge of the tool has a much blunter curve and there are corners where this meets the longer curve up the face away from the bevel. Quite possibly Beecham could grind this curve, but nobody else seems to want to try. Note that, in "Instruction for the use ...", Beecham gives us no information about the bevel, which is arguably the most important thing in sharpening a wood lathe tool. He doesn't even recommend a bevel angle at the tip, let alone tell us how the angle should change as we move around the wings. All things considered, I'm going to assume that Beecham threw this document together, perhaps under pressure from Crown to provide something to guide buyers of the tool, and did a really bad job of it. I'm going to rely for the most part on my memory of what the tool looked like as delivered from Woodcraft. Early MistakesDidn't know whether to sharpen bevel or upper face. Tried to sharpen top face on end of belt sander. Tried to grind bevel free-hand and made the tool pointier and lop-sided. Commercially Available JigsA YouTube video, Ted's Turnings - Vari-Grind Experiments, drew my attention to the ONEWAY Wolverine Vari-Grind Jig. Ted Ross, who made this video, appears to state that correctly setting up this jig will lead to some specific desired grind. The video is misleading because this is not true. ONEWAY claim that "you can dramatically reduce the difficulty of producing [certain lathe tool] grinds", which I think is reasonable. But you still need understanding and skill, which Ted fails to impart. My investigation of Ted's implied claims, however, convinced me that this jig was not going to help me and that I was on my own. I would have to design a sharpening jig from scratch. Designing a Sharpening Jig Using SketchUpLOTS TO WRITE HERE, IF AND WHEN I GET TO IT  The Bevel Grinding SetupThe photograph at right is a general view of my setup for re-grinding the skewchigouge bevel. (Right-click → View Image for a larger version.) My bench grinder is screwed down to a scrap board. The board is clamped to my bench. A couple of wood blocks are clamped to the board in front of the fine grinding wheel. These support the grinding jig at the required height (see below). Of the two long clamps in the middle of the picture, the leftmost one holds the blocks in place and also helps hold the board and the grinder securely to the bench. The rightmost clamp does all of these things but additionally holds the grinding jig onto the top support block. The "required height" of the jig is really anything that puts the tool in an open area on the side of the grinding wheel. It just so happens that the horizontal plane in I have the jig clamped more-or-less passes though the axis of the grinder, but this isn't necessary.
 The photograph at right is a closeup of the jig on the support blocks. The bottom block just lifts everything up. The top block has a guide strip glued to it (which, unfortunately, cannot be seen in any of these photographs). The long bar (I'll call it the "support arm") of the jig is located against this strip to set the angle from the jig to the abrasive surface. For this to work, the rear face of the top block must be perpendicular to the side face of the wheel. This is established with an engineer's square before the clamps are tightened. The shield has been removed from the outside of the wheel, exposing the flat face which will be used to grind the tool.
 The photograph at right is a tighter closeup of the jig. I made a video with this framing, showing the tool swinging as if it were being ground. The "tool clamp" is mounted on the support arm with a threaded rod and fixed with a washer, flange nut and jam nut. The rod runs in a hole in the support arm that is at right angles to its axis. Therefore, by clamping the arm at an angle of 20° to the axis of the bench grinder, the rod will be at an angle of 20° to the side of the wheel. The tool clamp rotates around the rod and the abrasive surface sweeps out a grinding cone with a 40° apex angle (20° half-angle), which is as desired. The tool is mounted in the clamp at an angle of 15°. This results in the bevel angle being 20 + 15 = 35° when the tool is in the neutral swing position as shown. As the tool swings away from the neutral position, either up or down, it becomes flatter to the abrasive surface. If it could be swung by 90° (which it can't), the tool would be at 20° to the surface. How this affects the effective bevel angle on the "wings" of the tool (I think I'm using the right term, here) is beyond my imagination, hence all the messing about with SketchUp models.
The next photograph on the right is a very tight closeup of the jig with the tool swung to its lowest point. You can see the area where the tool contacts the abrasive surface and the general shape of the bevel that has been ground. Now it's time to describe how to use the jig.  With the last clamp backed off, slide the support arm against the guide strip glued to the upper support block. While you're doing this (assuming the support block is oriented correctly to the wheel) the jig completely determines the angle at which the tool will meet the abrasive surface and how that angle changes as the tool is swung up and down (in stark contrast to the Vari-Grind jig, which does no such thing.) Slide the support arm to the left until the tool just contacts the wheel and then tighten the clamp. Before turning the grinder on, explore what will happen by spinning the wheel by hand and swinging the tool up and down. You'll be able to hear and feel when the wheel will be cutting. If it doesn't cut much at all, move the support arm an oh-so-tiny amount more to the left. You're looking at first to make some progress with the grind at some point in the swing without taking too big a bite and overheating the tool. When you're satisfied, hold the tool at a point in the swing where the wheel is cutting least and turn on the grinder. Then begin swinging the tool. Go slowly when you move towards positions that cut more. Swing back to let the tool cool and then go forward again. Continue until you can cover the full extent of the swing with the wheel barely touching the tool (or, in some positions, not touching at all). Turn off the grinder, let it run down and move the support arm just a tad to the left. Repeat this process until you've seen the wheel cut during the full extent of the swing, meaning that you've ground at least something off all the way around the bevel. Now you'll need to peer at the bevel to determine whether you're done or you need to continue. Keep going, in tiny steps, until you can see that you've ground every point on the bevel all the way around and from the cutting edge to the bottom. You may need to take the support arm / tool clamp assembly off of the support blocks to see this clearly. Another thing to watch for, depending on how much material you have to remove, is that the tool still projects slightly from the end of the tool clamp. Ideally, between each run of the grinder, you would move the tool a little further out of the clamp rather than sliding the support arm to the left. But, this takes longer to achieve and is much more fiddly (the upper surface has to be set by eye). So, in practice, it's best to start with the tool sticking out by the amount of material you think needs to be removed and then you'll end up in the right place. Don't, however, just keep going without checking that you're not grinding away the tool clamp and destroying an important reference. If all this seems like an awful lot of trouble, remember what we're doing here. We're taking a skewchigouge that has not had its bevel ground to shape, or you've messed up the shape or it came into your possession with the wrong shape — basically it has a bad bevel — and we're re-grinding the bevel to a shape that we know is effective. You're only going to have to do this once (unless there is some major mishap). If you decide to re-sharpen on the grinder, you'll only need one run of the grinder to refresh the edge. If you decide to re-sharpen on a stone (see below), you won't be back at the grinder at all.
 The Bevel Honing SetupAfter the bevel has been ground to the correct shape, the surface needs refining with a finer abrasive. I don't really know how far I'm supposed to take this. Many YouTube videos of sharpening lathe tools have the tool go directly from the grinder to the lathe, but the wheel is probably a higher grit than my 60. I decided to hone by hand using my double-sided diamond bench stone. This has 600 grit on the "fine" side and 1,200 grit on the "extra-fine" side. I have made a board to hold it steady, using cellular PVC rather than wood so that I can put water on the stone. The stone (which is made from metal) sits in a shallow recess and projects up by 3/32". I also have pieces of MDF on which I have stuck 3M lapping film. These are the same thickness as the stone, so I can continue with even finer abrasive. The setup is shown in the photograph at right. The "tool clamp" has been removed from the support arm used in the grinding setup and instead mounted on a hand-held "slider", still using the washer, flange nut and jam nut.

 Sharpening the Upper FaceAs delivered from Woodcraft, the top of my skewchigouge was ground in a convex curve with a 4-inch diameter (2-inch radius). Or, maybe a little more, perhaps 4½", it's hard to tell. I can't find any abrasive wheels of this size with a hole for a spindle. Grinding wheels seem to be either 6-inch or 8-inch. There are some without a hole here. But how could I make that work? The photograph at right is a general view of my setup for re-grinding the skewchigouge's concave upper face. Well, not grinding, exactly. I've re-purposed a 4" diameter sanding drum by taking off the foam and sanding the surface true to the lathe axis. I can mount on it a strip of abrasive paper and a strip of cloth, side-by-side. The abrasive paper wears out very quickly. I suppose this problem is still unsolved, but my current understanding is that I should be re-grinding the bevel, not the upper face, so this setup is just for honing with green compound on the cloth.
 ResultsI am very, very pleased with the results that I have obtained. All of my objectives were achieved. First of all, I got rid of the results of my misguided attempt to free-hand the grind and returned the cutting edge to the "correct" shape. (Note, though, that what I think is the correct shape is half from memory and half from peering at indistinct images on the Web.) Second, the curve at the front of the tool is now symmetrical about the point, at least as far as my eye can tell. As delivered from Woodcraft, it was noticeably off-center, which I'm assuming is not desirable. Third, I have complied with the instruction "Honing required before use" on the Woodcraft product page (without messing the tool up, this time). Lastly, I now have a reasonably efficient method of sharpening the tool when it becomes dull through use.  The photographs at right show the business end of my sharpened skewchigouge from three perspectives. (Use the right-click → View Image trick for larger images.) The overall view looks, as far as I am able to tell, very like the product images I've found on the Web, excluding those with obvious deviations from Beecham's instructions. It also looks the way I remember my skewchigouge on first unpacking it, before I tried honing it without a jig. What I'm least sure of is the line where the bevel meets the cylindrical body of the tool. Did it slope back at just that angle? I'm not sure, but I think so. The view of the bevel side shows that my jig has achieved a clean, conical surface. The honing process that followed grinding has produced a fine finish. The view of the upper face most clearly shows the shape of the cutting edge. This conforms exactly to my memory of the tool before I messed it up, except that it is now symmetrical about the tool axis whereas as delivered it was slightly off.
 Going back to "... a reasonably efficient method of sharpening the tool when it becomes dull ...", I'm hoping that refreshing the edge will amount to repeating the honing process, probably with reduced vigor. I don't expect to have to go back to the grinding wheel (unless I discover a significantly better contour). I also don't expect to have to mess with the upper face, other than rubbing off the burr, now that I've figured out that it's the bevel that deserves attention. What I imagine is that when I suspect that the tool has dulled, I will use the honing jig, give it maybe ten passes on the fine (#600 grit) side and the same number on the extra-fine (#1200 grit) side. Then I will swap the diamond stone for the lapping films for ten passes at 12 micron (#1200 grit) and ten at 5 micron (#2500 grit). Finally, I will knock off any burr on the upper face by pulling it, by hand, over the 4" diameter drum that I've fitted with cloth and green honing compound. I'm still in some doubt about the use of the lapping films. Is there any benefit? Since they are plastic, won't they deform and slightly round over the edge? I will continue to experiment.
|