|
Projects
Processes
Power Tools
Resources |
Turning a Wood Bowl - Preparing the Blank and Mounting it on the LatheThis page is part 1 of the steps involved in turning a basic wood bowl. Go back to the Main Page. Go to the Next Part (Part 2). Preparing the Blank and Mounting it on the Lathe 1 — Choose which face will be hollowed out to become the top of the bowl. If there are defects in the blank, try to arrange for them to be in the wood that is removed. In the picture here, you can see a split on the left side. It reaches the bottom of the blank, but all that wood will be cut away to shape the outside of the bowl. The split does not reach what I have decided will be the top. I have sketched the general shape of the bowl on the sides and you can just about make out that the growth rings of the wood curve the other way. This will make more of them visible in the finished bowl, which may be good or bad. Predicting which way up will result in the best looking bowl is beyond my present skills. 2 — Draw two lines across the top face from corner to corner. Where these diagonals intersect is the center. 2a — If you have a pair of compasses, then from the marked center, draw the largest circle possible on the top face. If you don't have compasses, no worries, there's an alternate procedure below. 3 — At the marked center, drill a hole to fit the worm screw that came with your lathe chuck (video 1, 1:51). In my case, I need a 3/16" drill bit and the hole must be 13/16" deep. You should take reasonable care to get the hole straight, but you don't need a drill press (in the picture, I'm using my home-made drill press). Obviously, you'll have to hollow out the bowl to at least the depth of this hole to get rid of it, so don't make it unnecessarily deep.
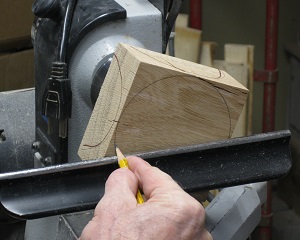 4 — Here's how to draw the circumferential circle without compasses. Mount the blank on the lathe using the screw chuck (see below for guidance and be extra sure that power is not connected). Bring up the tool rest to lie across the face that will become the bottom of the bowl. Position it slightly below the center, which you can find by rotating the lathe spindle by hand. Rotating the spindle with a pencil held on the tool rest allows you to draw a circle. Draw one as far out as you can without falling off the blank (see the photo at right). Then, unmount the blank. I find mounting and unmounting the blank like this to be very little trouble, so I'm not tempted to go out and buy a pair of compasses.
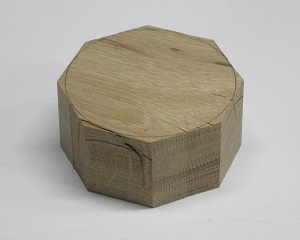 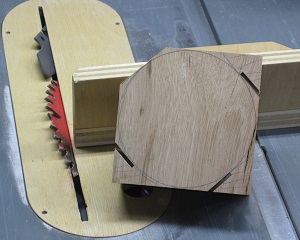 5 — Keeping outside the circle you have drawn, cut away excess wood. The ideal tool for this is a bandsaw. If you don't have a bandsaw, then you can use a table saw, miter saw or even a handsaw to chop off the corners, making an octagonal blank, which at least isn't square.
 6 — Mount the blank on the lathe (you may have done this to draw the circumference and then unmounted it). For safety, disconnect power to the lathe. Mount the chuck on the lathe and your worm screw in the chuck (video 1, 2:41). Put the drilled hole over the worm screw and screw the blank onto the chuck until the top face is tight against the jaws. I wear a glove to avoid splinters. For a very shallow bowl, you can reduce the depth of the drilled hole by including a spacer between the blank and the jaws, but make sure that it's firmly held in place and doesn't fly off when you begin to work it.
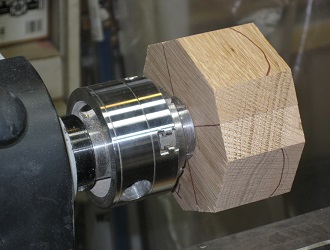
7 — (Somewhat optional) I prefer to bring up the tailstock (with a live center) to provide additional support while the blank is turned to round. (Admittedly, it has to be taken away as soon as that is done and work on the bottom of the bowl begins.) Usually I am content to just let the point of the live center dig in and press the blank back against the chuck. I figure that if something bad happens, the blank is more likely to stay on the lathe and I'll only have the gouge (or its fragments) to duck. But for a "difficult" wood, such as oak (see pictures at right), I'll go the extra mile and make sure the ring of the center also engages. To do this, I have to bore a hole for the point to sink into. This starts with a shallow drilled hole and is followed up with a countersink bit (as shown in the pictures). We're smack in the middle of the bottom of the bowl, here, so we need to be careful. If the hole is no deeper than absolutely necessary, it will disappear when we cut the mortise to reverse the bowl in the chuck (see later steps). Otherwise, we'll have to shave away the bottom of the bowl just to get rid of this hole. So, as I said, I only go to this extreme for hard woods or otherwise difficult blanks. Usually, I just dig the point in hard and ignore the ring.
8 — Make sure that the worm screw is tight in the chuck and the blank is tight up against the chuck. Bring up the tailstock and live center. Set the lathe to a suitable speed. I start at 800 r.p.m. for a 4" by 4" blank (video 1, 4:10). Connect power to the lathe and turn it on. If it has continuously variable speed, bring it up slowly. Make sure everything appears secure. You're going to turn the blank round for the sake of safety and to eliminate any vibration. If you didn't bother to hack off the corners, now would be a good time to rethink that decision. Even an octagon looks way less scary than a square at this point. Round, of course, is best, and if it's round enough you may skip this step. But, if I'm too stingy to buy compasses I'm not about to buy a band saw, so I have an octagon and I make it round as the first step on the lathe. Don't get distracted and think that you're doing spindle turning! Step away from that roughing gouge! You've got end grain flying at you twice per rotation and you need a tool that can slice through the wood fibers without digging in. With your bowl gouge, make push cuts from whichever side you prefer (right for me, as I am right-handed). Don't go all the way across because you'll lose grain support and cause damage to the face. Instead, switch hands and start push cuts from that face and work back to where you stopped. You're done when the workpiece (no longer a "blank"!) is round enough not to cause vibration and you judge that accidental contact won't cause unnecessary injury. You'll reach the final shape in a later step when you come around the curve of the bowl from the bottom. As I approach round, I increase the speed to 1,250 r.p.m.
Go to the Next Part (part 2). |