|
Projects
Processes
Power Tools
Resources |
Wood Turning VideosHere I'm going to record videos (mostly YouTube) that I've found educational in some way. I'll include notes to help me remember them so that I can go back and watch them again to refresh my memory. Videos on Spindle Turning and Lathe Work in GeneralTo DO : Make a separate page for this. Videos Specifically About Bowl TurningTurning Your First Bowl beginners woodturning How to turn your first bowl Bowl Gouge - Which Way to Cut - Supported Grain Cutting Direction Woodturning Video NEVER DO These 5 Woodturning Bowl Things – Video Bowl Gouge Beginner First Use How To Video - Woodturning 4 Bowl Gouge Techniques — Push Pull Scrape Shear Cuts Video Stop Bowl Gouge Kick Back Technique - Woodturning Video Tutorial on how to use BOWL GOUGE on cross grain work Turning Your First Bowl, Axminster ToolsThis video is remarkable for being very compact (12:24) while managing to cover the entire process of turning a bowl. The description starts with a useful breakdown into thirteen "chapters", so it's easy to revisit a particular section. A "face plate ring" is used to mount the blank (elm, already cut round) to the chuck rather than a worm screw or a simple face plate in place of a chuck. Just another option. The circumference is trued up using what I think are pull cuts. The tool looks like a straightforward fingernail grind; no swept back wings here. The bottom face is flattened using either pull cuts or scraping, I can't figure out which. Dividers are used to mark the diameter of the mortise (called here a "recess") and it is started with a parting tool at the outer edge. The waste in the center is cleared away using the bowl gouge "without the bevel rubbing", but still looking like pull cuts. So, is it scraping? I don't get this. The direction has to be towards the center to protect the edge of the mortise. A push cut is used as a "finishing cut", without explaining why this is suddenly OK after all. The dovetail is cut into the outer edge with a skew chisel (used, I think, as a negative-rake scraper). After marking the "foot", i.e. the base of the bowl that will remain for it to rest on, it is cleaned up with a skew, this time admitting to it functioning as a scraper.  Then the bowl gouge comes back with pull cuts to shape the outside of the bowl ("taking waste away") from the base around the lower edge to the sides. But, the surface is not clean because he's "only use a roughing cut". He uses a push cut to clean it up. This is worth watching carefully. But, why not use push cuts from the start? He sands and finishes before turning the piece around. 100, 150, 240 and 400 grits with considerable work at 100 before moving on. Libéron finishing oil. After turning the workpiece, the first goal is to clean up the outer part of the top face. This is done with a couple of push cuts. The center is then removed using scooping push cuts, starting from the middle and working out. He checks the wall thickness before the last couple of cuts, obtaining a "finishing" cut on the last so that it's ready to sand. Now he needs to "take the bottom away". More push cuts, now working from the outside in and leaving a lump in the center. After again checking the wall thickness, this is cut away with more push cuts. Sanding and oiling is as before. The outside, already oiled, is burnished again. beginners woodturning How to turn your first bowl, Black Label woodworksThis is also a compact video (18:23) that shows all of the steps in turning a bowl. There is no breakdown into "chapters", so you have to watch it through or use my pointers to significant moments. Chris starts with a square blank, uses compasses to draw the circumference and a bandsaw to cut it round. I don't have that stuff, so I mount the blank to the lathe, spin it by hand to draw the circumference and then lop the corners off with a table saw. It's nice to see it done another way. In the end, we both mount the blank to the lathe with a worm screw. Nothing new here. This is a 6 inch diameter bowl. At 4:10 Chris sets the lathe speed at "400 or so r.p.m.s". I think I catch him increasing the speed at 5:20. I have 500 and 800 r.p.m. available. I'm happy with my choice of 800 r.p.m. for four-inch bowls and will go down to 500 for six-inch (and larger) bowls.   After marking the mortise / recess and the outer edge of the foot, Chris shapes the outside of the bowl will pull cuts, riding the bevel (4:19). To my eye, he seems to transition from a pull cut out from the foot across the base to a push cut as he goes around the curve to the outer wall. Later, he seems to switch to a pull cut all the way, but stops riding the bevel. I don't see Chris at any point true up the base of the bowl. He also has a quite narrow foot, something that Kent of TurnAWoodBowl warns against. Bowl Gouge - Which Way to Cut - Supported Grain Cutting Direction Woodturning Video, Turn A Wood BowlKent explains what is meant by cutting in a particular direction. "Cut with the grain" and "Cut downhill" are confusing and misleading. Instead, we should talk about "Grain supported cuts". Direction isn't important when just turning a bowl blank to round. Left-to-right, right-to-left, it doesn't matter. Just don't run off the edge or you'll get tear out. Instead, start from each side and work in. This introduces the idea of grain support. The same applies to face cuts. You can start from the edge and work toward the center or start at the center and work out (here there is no danger of peeling away end grain fibers). 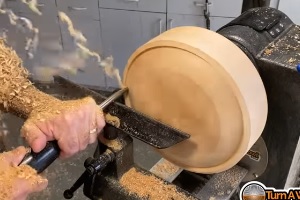 The point of the video is how to make a cut that goes "through the grain at an angle", as when we shape the side of the bowl on a curve (7:07). You can skip the analogies with a broom, a pig and celery and rejoin at 10:38. An interesting digression at 11:53 contrasts the normal side-grain bowl with the more unusual end-grain bowl. The demonstration begins very suddenly at 13:14. We see Kent beginning to shape the outside curve of a bowl with push cuts starting at the base and working around the bottom edge towards the rim (snapshot at right). At 14:07, there is a counter-demonstration in which Kent does it the wrong way and the difference is huge. Somewhat obviously, if you're making a "closed form bowl", i.e. the opening is narrower than the widest part, you work from the bottom to the widest point and from the rim to the widest point in two separate cuts (starts at 16:28). In summary, the video makes one point in very convincing detail - to shape the curved outside surface of a bowl, work from the narrow part (the base and, sometimes, the rim) towards the widest part (often the rim). Kent does this with a push cut. He doesn't mention the tool he's using, but it looks like a swept-back / Ellsworth / Irish grind on a mid-size bowl gouge.  NEVER DO These 5 Woodturning Bowl Things – Video, Turn A Wood Bowl
In summary, the video is notable for the exhortation not to use spindle tools, which, sorry Kent, everyone else seems to do when appropriate. At 12:01 there is a plug for Kent's Bowl Gouge Mastery eCourse. Bowl Gouge Beginner First Use How To Video - Woodturning, Turn A Wood Bowl4 Bowl Gouge Techniques — Push Pull Scrape Shear Cuts Video, Turn A Wood BowlStop Bowl Gouge Kick Back Technique - Woodturning Video, Turn A Wood BowlThis is a fairly short (10:44) video in which Kent explains why kickbacks occur and how to stop them. He covers two situations. The first is when starting a push cut across the face of a workpiece. This would be used on the bottom face to level the foot of a bowl and on the top face to clean up the bowl rim. The second is when bringing a push cut into the flat area at the bottom of a bowl. The cause is the alternation of side-grain and end-grain at the cutting edge. The end-grain requires more force to cut through and pushes back harder on the edge, bumping it off the ledge you're trying to establish to provide bevel support. The solution is to "close" the flute (to three o'clock) until the ledge is formed and only then open it up and begin the push cut. This makes sense to me for the first situation, but in the second the bevel support face is well established and I don't see how the same advice applies. HOW TO TURN A BOWL __ Tutorial on how to use BOWL GOUGE on cross grain work., Tomislav Tomasic Woodturning (Dodir Drva)Bowl gouge basics and how to master hollowing a bowl , Tomislav Tomasic Woodturning (Dodir Drva), |