Unpacking
The QNAP TS-233 is packaged in a simple cardboard box with no non-recyclable materials inside. newegg had put this into a corrugated cardboard shipping box with a few air-filled pillows and it arrived in perfect condition. The parts inside were:
- The network attached storage system itself,
- A universal input, 12 volt, 5.417 amp, (65 watt) power pack,
- The power pack AC cable,
- Six screws each for 3.5 and 2.5 inch drives (not four as shown in the QIG),
- A 6-foot (1.83 meter) Ethernet cable, and
- A printed 'Quick Installation Guide' (QIG)
Installing the SSDs (disks)
The 'Quick Installation Guide' is entirely pictorial, but the process is easy enough and I had no real difficulty. Translating the pictures into words, we get:
- Unscrew and completely remove the single (slotted) screw in the bottom of the NAS enclosure.
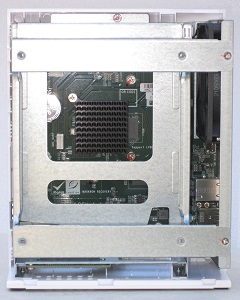
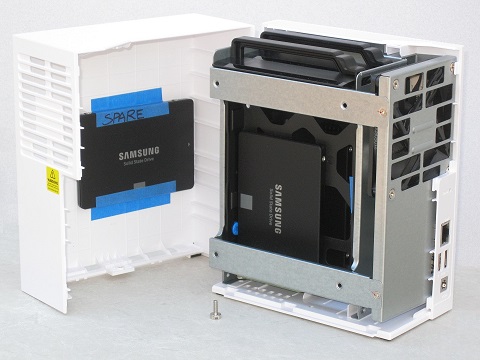
- Lay the NAS on its left side (where the LEDs and buttons are). The right-hand part of the enclosure is now upward. Lift it until it separates from the other part by about half-an-inch. Then slide it towards the top of the NAS and off.
- To remove the drive slides, pinch the retaining clip and pull them out of the chassis.
- Remove the rails, two from each slide. You'll need these for 3.5 inch hard drives (follow the instructions) but put them aside if you're using 2.5 inch drives.
- For 2.5 inch SSDs (or hard drives), secure them to the slides with three screws into holes at the edges of the face ('not' in the sides).
- Push the slides back into the chassis. The SATA connectors will engage smoothly.
- Put the right side of the enclosure back on, put the screw back in and tighten it up.
- Plug the power pack into the NAS and a wall outlet, plug the Ethernet cable into the NAS and into a gigabit switch that it also connected to your computer.
Powering the NAS On and Off
To turn on the TS-233, briefly press the power button. A beep will sound (or maybe not, if you've somehow disabled the 'alarm buzzer').
You can turn the TS-233 off in three ways:
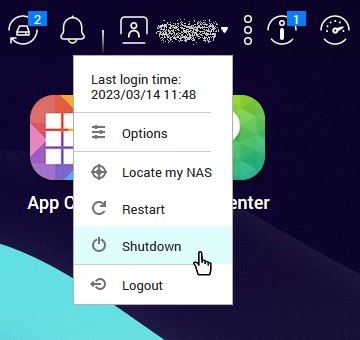
- From within QTS, while logged in to the NAS (see the next section). Click on the [USER_NAME] icon in the task bar and, in the menu that drops down, click ‘Shutdown’ (see Page 25 of the QTS 5.0.x User Guide). You might be surprised at how long it takes for the system to halt and turn itself off.
- Using the power button under normal circumstances. Press and hold the power button for 1.5 seconds (Page 40 of the TS-x33 User Guide). This will not work if you’ve selected the ‘Do not shut down using the power button’ hardware settings option in Control Panel → System → Hardware → General (Page 55 of the QTS 5.0.x User Guide).
- Using the power button under abnormal circumstances (the device is unresponsive.) Press and hold the button for 5 seconds (Page 40 of the TS-x33 User Guide).
Connecting to the Windows Network
QNAP want you to use their Qfinder Pro application to locate the NAS on your network. I didn't do this because I don't like installing programs on my Windows computer just because someone tells me to. If you decide to do this, I can't help you. Or, you can do it the way I did. I logged on to my router (OK, the router I rent from Verizon) and inspected the DHCP leases. I quickly recognized the static leases for the old NAS and the two network printers and the dynamic lease for the computer I was using and that left only one dynamic lease which had to be the new NAS. From this, I obtained the MAC address, which matched the sticker on the bottom of the unit. I created a new static lease allocating a fixed IPv4 address (such as, just for example, 192.168.0.20) to the new NAS, power cycled the NAS and checked the DHCP table again. The NAS was now at this address. On the next page, Operating System, we will make contact with the software running on the NAS by typing this IP address into a Web browser.