Introduction to Shared Folders
In a QNAP NAS, running the QTS operating system, the file “containers” that become usable over the network are ‘shared folders’. (This is different from my old D-Link DNS-321, which directly shares the volume.) So far, I have created the storage pool and divided it up into the system volume and three user volumes. Now I need to create some shared folders and make them accessible over my network. I will describe both these steps on this page as they are closely related.
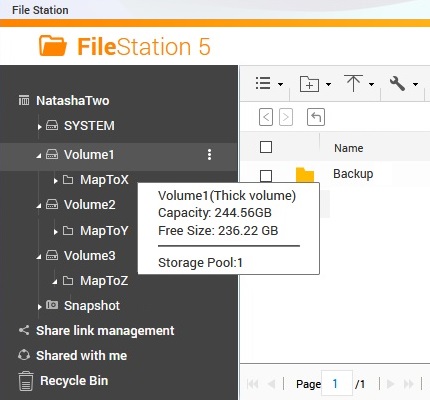
My reason for having three user volumes is that my wife would have one for her exclusive use, I would get one for my stuff and there would be one that I could experiment with, hopefully without messing everything up. My allocation of space between the volumes is not important because a) 250 GB each should be plenty and b) I can change it if necessary. Continuing this reasoning, it makes sense to create one shared folder in each volume. To use a shared folder in Windows, it must be “mapped” to a drive letter, for example X:. Then it can be used to store ordinary folders and files in exactly the same way as the familiar drive C: or a USB stick that you plug in that becomes, perhaps, drive D:. In this way, the entire capacity of a NAS volume is made available for use just as if it were another drive in the computer.
After some experimentation, I discovered that the name I give to a shared folder shows up in Windows File Explorer as belonging directly to the NAS (which I gave the name NatashaTwo). The volume name does not appear. After mapping the shared folder to a drive, File Explorer displays it with that folder name first, then the NAS name in parentheses and finally the drive letter (we’ll come to all this again later). So, as a reminder during mapping and to make the identity of each network drive very clear after mapping, I decided to use folder names of the form “MapToX”. I considered naming the folders after their intended purposes, but I was squeamish about having data folders named after people hanging about on the household network.
Now that I have explained where I’m going with this, I will get on with it. A few extra details will pop up, such as hiding the shared folder of the system drive. I should, perhaps, mention that I’ve looked ahead to the off-site backup process enough to know that I will not regret the decisions I’m making here. Not immediately, anyway.
Creating Shared Folders in User Volumes
Having used the ‘Storage & Snapshots’ tool (app?) to create the storage pool and volumes, I now have to switch to ‘File Station’ to manipulate folders. (How functionality is distributed among tools in QTS makes little sense to me. To make matters worse, you can’t delete a shared folder in File Station. For that you have to use ‘Control Panel’.) Here are the steps to create a volume:
- Open ‘File Station’. In the dark panel on the left, you will see at the top the name that you gave to the NAS back when you set up the Operating System. There may be an indented list of items underneath it. If there isn’t, open it up by double-clicking on the NAS name.
- Hover over the row listing the volume in which you want to create a shared folder. The row will turn medium-grey and a properties pop-up will appear. (If anything looks ‘selected’ with orange text on a darker background, just ignore it; it doesn’t seem to matter.) To the right of the volume name, look for three dots in a vertical row (see the screen capture to the right). Carefully left-click on this and select ‘Create a Shared Folder’.
- The ‘Create a Shared Folder’ dialog appears with ‘Step 1/3’ at the bottom left.
- Enter the shared folder name. I would enter, for example, “MapToX”. You might enter “MyRippedCDs”, “FredsPhotos” or “DailyBackups”.
- If you like, enter a comment. I have not found this to show up anywhere but in File Station, so it is of limited use, especially if you’ve chosen the folder name well.
- Check that the ‘Disk Volume’ is the one that you wanted.
- Next to ‘Path’, leave ‘Specify path automatically’ selected. Or, if you know what you’re doing, select ‘Enter path manually’ and enter a path. I don’t know what this does, the default works fine for me, so I leave it alone.
- Leave ‘Folder Encryption’ unchecked. Or, if you know what you’re doing, check it and enter the password. I am not using encryption.
- Click ‘Next’ to go to Step 2/3, ‘Configure access privileges for users’ (assuming you’ve entered all the required information).
- Step 2 is all about which users will be able to access the shared folder. For our present purposes, "access" means mapping it to a drive letter in Windows and using it like any other drive. You’ll see that the (disabled) ‘admin’ user has ‘No Access’ and you (the replacement administrator) have ‘Read/Write’ access. If you’ve jumped ahead, there may be other users, but here we’ll come back to them later.
- Click ‘Next’ to go to Step 3/3, ‘Properties’.
- Leave ‘Guest Access Right:’ set to ‘Deny Access’. Or, if you know what you’re doing, select ‘Read only’ or ‘Read/Write’. I thought that fiddling with this might allow access without providing credentials (see below), but it doesn’t seem to. Maybe it refers to access by people logged in to the NAS who haven’t been granted explicit rights.
- Leave the property ‘Lock File (Oplocks)’ checked and uncheck everything else on this page. You may also want to leave ‘Enable Network Recycle Bin’, but in my experience most people don’t even use the Windows desktop recycle bin so this would just waste space and add confusion. I haven’t even tried this option out.
- Click ‘Finish’. You can use the ‘Back’ button to return to previous steps without losing your work. If you’ve changed your mind, you can also go back to find a ‘Cancel’ button. There isn’t one at the final step, but you could probably use the ‘x’ in the top-right corner. It takes just a few seconds to create the shared folder.
- I skipped over a few things. In Step 1, there is text stuffed in between ‘Comment’ and ‘Disk Volume:’ stating that the ‘Snapshot Schedule:’ is ‘Daily, 01:00’. I don’t want to figure out snapshots at this point and I’m just hoping that this is OK to leave alone. Below ‘Disk Volume:’, there is greyed-out text about ‘Qtier Auto Tiering'. This is something else I haven’t figured out yet. I also skipped over allmost of the ‘Properties’ in Step 3/3. I’ll revisit ‘Hide network drive’ below. The others, I may or may not figure out in due course.
As well as creating new shared folders, we can use File Station to modify those that we’ve already created (but not to delete them).
- In the list of items under the NAS name, locate the system volume. In my case, I gave it the name “SYSTEM” and you can see it at the top of the list in the screen capture above. Open the list of items underneath the system volume by clicking anywhere on its row. (Don’t double-click, That’s for the NAS name at the top. If you try that here, the list will just open and then close again.)
- There will be, in this list, a shared folder named ‘Public’ (probably the only item). QTS created this by itself when it noticed that you’d created the first shared folder and appropriated it as the system volume. Right-click anywhere in the row and, in the menu that pops up, click ‘Properties’ right at the bottom.
- A dialog pops up. Make sure that ‘Properties’, on the left, is selected (more prominent that ‘Permissions’, on the right). Click ‘Shared Folder’ at the very bottom.
- The ‘Edit Properties’ dialog opens. What’s here is a mixture of information from Steps 1/3 and 3/3 of the ‘Create a Shared Folder’ dialog that we met above. The stuff from Step 1/3 is greyed out to the point that it’s almost illegible, but of some interest might be the ‘Comment’ added by QTS, which is ‘System default share’. This phrase appears nowhere in either User Guide. Anyway, our purpose in coming here is to check ‘Hide network drive’, so do that thing. Leave everything else as it is.
- Optionally, take note that ‘Enable Network Recycle Bin’ is checked. You could uncheck it. I left it checked. I have no idea what this folder is for, I’m turning off its network visibility, so I care very little about it having a recycle bin.
- Click ‘OK’. Click ‘Yes’ in the warning pop-up. It will take just a few seconds to make this change. Both dialogs will close and you’ll be back at FileStation.
- If you’re interested, open the list of items under ‘Public’ to see if there’s anything in this folder. Don’t double-click, as for the NAS name, and don’t just click somewhere in the row, as for the volume. For a shared folder there is a third method. You need to click very precisely on the little arrow next to the folder icon. (Why use a single method to achieve something when you can use three different ones in a single item tree?) You may see an item called ‘@Recycle’ with the three-folded-arrows recycle symbol to the left. Plainly, this is the ‘Network Recycle Bin’ that we can enable or not. I have never seen anything in it.
I’m really done here and you should probably skip to the next section because I’m going to tell a story. I started out with a shared folder named ‘Archive2’. I was using it just to try stuff out. Then I settled on the names I described above and needed it to be ‘MapToX’. My first instinct was to delete ‘Archive2’ and start again, but I couldn’t find a way, in File Station, to delete a shared folder (there isn’t one). Plan B was to rename ‘Archive2’ to ‘MapToX’.
This starts out in the same exact way as hiding the ‘Public’ folder in the system volume, but we’re in a user volume, looking at a folder that we created, not QTS. The stuff at the top of the ‘Edit Properties’ dialog is not greyed out, so we can change it. OK, fine, I can change the folder name and the comment and ... wait, I can change the disk volume? And the path, which I left as ‘Specify path automatically’ when I created the shared folder, is now filled in as ‘/Archive2’. I can have a folder name different from its path in the root folder? Or should I change both to still be the same?
What I did was to chicken out. I searched harder for a method of deleting shared folders. You have to use ‘Control Panel’. There, in the ‘Privilege’ group, click on ‘Shared Folders’. Check the selection box to the left of the row for the folder you want to delete and then click the ‘Remove’ button. This was scary, but it worked and I had little to lose anyway; I could just start everything over again if I got into a big mess. As you can probably tell, I’m having a problem trusting QNAP’s software.
Finding the NAS on a Windows Network
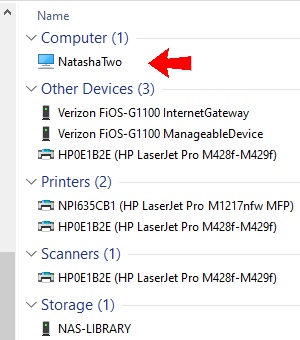
At the very bottom of the navigation pane of Windows File Explorer (the left-hand side), there is an icon that represents the network. If you click on this, Windows will try to display, in the right-hand pane, the devices connected to your network (I say “try”, because I’ve not found this to be 100% reliable). You should see your Internet gateway, network printers/scanners, and computers (other than yours) presently connected to the network. You should also see the NAS. My old DNS-321 showed as ‘Storage’, which made sense, but the TS-233 is grouped with the computers.
If this doesn’t work, make sure that network discovery is turned on in the active network profile. Go to Control Panel → Network and Sharing Center → Advanced sharing settings to check this. Note that the ‘Network and Sharing Center’ button on the ‘File’ ribbon takes you instead to Settings → Network Status, but you can get where you need to be with one more click. A restart may also help.
Once the NAS shows up, go back to the navigation pane and click the > icon to expand the network as if it were a folder. The NAS will appear, listed under the network as if it were a sub-folder (which, in a way, it is). Other computers may also appear. Now, in the same way, try to expand the NAS. You will get a ‘Windows Security’ pop-up, telling you to ‘Enter your credentials to connect to: [TheNAS]’ and offering to ‘Remember [your] credentials’ for you. Don’t enter your Windows username and password. This does not work. You need to supply a username and password known to the NAS.
Entering Credentials to Access the NAS
To move past this point on the notebook computer that I normally use, I had simply supplied the username and password with which I was logging in to the NAS. However, I want to know that I can allow other people to use a restricted set of the shared folders. So I moved to the library computer, which my wife and I share. I want to give it access to my wife’s shared folder and my shared folder but not to the experimental one or to any USB hard drives plugged in to the NAS (which I haven’t written about yet). Recall that the ‘Public’ shared folder in the system volume isn’t even visible on the network (see above).
First, we need to create a new QTS user.
- Open ‘Control Panel’. On the left, look for the ‘Privilege’ section and scan across to the right to find ‘Users’. Click this.
- The display changes to squeeze everything that was on the opening page over to the left, leaving room for a working area on the right. It shows a list of the users registered on the NAS. There’s the disabled ‘admin’ account and the account I’ve been using since it was disabled (which is in the ‘administrators’ group). To create a new user, click the ‘Create’ button and, in the drop-down that appears, select ‘Create a User’.
- The ‘Create a User’ dialog appears.
- Enter a username. I chose “Household”. Optionally, enter a description.
- Enter a password, then re-enter it for verification. There’s a checkbox that shows the password instead of a row of dots.
- Optionally, enter a mobile ‘phone number and/or an e-mail address. I think this is just information stored in the user record where an administrator can get at it. The NAS isn’t going to call you up on the ‘phone. The e-mail address may be used for notifications (which I haven’t yet figured out).
- Scroll down to see the option ‘user must change the password at first logon’. The meaning of this is clear, so either check it or don’t check it. (I think that, in general, administrators do not know users’ passwords, although they can change them when necessary, and this option makes that practice possible.)
- Also by scrolling down, find the ‘Send a notification mail to the newly created user’ option with an ‘Edit Message’ link. This seems rather hokey, but I may try it someday just for giggles.
- Over on the right-hand side, check the user groups to which the new user will belong. Use the ‘Edit’ button to select and un-select groups or even create a new group from right here. I have not created any new groups, so I just have ‘everyone’ and ‘administrators’. My new user will be in ‘everyone’ (which can’t be changed) but not in ‘administrators’.
- Further down, define the user’s ‘Shared Folder Permission’. Again, use the ‘Edit’ button to make changes. By default (as far as I can tell), a new user has ‘Read Only’ access to the Public folder of the system volume and ‘No Access’ to anything else. (I note that folders are listed by name only, without their volumes. What would happen if there were folders with the same name in more than one volume?) I changed the Public folder to ‘Deny’ and granted ‘Read/Write’ access to my wife’s shared folder and my shared folder.
- At the bottom on the right, check that the user has the desired application privilege. I’m not expecting this user to actually log in to the NAS, so I un-granted all Application Privileges except Microsoft Networking. I don’t even know if that is needed, but it sounds dangerous to turn it off.
- Click the ‘Create’ button (or ‘Cancel’, if you’ve changed your mind). The new user appears in the list. There are buttons to change everything you entered during creation of the user.
OK, now we have a user with appropriate shared folder permissions. Back to trying to expand the NAS in Windows Explorer so that we can see the shared folders inside. When the ‘Windows Security’ pop-up appears, enter the username and password of the new user just created (above). As I want our library computer to always have access to shared folders, I checked both ‘Re-connect at sign-in’ and ‘Remember my credentials’. If you are just trying things out, you may not want to do this.
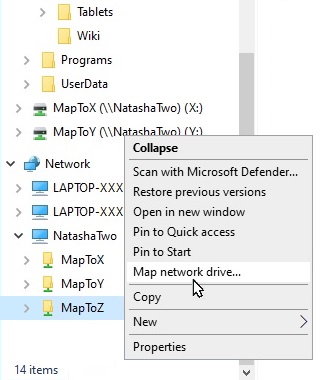
Now the NAS (“NatashaTwo”) expands to reveal all the shared folders that are not hidden (see the screen capture at right). These folders can be further expanded to show their contents, but only if access permission was granted to the user whose credentials were used. In my case, from the library computer I can expand two folders but when I try to expand the third (the experimental one) I am told ‘Access is denied’ and asked for new credentials.
Mapping Shared Folders to Drive Letters
Actually mapping the shared folders to drives is very easy. Just right-click on the shared folder (listed under NatashaTwo) and select ‘Map network drive...’. Pick the appropriate drive letter in the drop-down, make sure that ‘Reconnect at sign-in’ is checked and ‘Connect using different credentials’ is unchecked, then click ‘Finish’.