|
Introduction TS-233 Basic Setup
Advanced Setup |
Overview of System Setup The Easy Stuff is OverSo far, this is what I've done:
Now Comes the Difficult PartThe above was all obvious and inevitable. I was guided through by the system and pretty much just did as I was told. From here on, things were different. The software still tried to guide me, but began asking questions about things I didn't really understand. Increasingly, I lost track of exactly what I was accomplishing, which steps were necessary, rather than optional, and to what extent I'd be able to backtrack and correct things I'd getting wrong. My confidence in the QNAP documentation also began to fade. I'd got through the TS-x33 User Guide and was now referring to the 535 page QTS 5.0.x User Guide. But, this read as a reference document, not a guide at all. It assumed I knew exactly what I was doing (which I didn't) and just told me in excruciating and repetitive detail how to do it. My progress slowed to a crawl, I constantly made mistakes and had to backtrack and repeat steps. Frustration set in. In the following pages, I'll describe first what I did that got me where I wanted to be. I'll try to explain my choices and where I found useful information. After that, I may mention the mistakes I made and how I recovered from them. I'll finish this page with the overview promised in the title. 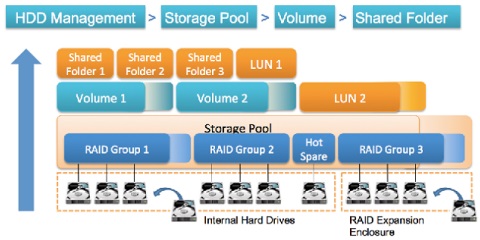
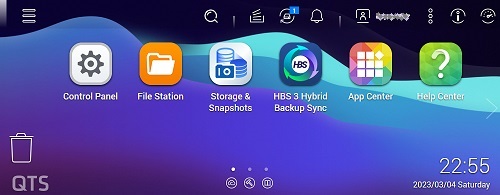 But First, A Little HousekeepingAt the end of setting up the QTS operating system, after disk drive initialization, I was given the prompt ‘Go to NAS Management’. On the way, before the Desktop appeared, I was instructed to read QNAP's Data Privacy Notice. I don't see much point in this. They're all the same and there's not much I can do if I object except take it all apart and return it. Then I wouldn't have a new NAS. So, I ignored this and will just continue to try to prevent QNAP from harvesting my data in the first place. Finally, I was at the QTS Desktop. (To get the screenshot at right I shrank the browser window a lot; everything is much more spread out at a usable window size.) The 'Task Bar' (along the top) is described starting on page 23 of the User Guide. This is worth a read. It boasts that everything can be done in multiple ways, something that I don't like at all. Below the task bar, the screen was flooded with wizards, providing yet another way for me to do stuff I didn't yet understand. TO DO - Write up diary notes from February 19th, 2023 about the Notice Board.
|