ownCloud? WebDAV? What’s All This About?
It was not one of my prime objectives to have cloud backup of the new NAS. But, I was interested to see if it’s possible, and how well it works (this interest being tempered somewhat by my miserable experience setting up everything else).
I subscribe to a shared Web hosting service (that’s where you’re reading this Wiki) for about $60 per year. Along with a Web site, e-mail server, Wiki, etc., I get the use of 15 GB of disk storage. That’s not a lot, but it’s included in the price. To make use of this, I have been running the ownCloud server-side software and have the Windows client installed on several computers around the house. Changes that I make to files in a particular folder (and its sub-folders) on any computer are synchronized to the others and backed-up on my shared server (which is in a data center in Denver, Colorado). I’ve been using this for the revision control repository for software projects, such as my Sudoku solving program.
ownCloud includes a server-side implementation of WebDAV. That means that a “user agent” can create, read and write files and folders (directories) on my server storage from somewhere else on the Web. The ownCloud Windows client, mentioned above, is an example of such a user agent. The QTS operating system that runs on a QNAP NAS includes a WebDAV client / user agent. If I configure that to access my server, then my NAS (NatashaTwo) will be able to use my 15 GB of storage as a backup destination. Then I have an off-site backup in a secure data center without trips to the safe deposit box at the bank.
Creating a new User in ownCloud
It’s almost certainly a good idea to dedicate a particular user account on your ownCloud server to managing storage you intend to use for backing up a NAS. You can use an existing user, or you can create a new one as follows:
- Log in to ownCloud as a user that is a member of the admin group.
- Click your username in the top right corner and select ‘Users’ in the drop-down menu. The ‘Users’ screen will appear, displaying a list of the present users.
- In the fields along the top of the screen, enter the new user information:
- ‘Username’ — Enter a name by which the new user will be known.
- ‘E-Mail’ — Enter a valid, working e-mail address for the new user.
- ‘Groups’ — Select the group or groups of which the new user will be a member. Create a new group if you need to.
- Click the ‘Create’ button. The new user will be added to the list. You can make the following changes to the user’s account:
- ‘Full Name’ — The default full name is the same as the Username. Click on the entry to change it. Edit the name as you wish and hit the enter key. You cannot use spaces (there may also be other characters you can’t use).
- ‘Groups’ — You can change your mind about the groups to which the new user will belong.
- ‘Group Admin for’ — You can give the new user admin privileges for one or more of the groups to which they belong.
- ‘Quota’ — You can give the new user a storage quota.
- An e-mail message will have been sent to the e-mail address you provided. This will contain a hyperlink which you must click. This will take you to the ownCloud ‘change password’ screen. Choose a password for the new user and remember it or record it somehow.
- ‘New password’ — Enter the password.
- ‘Confirm password’ — Re-enter exactly the same password.
- Click the ‘Set Password’ button. You can close the browser window and also delete the e-mail. You’ll get another one at the same address assuring you that the password was changed successfully. You can delete that too.
Now you can log into your ownCloud server as the new user. The first time that you do this, there may be a pause of several seconds and you may get a promotional pop-up. You will start in the ‘Files’ view. Some folders have been created for you and you can poke around in them to see what’s there. If you’re using this as storage for backing up a NAS, it will probably just be in your way and you should delete it.
Obtaining an ownCloud User’s WebDAV URL
- Log in to ownCloud as the user that you decided would own and manage the storage you intend to use for backing up the NAS.
- Make sure you are in the ‘Files’ view (look in the top left corner). If you are not, use the hamburger menu to switch to that view.
- Click ‘Settings’, or the gear icon next to it, in the bottom-left corner. Two items will appear.
- ‘Show hidden files’ does not concern us here.
- ‘WebDAV’ — This is followed by a URL and then the explanation “Use this address to access your Files via WebDAV”. You can select the URL and hit Ctrl-C to copy it. The URL looks like this: https://ecrostech.com/owncloud/remote.php/dav/files/TestUser/. This is what you need to give to an ownCloud client (or “user agent”) so that it will access the files stored for this particular user. (You will also need to give the client the Username and Password.)
Creating a WebDAV Storage Space in Hybrid Backup Sync
Configuring the WebDAV client to gain access to storage on the server is done using Hybrid Backup Sync, not the QTS operating system itself. Documentation for this is not included anywhere in the 536 pages of the QTS 5.0.x User Guide. I found it online in the HBS 3 section of the QTS 4.5.x User Guide.
- Open ‘HBS 3 Hybrid Backup Sync’. In the blue panel on the left, click on ‘Storage Spaces’.
- Still towards the left, click the ‘Create’ button below ‘Storage Spaces’.
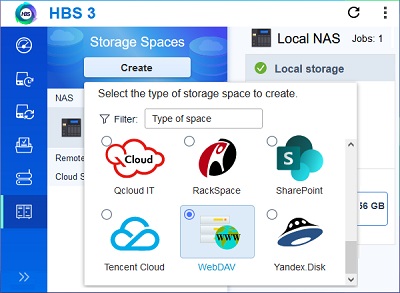
- A drop-down appears, inviting you to “Select the type of storage space to create”.
- Scroll to the bottom and click WebDAV (see the screen capture, at right).
- The ‘Create a Storage Space’ pop-up opens. Check that ‘WebDAV’ appears under the title. In this window, configure the storage space settings:
- ‘Name:’ — Enter a name that you will use to identify the storage space. I chose “EcrosTechServer” because the storage is on the ECROS Technology server. Maybe a better choice would have been “NasCloudBackup” because that’s the intended use.
- ‘User ID:’ — Enter the ownCloud Username through which you will access the storage. Since my nickname for the Network Attached Storage system is “Natasha”, I created an ownCloud user specifically for this purpose and made the Username “Natasha” (the full name is “NatashaTwo”).
- ‘Password:’ — Enter the password corresponding to the Username.
- ‘Server URL:’ — Enter the URL through which the user named above gains access to files on the server.
- ‘Use a proxy server’ — This option is explained as follows: “Allows you to use the system proxy server or configure another proxy server.” I left it unchecked.
- ‘Validate SSL certificate’ — This option is explained as follows: “Verifies the validity of the cloud services SSL certificate.” I left it checked. It seems like a good idea.
- Click Create. HBS 3 creates the Storage Space. This takes a little while, not more than a few minutes, however. I assume that there is some one-time setup to do. The WebDAV Storage Space is listed in the ‘Storage Spaces’ view of HBS 3 and also in the ‘Overview’.
Creating a Backup (“Sync”) Job in Hybrid Backup Sync
Now that a Storage Space is available, via WebDAV, on my rented server, I can use it as the destination of a backup job. I began with a small test to make sure all this worked before putting effort into a proper backup plan. This was a job to create a replica of a NAS folder on ownCloud. By “replica”, I mean that, after running the job, what’s on ownCloud should be the same as what’s on the NAS. New files should be copied over, changed files should be updated and files that are no longer there should be deleted.
- Open ‘HBS 3 Hybrid Backup Sync’. In the blue panel on the left, click on ‘Sync’.
- Still towards the left, click the ‘Create’ button below ‘Sync’ and, from the drop-down, select ‘One-way Sync Job’.
- The ‘Create a Sync Job wizard appears. The first step is ‘Select folders’. The ‘Select the destination storage space’ pop-up is already showing. A well-designed user interface would have you select among the existing storage spaces. If you want one that doesn’t yet exist, you should be prompted to create it as described above. What actually happens is that the creation of a new storage space is also jammed in here. So, you begin by selecting the type of storage space you’re looking for.
- Scroll to the bottom and click on WebDAV. What happens now if you have created a single WebDAV Storage Space, as above, is that a new panel appears in the pop-up with ‘Add new account’ at the top and the ‘Name’ and ‘User ID’ of your existing Storage Space below (for example ‘EcrosTechServer natasha’). There is a selection circle to the left of this and it appears to be selected. There is an edit icon to the right. So, you have the ability to create a new WebDAV Storage Space or make changes to one you’ve previously created from here. Since you got here with the intent of creating a sync job, I don’t think this is a good idea. I’m not even going to guess what happens when you click on WebDAV in other cases.
- Just click the ‘Select’ button. Ignore the new panel. The pop-up rolls up to reveal the first step of the wizard. The destination storage space is already filled in on the right about half-way down (but there is nothing to tell you what this is). Check that it is correct. If it isn’t, there’s an edit icon to the right which brings back the pop-up, but I would quit, take a walk around the block and start again.
- ‘Job Name:’ — Enter a descriptive name from which you will recognize this job. It cannot contain the characters /, |, \, :, ?, <, >, * or ".
- ‘Description:’ — Enter a description of the job, which you will probably never see unless you’re creating or modifying the job itself.
- ‘Action:’ — Use the drop-down to select the ‘Mirror’ action. The alternatives are ‘Copy’ and ‘Move’, neither of which results in filesystem synchronization. Clicking on the ‘Learn about actions’ somewhat clarifies the difference (but, does ‘Move’ delete destination files that weren’t in the source?).
- ‘Map external volume’ — Leave this unchecked. It is not mentioned in any documentation that I have found.