|
Introduction TS-233 Basic Setup
Advanced Setup |
Setting Up One Touch CopyUSB One Touch Copy Button The USB One Touch Copy button allows you to copy data backups from a USB device to the NAS or from the NAS to a USB device. This feature supports incremental backups. The NAS only copies files that were modified or added after the last backup. To configure the behavior of the button when an external device is connected to the button's USB port, install and use Hybrid Backup Sync on your QNAP operating system. For details, see the Hybrid Backup Sync documentation. The USB One Touch Copy Button (and USB Port, and LED)The 'USB One Touch Copy Button' is described on page 43 of the QNAP TS-x33 User Guide. The description is so brief that I include it here in its entirety (in the frame on the right). Searching the document for the word "touch", you can also find out that only the front USB port supports this feature and that there is an LED to tell you how things are going. The only mention in the QTS 5.0.1 User Guide is a note that it won't work if you 'Disallow USB Devices'. With only five sentences of documentation, it's a shame that the second one is misleading. USB One Touch Copy does not support incremental backups in the way that this term generally implies. It just copies changed and added files on top of the file structure that is already there. It would be better to entirely avoid the use of the word 'backup' and stick to 'copy'. Hybrid Backup SyncAfter some head scratching, I realized that One Touch Copy isn't a native function of the TS-233 or the QTS operating system. It is a function of the Hybrid Backup Sync app. I have a separate page about how I installed this, learned about it and what else I've done with it (if anything). Here I want to focus just on One Touch Copy as it is a major reason for me selecting this NAS.
Configuring USB One Touch CopyHybrid Backup Sync (hereinafter HBS 3) does not appear to have a user manual but is instead documented as an online tutorial article. In the contents section, click on Configuring USB One Touch Copy. The instructions seem fairly straightforward. It was not until I tried to carry them out that things began to go pear shaped. 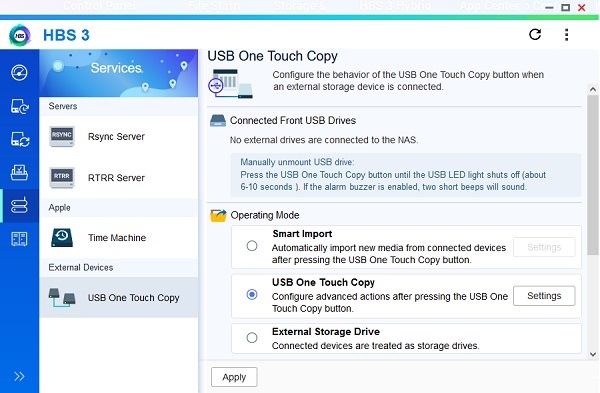 Having started HBS 3, on the left I clicked ‘Services’, which has an icon a bit like a hamburger with a toothpick in it. On the page that appeared, I clicked ‘USB One Touch Copy’, which is the only entry in the ‘External Devices’ section at the bottom. The heading on the right confirmed that I was in the right place. There’s a note about manually unmounting a front-connected USB drive. I cannot find this in the documentation, so it’s good job I noticed it. You have to press the One Touch Copy button for 6 to 10 seconds, until the USB LED goes off and there are two short beeps. I discovered (below) that this works only if ‘Manually unmount USB drive’ is enabled and that it's actually one slightly-longer-than-normal beep, not two short ones. This beep does not sound if ‘Enable the alarm buzzer’ (below) is unchecked. From the options offered in ‘Operating Mode’, I selected ‘USB One Touch Copy’. To the right, the ‘Settings’ button became enabled and I clicked on it. There are two parts to the page that appeared next. I did nothing (for now) about the second one, ‘Notifications’. I’ve not configured the ‘Notification Center’ and have no idea what the instructions here mean. I left the ‘Send a notification when:’ boxes unchecked. The first part, ‘Select Folders’, is about a lot more than selecting folders. In fact, I’ll leave selecting folders to last and begin with the straightforward stuff. In ‘Backup mode:’, I selected ‘Back up to connected USB drive’, the alternative being ‘Back up to NAS’. Nowhere can I find an explanation of what this means. In ‘Backup action: ’, I selected ‘Copy’ because this is the easiest to understand. The tutorial text is just replicated from what appears underneath this drop-down when I made the selection. I will come back to this and experiment. Skipping over the selection of folders, I left ‘Manually unmount USB drive’ checked. It took a lot of experimentation (below) to discover that this was the right choice. If it is unchecked, then you can't unmount a drive from the front USB port by pressing the USB One Touch Copy button, as described above. Nothing happens. You have to use QTS to unmount the drive. I also left ‘Enable the alarm buzzer’ checked (for now). My hope is that this enables the alarm for operations related to USB One Touch Copy only. There is a beep when a copy starts. There is no beep when the copy completes. At the very bottom of the page, the method of manually unmounting the front-connected USB drive is repeated. There are also three more critical pieces of information that I have not found anywhere else:
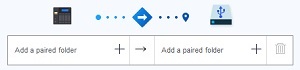 Selecting Paired FoldersOK, I can’t put it off any longer. Selecting folders. The tutorial gives the following guidance - “Select the paired folders”. No, wait, I do the QNAP Technical Publications department an injustice! By searching the entire tutorial for the word “paired” I find that the selection of paired folders also comes up in the ‘Creating a One-Way Sync Job’, ‘Creating an Active Sync Job’ and ‘Creating a Two-Way Sync Job’ sections. In all of these, seven steps are laid out. It’s only in ‘Configuring USB One Touch Copy’ that we are left to figure it out ourselves. Here are the steps: a. Under the source, click +. A dialog box opens. b. Select a folder. c. Click OK.
d. Under the destination, click +. A dialog box opens. e. Select a folder. f. Click OK.
g. Optional: Repeat the previous steps to add additional paired folders.
There’s also a pencil-and-paper icon which we can click to edit an existing folder (which I assume means change your mind about which folder to use) and a trash can icon which we can click to delete an existing pair. I should perhaps mention that it was my assumption that, for each folder pair, everything in the source folder (on the NAS) would get copied into the destination folder (on the USB drive) and that there would be no interference between pairs. Selecting the source (which I assumed correctly is on the left) went OK without these instructions (which I discovered later). At the time, I had on the NAS only one volume containing a single shared folder. The ‘dialog box’ (actually, a simple file browser) allowed me to navigate to the shared folder and select it. Selecting the destination (on the right) was another matter. At first, I got nowhere at all. Without even the meager guidance I discovered later, I was just trying stuff at random. There’s a text entry box in the file browser that wasn’t there for source selection. It has the tool tip “Specify a path”. Beside it is a folder-with-a-plus-sign-in-it icon. I recall expecting to be able to ... well, to specify a path for the destination relative to the root folder of whatever drive I plugged in. This did not work. After a while, I decided to try with a drive plugged in. I used one of the 1 TB Western Digital ‘easystores’ that will be the off-site backup drives when all this is working. A pop-up also appeared asking me what I wanted to do. I answered ‘Use this device for backup’ and the pop-up went away. (Will I get this every time? What if I’m not logged in? See below.) Now there was a new ‘folder’ that I could select as the destination. It was named ‘FrontUSB1’ (but turned out not to be a folder at all, just a name for the root of the drive that I plugged in). Also, selecting this ‘folder’, typing something in the text entry box and clicking the icon appeared to create a new (real) folder that I could also select as the destination. Expecting all to be well, I clicked ‘Apply’. HBS 3 disappeared from the screen. OK, I guess it’s really, really important to have a drive plugged in while you configure USB One Touch Copy. I started HBS 3 back up, went through everything again (with the drive connected), checked that it had stuck and closed HBS 3. In the QTS toolbar, there is a drive-with-an-arrow-around-it icon, which pops up a list of ‘Connected external devices’. The front-connected USB drive is here. (Note to self: give drives distinctive names. QTS doesn’t tell you which port the external drives are plugged in to.) There’s a eject button for each drive, so I was able to disconnect. The blue LED went out. I looked at the drive in Windows and found it unchanged, with no ‘FrontUSB1’ folder. Trying It OutI had made my best guess at each setting. It was time to try it out. I copied a folder containing 4.55 GB of data from the old NAS (Natasha) to the only shared folder on NatashaTwo. I plugged the USB drive back in and the ‘what do you want to do’ pop-up came back. Again I selected ‘Use this device for backup’, but this time, I also checked ‘Do not ask me again’. (So I have an answer to my earlier question, but suppose I change my mind? I probably won’t, but it would be nice to know where to go to select something else.) Out of total paranoia, I started HBS 3 and inspected the USB One Touch Copy settings. As far as I could tell, they were unchanged. Back up to connected USB drive, Copy, from the sole shared folder, to the root of the USB drive, Manually unmount USB drive, Enable the alarm buzzer. I closed HBS 3. OK, here we go. At this point I hadn’t found the instruction on how to start the copy, so I gave the button a good, long push, fortunately not enough to unmount the drive (I hadn’t found that instruction either). By the wall clock, the flashing of the blue USB LED lasted about 80 seconds. Out of pure luck, I saw ‘notices’ sliding out and back on the QTS desktop. Using the letter-i-in-a-steering-wheel icon, I took a look at them. One reported the start of the copy and the other the completion. The difference between the timestamps was 68 seconds. Assuming there’s some more-or-less fixed housekeeping overhead before and after, I’m happy to use this figure rather than stare at the clock. 4.55 GB in 68 seconds is 67 MB/s (536 Mbit/s). That’s over half the CrystalDiskMark sequential write speed of 120 MB/s that I’ve measured for the WD easystore USB drive on my notebook. (The 5.0 Gbit/s USB 3.0 raw data rate and 500-plus MB/s read/write speed of the SATA 3.0 Samsung EVO SSD are not limitations.) If the amount of data I have to back up grows to, say, 100 GB, then I can expect the copy to take around 25 minutes. This is better than I expected. 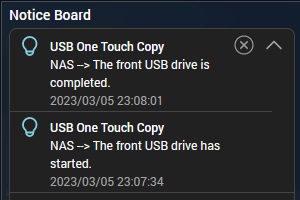 The blue LED was still on; the drive was still mounted. I pressed the button for seven seconds and the blue LED started flashing as the drive unmounted, so I let go of the button. ‘Manually unmount USB drive’ apparently means ‘leave the drive mounted so that I can manually unmount it’. This was the wrong choice; for this to be of any use, I’d have to log on to the NAS and go poking around in the USB drive for some reason I can’t right now fathom. I will uncheck this option. So, What, Exactly, Happened?I plugged the USB drive into my Windows notebook. The test folder appeared at the root. Again, there was no ‘FrontUSB1’ folder; this is some kind of phantom folder made up by HBS 3 to give you something to select. The Windows properties of the test folder on the NAS and the copy on the USB drive are identical (same number of bytes, files and folders). So, what I’ve got is a just a straight copy, as if I’d done it from Windows. Almost certainly, if I had put more folders into the shared folder of the NAS, they would also have been copied to the root of the USB drive (confirmed below). This is all exactly what I want. I’m getting a complete and exact copy of the NAS shared folder on the USB drive that will go into the safe deposit box. This means that anybody with basic computer literacy will be able to get the data back if I should take it into my head to run away with NatashaTwo.
In pursuit of an answer to the ‘Copy’ versus ‘Synchronize’ question, I entered the query “copy synchronize” in the ‘How To’ area of the QNAP Web site. I was surprised to get a useful-looking result. The full text of the FAQ article was as follows: The Copy action on USB one touch copy:
Backup all data to the destination folder, Any duplicate destination will be overwritten with the source data. Any destination data that doesn't also exist in the source folder will keep saved.
The Synchronize action on USB one touch copy:
All data is copied from the source to the destination. Any duplicate destination will be overwritten with the source data. Any destination data that doesn't also exist in the source folder will be removed.
Ignoring the difference between ‘Backup all data to the destination folder’ and ‘All data is copied from the source to the destination’, it seems that the difference is what happens to data that has been deleted from the source. With ‘Copy’, it is kept; with ‘Synchronize’, it is removed. This is simple enough, if correct. Why not just come right out and say that? Further ExperimentationAdding a Second Folder with More DataI added another 1.49 GB of data to the NAS in a second folder and pressed the button again, this time just until the flashing began, to start the copy. The difference between the start and completion notice timestamps was 27 seconds, for an average transfer rate of 55 MB/s. Again, Windows properties of the source and destination folders were identical. However, why wasn’t the original folder copied again? What criteria does the NAS use to decide not to do this? What’s the difference between the ‘backup actions’ ‘Copy’ and ‘Synchronize’ (see note panel on the right)? Changing a Few Files and Paying More AttentionBy looking at timestamps, I found that a few files in my test folder on the old NAS (Natasha) had been changed or added during the normal course of events. I copied just these onto the new NAS (NatashaTwo), overwriting the originals of changed files. In HSB 3, I unchecked ‘Manually unmount USB drive’ and clicked Apply. I plugged the USB drive back into the NAS. Nothing happened for 4 seconds. Then the blue LED flashed for 6 seconds before settling down in the on state. ‘Detected external device’ appeared on the Notice Board. I pressed the USB One Touch Copy button for a couple of seconds. The blue LED flashed for perhaps 30 seconds. There was a beep, but it was nearer the start of this period than the end. The difference between the start and completion notice timestamps was 13 seconds. The blue LED was still on and QTS indicated that the USB drive was still mounted. I recalled that I could not (even accidentally) start another copy, so I pressed the button for ten seconds to unmount the drive. Nothing happened. I tried twenty seconds. Again nothing. I have a third idea about what the ‘Manually unmount USB drive’ option does. It enables / disables unmounting by pressing the button for 6 to 10 seconds. There is no way to have the drive unmounted automatically at the end of the copy. I’ll have to do it all again to test this, so I used QTS again ... Wait! There are now two ‘notifications’ (these are different from notices and are under the bell icon in the toolbar). They read ‘[USB One Touch Copy] “Unmount the front USB drive” is not set.’ This all stacks up if we assume that this refers to the ‘Manually unmount USB drive’ option. Two notifications because I pressed the button twice. Anyway, after unmounting from QTS, it took about seven seconds for the blue LED to go out. Moving the USB drive over to my Windows notebook, I saw that again the Windows properties of the test folder on the NAS and the copy on the USB drive were identical. So NatashaTwo had figured out that only a few files needed to be updated, copied them over and left everything else alone. This is far better than I expected. Why wouldn’t QNAP clearly state this? Since they don’t, can I rely on it? Is there a way to verify the copy? Is there a log of the copy operation somewhere? What’s Left To Do, Here?I think I finally know what ‘Manually unmount USB drive’ means. To make sure, in HSB 3, I re-checked the option and clicked Apply. What I expect is that, the next time through, the USB drive will still be mounted at the end but that I will be able to unmount it by pressing the button (for 6 to 10 seconds). Rather than make you wait, I’ll disclose now what happened ... the LED began to flash at 7 seconds after I pressed the button, there was a longish beep (about one second, not two short beeps) and the LED went out at 12 seconds. In QTS, the USB drive is no longer shown. With ‘Enable the alarm buzzer’ checked, there is a beep. To figure out whether this is at the beginning or the end of the copy, I needed to drag out the operation so I found another 2.23 GB of data to put in the NAS. When I pressed the button to begin, the blue LED began to flash at four seconds, the start notice timestamp was five seconds and the beep sounded at six seconds. So, the beep is to tell you to let go of the button. There is no beep when the copy completes. (The completion notice timestamp was fifty seconds, so 2.23 GB was copied in 45 seconds for a rate of 50 MB/s. Once again, the Windows properties of the test folder on the NAS and the copy on the USB drive were identical.) Verifying my understanding of exactly what is going on is the most important thing left to do. My next step is to remove some data from the test source folder and run again with ‘Backup action’ still on ‘Copy’. If I’ve got it right, it will not be removed from the USB drive (and, indeed, it wasn't). Then I’ll run with ‘Backup action’ on ‘Synchronize’ and that data should disappear (and, indeed, it did). With the last experiment, I tagged on two other small investigations. I found that with 'Enable the alarm buzzer' unchecked, there were no beeps when the copy started nor when I manually ejected the drive. I also found that a folder, containing a file, placed in the root folder of the USB drive was removed along with the files deleted from the NAS. This is important and means that in order to use the off-site USB drives for anything other than USB One Touch Copy, the copy destination must be a folder under the drive's root and not the root itself. Other folders alongside the destination folder in the root will presumably not be touched. Press All the 'Apply' ButtonsI made another minor mistake and was punished out of all proportion for it. After changing the settings of USB One Touch Copy (shared folder Archive2 → MapToN), I clicked the ‘Apply’ button to close the ‘Settings’ dialog, but did not click the ‘Apply’ button at the bottom of the ‘USB One Touch Copy’ tab. I tried to start the copy, but it failed because the source folder (Archive2) was no longer there. I got a ‘Notice’ telling me that the copy had failed, but to find out what was wrong I had to look at a ‘Notification’, which I had not seen (noticed) at first. OK, fine, I made the changes again and this time clicked both ‘Apply’ buttons. Then I found that I could not run the copy again until I’d unmounted, removed and re-inserted the USB drive.
|