|
Projects
Processes
Power Tools
Resources |
Bowl Turning Practice, January to ??? 2024This page is a diary of learning and practicing turning a basic side-grain bowl. There are pictures and lists of the wood blanks I procured with source and cost. Then the finished bowl is shown for each blank with notes about my progress, anything I leaned specifically for that bowl and a summary. Just scroll down the page looking at the pictures and stop at anything that catches your eye.
December 31st, 2023 - Practice Bowl BlanksI don't expect to make a bowl that I can show to anyone (except my long-suffering wife) without a lot of practice. So, at the same time that I acquired my bowl gouge, I ordered a number of inexpensive bowl blanks. I also threw in a few moderately priced blanks that might result in something nice-looking. From left to right (more or less) in the picture :
January 4th, 2024 - Very Nice Walnut Bowl BlanksOn eBay, I have a habit of bidding on interesting items that I'm confident will sell for much more. It's like "watching" them, but also perhaps getting lucky and winning the item for a bargain price. While tossing "buy-it-now" items into my shopping cart, I came across jekas_9202 selling walnut blanks already turned round. I'd already paid over $20.00 for 6" x 6" x 2" maple and black walnut. These looked nicer and weren't much more. So I put in bids just above the minimum. Again, I didn't expect to win. But I did. On three items. Nobody else bid! I was surprised, but even counting the shipping charge (which I'd neglected to look at) I think I've done OK. But it will be a while before I have the skill to turn a bowl from a blank costing almost $40.00.
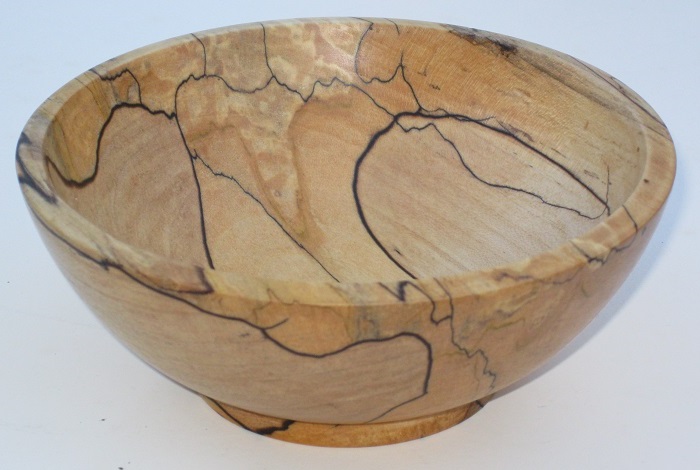
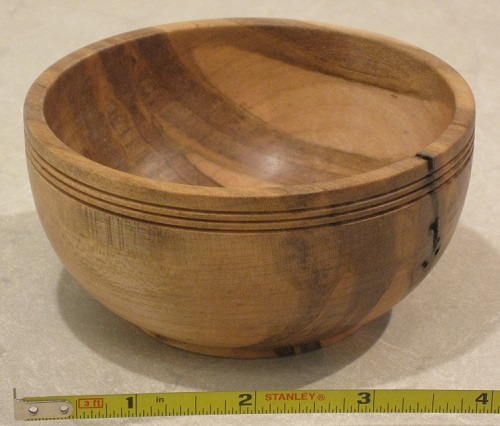
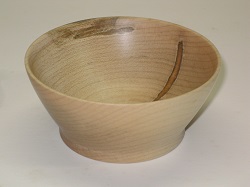 January 12th, 2024 - The Ambrosia Maple Blank with the Least AmbrosiaObviously I should start here because I have six pieces of this wood species, they were less than four dollars each and I'm familiar with maple. Red maple is described as "fairly easy to work" on the Wood Database. What I learned from this first practice bowl was important. When a bowl this small detaches from the lathe it doesn't do any damage. This was good, because it came off three times. In pieces. A catch resulted in a gash low down on the outside, which I repaired by making the bowl smaller and more vee-shaped. After I turned the bowl to work on the inside, a catch ripped it out of the chuck, destroying the mortise. I was able to turn another mortise, making the bowl smaller again, because I had not hollowed it out to the center and the worm screw mount was still usable. After the hollowing was done, I needed to clean up the top edge but made it massively worse. I continued only with my wife's encouragement and resorted to spindle tools. On the plus side, even the small amount of ambrosia figure makes this tiny bowl quite attractive. But I'm not happy with how vee-shaped it is. Also, a heck of a lot of sanding still didn't remove rings around the inside that can be easily felt. From this 4" square, 2" thick blank, I ended up with a 3⅜" diameter 1⅜" tall bowl.
 January 15th, 2024 - The First Zebrawood BlankStill with modest expectations, I picked Zebrawood for my next try as it was cheap and I have three pieces. The Wood Database says that Zebrawood "... can be very difficult to plane or surface due to the prevalence of interlocking grain" and warns "Tearout is common". I picked the worst piece, with some kind of weird defect, and I won't mind throwing it out. I had similar difficulties to my first try. Getting a decent surface on the bottom of the bowl was just not working. However, when things went wrong they didn't go as disastrously wrong. Except for one serious catch, I was just trying over and over again and not getting it right. Again, I eventually rescued myself with spindle tools (which is OK on the top and bottom faces of a bowl). Working around the side of the bowl with a push cut was juddering and leaving a rough surface. I realized that I should be sharpening the gouge more often. Things then went rather better. Hollowing the inside worked fairly well and I got a more pleasing curve to the walls. I'm definitely limited in how steep I can make the walls by the bevel angle of my gouge. I should at least see what it is and maybe grind it differently. After sanding and finishing, the only really visible flaw is a ring where the inside walls of the bowl rather sharply transition to the flatish bottom. From this 4" square, 2" thick blank, I got a 3¾" diameter 1½" tall bowl.
January 18th, 2024 - Blanks from Spalted Maple from Our Own Back YardMany years ago, I felled a 43-foot Norway maple in our back yard single-handed. OK, it was rather spindly, but even so. There was only one point where I wondered how long I would be hanging upside-down from my safety ropes waiting for someone to come by and call an ambulance. Most of the wood I cut into logs which I later split and that was our firewood. But, about four feet of the main trunk lay forgotten until I decided to clear up that part of the yard several years later. I got the chainsaw out and set about cutting it into more firewood, but I stopped when I saw that the wood had become spalted. I'd become interested in woodworking, so I knew what I was looking at and saved the parts that were not soft, milling it into pieces as best I could. But, I couldn't figure out quite what to make from it. I was into keepsake boxes at the time, using bookmatching techniques to get continuous grain around all four sides. In the end, I put the maple to one side. But now it's obvious. I can make bowls! Today I cut one piece into three blanks about five inches square and two inches thick. As you can see from the picture at right, I got carried away and started roughing out the bowls. But, I then stopped myself and got back to my original plan.
 January 19th, 2024 - The Knotty White Ash BlankThis blank is up next, while my expectations are still low, because of a large knot. This is at the edge of one face and slopes toward the center. I've oriented the blank so that this will be on the top. I'll have to remove material from the top face until I have a clean upper edge and then my hope is that hollowing out the bowl will just disappear the rest of the knot. The first picture, at right, shows me putting the blank on the lathe using the worm screw in preparation for starting work on the bottom. Then I will turn the piece and deal with the knot on the top. I've not worked with white ash before, so I checked it out at the Wood Database. I read "Produces good results with hand or machine tools ... finishes well". Good! From the 4" square, 2" thick blank, I got a 3¾" diameter 1½" tall bowl.
 January 22nd, 2024 - The Middle Spalted Maple BlankThose spalted maple blanks were calling to me. Wood that I felled in my own back yard, seasoned, spalted (accidentally) and milled! I quickly discovered that parts that are significantly decayed are a liability and won't finish cleanly. I could have figured that out if I'd thought about it. I got a 5" diameter 1¾" tall bowl.
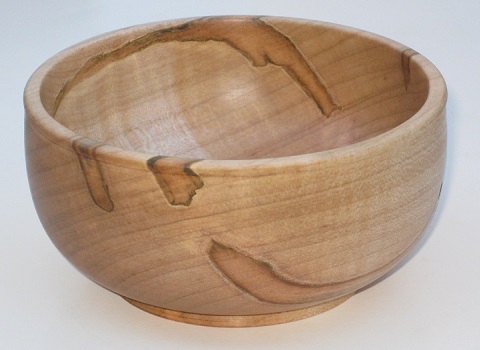
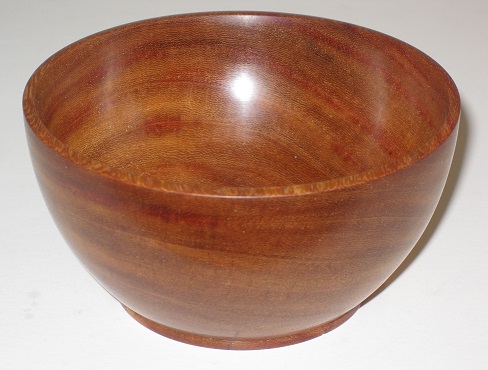
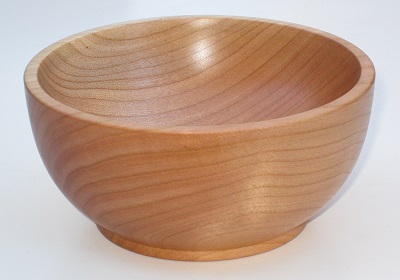 January 22nd, 2024 - The First Cherry BlankCherry is described on the Wood Database as "one of the best all-around woods for workability". I find it a dream to work with, it is reasonably priced and looks elegant, although lacking the impact of some more expensive and difficult woods. Somehow, after my eBay spree (above), I only ended up with two small pieces. So, I delayed using one up until I felt that I would get a decent result. As expected, I found this wood easier to work than maple, zebrawood and ash, although this could be partly due to the practice I'm gaining. From the 4" x 4" x 2" blank, I got a 3 7/8" diameter 1¾" tall bowl. I'm very happy with the shape; my earlier attempts were too vee-shaped.
 January 31st, 2024 - The Third (i.e. the Best) Spalted Maple BlankI got a 4¾" diameter 1 7/8" tall bowl.
 February 2nd, 2024 - An Ambrosia Maple Blank with a Bit More AmbrosiaIt's time to see if three weeks of experience enables me to do a better job with ambrosia maple. (I've also improved my sharpening setup with a 180-grit CBN wheel and a 400-grit diamond disk.) The answer is a resounding yes. The wood seemed almost as easy to work as the cherry (above), so my improvement is probably as much to do with practice as choosing an easy wood. I tried for and achieved an even wider bowl shape than with the cherry (i.e. not so much a dish shape). This meant that my bowl gouge was unable to turn the corner between the wall and the bottom. For it to do that, I would have to re-grind it to a larger bevel angle, which I am not ready to do. So, I had to remove the wood in this area by scraping. I used the bowl gouge on its side and also my trusty skewchigouge. The scraping left a poor surface finish with slight tear-out, so a lot of sanding was needed, starting at 80-grit (which it's my general goal to avoid). I used 2-inch diameter sanding disks on a foam pad mounted in a drill, which is fairly new to my arsenal of equipment. The result is 3¾" in diameter and 1¾" tall. I am very pleased with it. As well as the shape, I'm proud of the tiny raised band around the outside of the rim.
February 15th, 2024 - I'll Just Turn All My Blanks Round ... Oops!After a hiatus of a couple of weeks, I was itching to get some more time in on my lathe. I decided to gather up all the bowl blanks that I've accumulated and make them round and ready for the next step. I feel I have this part under control (see Turning a Wood Bowl, Part 1). In summary, if the blank is square, I cut the corners off to make it an octagon, mount it on the lathe and turn it round. If it's already round, I just find the center and mount it on the lathe. By "mount it on the lathe", I mean drill a hole in the center of the top face and use that to thread it onto a "screw chuck". At this time, my screw chuck is the Vevor 2.75" scroll chuck with the accessory "worm screw". This all seemed to be going fine. I'm using push cuts with my deep-fluted bowl gouge both right-handed and left-handed. I'm starting the cut without catches and remembering to stop before the end so as to avoid tear-out of unsupported grain. The hammering sound and vibration as I alternately cut wood and the air space in between is annoying, but I'm no longer intimidated by it. I'm sharpening the tool often and maintaining the "fingernail" profile. And, look! A huge pile of round blanks! And then disaster strikes. I knew that pau rosa is a hard, heavy wood. I felt it when I drilled the hole. I felt it even more when I tried to thread the blank onto the screw chuck. But, instead of thinking, I just applied more force. The accessory screw snapped off. It was probably made from ordinary mild steel. Well, that's Vevor and that's why I paid sixty five dollars and not several hundred.
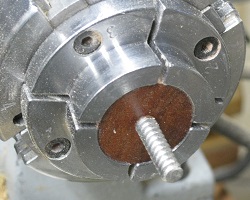 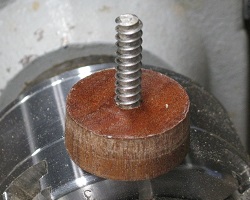 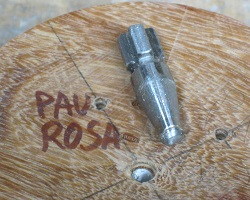 There are three ways around this little problem. I can try to get a replacement worm screw, but that will take weeks. I can go back to eBay and get a dedicated (and perhaps better made) screw chuck for about twenty-five dollars and that will take four days to a week. I can try making a screw chuck and be back in business tomorrow. I found a sturdy, stainless steel, number 12 sheet metal screw. Number 14 would be better, but this will do. I found a scrap of curupay, which is even harder than pau rosa. I glued this to a piece of maple mounted in the chuck jaws. Then I carefully turned the curupay to a disk, tapering slightly and one inch diameter at the small end. I drilled it to take the screw (using a drill chuck in the tailstock) and also drilled and squared up a recess for the screw head. Then I parted it off at a thickness very slightly less than the depth of the chuck jaws. I put epoxy on the screw, ran it in firmly and put it in a warm oven to set. Then I ground off the point, shortening it to three-quarters of an inch. Mounted in the chuck, pressed hard against the back of the jaws and gripped by the taper, this looks pretty much the same as the broken worm screw. With a smaller thread, mounting the blanks is a lot easier, but, to my surprise, it seems to hold just fine, even to turn the second pau rosa blank to round (lower left in photo)! The lesson learned is that I was drilling too small a hole in the blank and putting too much effort into screwing it onto the chuck. Going forward, I will use the same hole size for softer woods such as cherry and walnut, but a slightly bigger hole with an easier fit for hard maple and harder woods.
Attach:Bowl4InchWhiteAsh2.jpg Δ February 20th, 2024 - The Second, and Last, White Ash BlankI found the first ash bowl both difficult and unrewarding. The wood seemed tough and, in spite of the Wood Database's claim to the contrary, hard to work. It was prone to tear-out. A lot of sanding was needed to get something worth keeping. Even then, the appearance is unremarkable. It just looks like an idealized version of "wood". Finally, there are tiny black specks lodged in the end grain, which I assume are abrasive particles from the sandpaper. They can't be seen unless you look closely, but I know they're there. So, I chose to finish the second ash bowl partly to be just done with ash. I also wanted to know whether things would go better than with the first, and they did. In spite of dubious workability, I achieved a contour and finish that required only moderate hand sanding starting at 150 grit.
 February 21st, 2024 - The Pau Rosa Blank that Broke my Screw ChuckI should have held off on a known hard wood until I gained more skill, but I just couldn't stand the broken screw stuck in the blank and mocking my incompetence. I wanted it out of there and in the trash. So I screwed the blank to my 2 inch faceplate, this being the more laborious (but more secure) alternative to a screw chuck. From there, I can proceed normally, leaving a "spigot" of wood when I begin hollowing so as to get tailstock support. The broken screw will just sit harmlessly in this spigot until I break it off to finish hollowing. (By the way, I now have a dedicated 3 inch faceplate / screw chuck combination in addition to my home-made screw chuck, plus the 2 inch faceplate and the eBay seller of the scroll chuck is going to send me a replacement worm screw, so I'm in good shape again.) Back to the pau rosa. I found it very difficult to turn due to its harness. I could only take a shallow bite and then I would drop the cut part way around the curve and have to pick it up or start again. The end grain finished very rough, although I could not see tear out. In the end, I pulled myself together and got one decent-sized cut all the way around the outside curve with a plan to sand it into submission. This went ... strangely well. I started with 100 grit (I had a lot of rough end grain to smooth out). As soon as I applied the paper to the wood, all the abrasive particles were gone. I was left holding a scrap of smooth paper. I tried another piece and the same thing happened. Expecting to have to give up, I stopped the lathe. The wood was well on its way to being smooth. In fact, it looked and felt as if I'd been using a much higher grit sandpaper, maybe 220 or even 320. So I just pressed on, using more, but not a whole lot more, paper than usual, and ended up with an incredibly smooth finish. I flipped the workpiece to hollow it out, as usual holding it with the chuck jaws expanded into the mortice plus the tailstock pressed into the screw chuck hole. This continued to be hard work, but at least I knew where I was going. As the wood is hard and tough I went for a thinner wall than before, I suppose just to show off, if I'm honest. Well, I prefer the appearance of the normal walls, so I won't do this again. I noticed that the wall thickness is not uniform all the way around. At first, I assumed this was just a failure to get the bowl spinning on the same axis to turn the outside and to hollow it out. Then I noticed that the wall is thick in two places around the circumference and thin in the two places between. So, what almost certainly happened is that the wood changed shape as I removed waste. I suppose it could have dried further during the day between working the outside and inside, but I think it was just the release of stresses. I should perhaps think of roughing bowls out on both sides as if they were green to avoid this in future.
 February 23rd, 2024 - Another, Rather Heavy, Ambrosia Maple BlankThis was up next because I have four left and maple works well. However, this blank is heavier than the others and turns out, no surprise, to be harder. That alone wouldn't be so bad, but there are large areas of comparatively soft wood in just the wrong place and this results in noticeable gaps being torn in the end grain on the sides of the bowl. I've read that applying an oil finish and turning while it's still wet can help by softening the fibers. This did not work. Next, I tried wood hardener, which worked with spalted maple. It was no help here. In the end, I filled the gaps with wood glue and sawdust and just got down to sanding my way to an acceptable result. After flipping the bowl I had the same problem on the inside. The soft wood is in a band across the bottom of the bowl and I have what looks like a tear all the way from one side to the other. So, more glue and sawdust and serious sanding. In spite of my problems, the end result is quite handsome. You can see the tears if you look closely, but if you accept them as a feature of the wood they don't spoil the bowl.
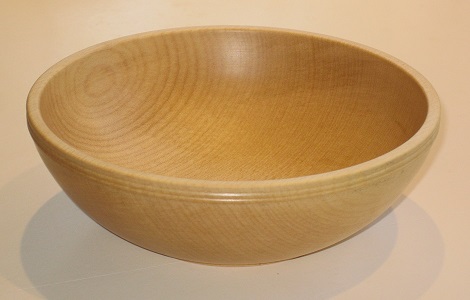 February 25th, 2024 - The Six-Inch "Flame Curly" Maple Blank (Hah!)The push cut is working for me in most cases. Sometimes, though, it lets me down. First, I have a problem starting it from space and occasionally get a catch which ruins something that was finished a moment ago. Second, sometimes the tool starts to oscillate into and away from the wood. This creates waves in the cut surface, which the bevel now rides on to produce more waves as the cut progresses and it all goes to hell. Maybe another cut would fix this, but I have a strong tendency to take very small bites and that does no good. I often end up scraping until I get rid of the waves and then trying again with a mostly flat surface, which either works fine this time or goes to hell again. So, anyway, maybe I should add the pull cut to my bag of tricks. To try to learn this cut, I picked this blank because soft maple is a dream to work (I found this out when I turned it round) and there's a fair bit of wood to practice on before I have to get serious about making a bowl. Well, I don't think I can do pull cuts. I got some pretty bad catches, but, as I'd planned, there was still a bowl in there. Going back to the videos, I decided that my bowl gouge is not ground in a way that facilitates this cut. I would need a shorter bevel and/or swept back wings. So I gave up on the pull cut and just turned the bowl. This was very, very enjoyable. I could take decent sized cuts and streams of shavings would pour out from the gouge and pile up in my arms. I even decided to show off a bit and poked a couple of tiny beads below the outer rim of the bowl. There was, as I suspected, no figure in the wood, and I feel that $21.35 was too much to pay. A black mark against exoticwoodzone.
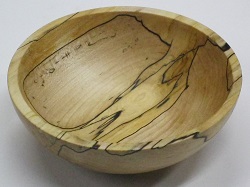
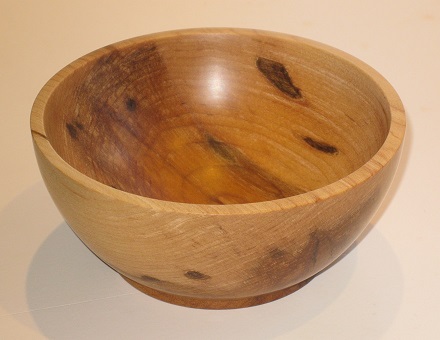
Attach:Bowl5InchSpaltedMaple1.jpg Δ February 28th, 2024 - The First (the Least Interesting) Spalted Maple BlankThis blank has actually made more trips to the lathe than any other, so the date is just when I completed it. It turned no differently from the others, except that I was better prepared and had soaked it with wood hardener. From the photograph, you can see that it's still very interesting. That's because I've positioned it to hide the plain, boring part, a large patch where there is just ordinary maple wood. After doing the best I could with the bowl gouge, I had to power sand the inside with the two-inch disks starting at 150 grit. I'm not unhappy with this; it's a challenging wood.
 February 29th, 2024 - The Fourth Ambrosia Maple BlankNow there are three blanks of this wood left. I don't see much to choose between them, so I'll work through them to gain practice. I'll stop agonizing over tears in the soft parts of the wood because they're not that noticeable in the finished bowl and fit in with the overall "damaged" appearance. No more trying to plug them with glue and sawdust. With some scraping (using the wings of the bowl gouge on the outside and my skewchigouge on the inside) I can reduce sanding to an acceptable level. I experimented with "twice turning", which should relieve any stress in the wood and allow it to dry out if necessary. This is in reaction to the pau rosa bowl that "moved" after the outside was turned, see above. All I did was to flip the bowl before the outer profile was fully developed and rough out the inside. This did not work. When I flipped the bowl back, it was running on a very different axis. The "spigot" remaining after I begin hollowing does not provide the support of the original top face. Maybe it would on a bigger bowl if I left a spigot as large as the screw chuck. To rescue this bowl, I finished the outer profile while the chuck held it by the mortise / recess. This required scraping, as I've not figured out the pull cut. The appearance of the finished bowl is different from the earlier ones, having bands of darker wood. There's also more evidence of the beetle at work on this particular bowl with a sizeable "living space" right at the edge. To change things up a bit, I decorated the outside edge with V-cuts.
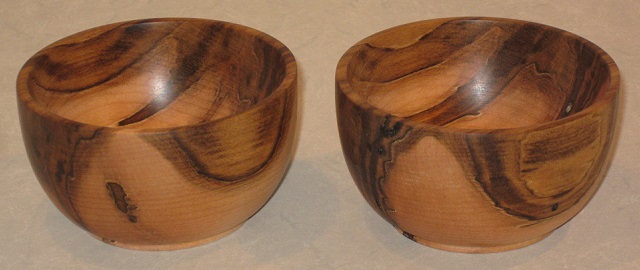 March 9th to 11th, 2024 — The Fifth and Sixth Ambrosia Maple Blanks - Litter-Mates!When people see my growing collection of bowls it’s not unusual for them to express an interest in the process of making them. Some friends were visiting when I had one of the last two ambrosia maple blanks on the lathe and they watched while I made a couple of push cuts on the inside. The question then came up - how long does it take to make a bowl? I’d not paid attention to this and couldn’t answer. So, I completed the one on the lathe and made the estimate of three hours. Toying with this bowl and the last blank, someone noted similarities in the pattern and we realized that the two blanks had been next to each other in the tree. So, we called them “twins” and then “litter mates” and I set about turning the second bowl to be the same shape as the first, to the best of my ability. Here they are in the picture at right. And, yes, it’s probable that the fourth ambrosia maple bowl, above, also came from close by in the same tree. I didn’t come across any new problems. I worked slowly to minimize tears in the soft parts of the wood and fixed them up as best I can with scraping and sanding. I am starting to think that I should buy a real scraper tool, probably a small round-point scraper which I will then grind to a French curve.
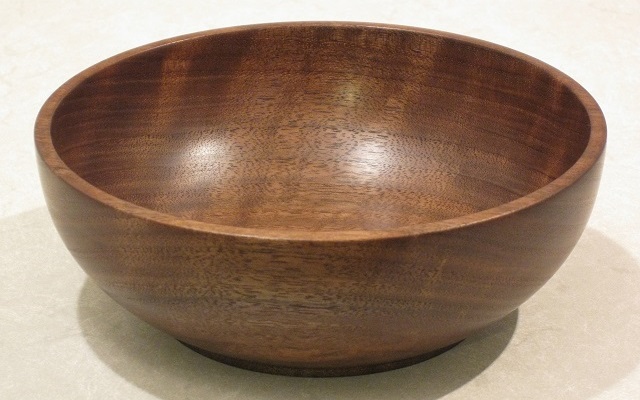
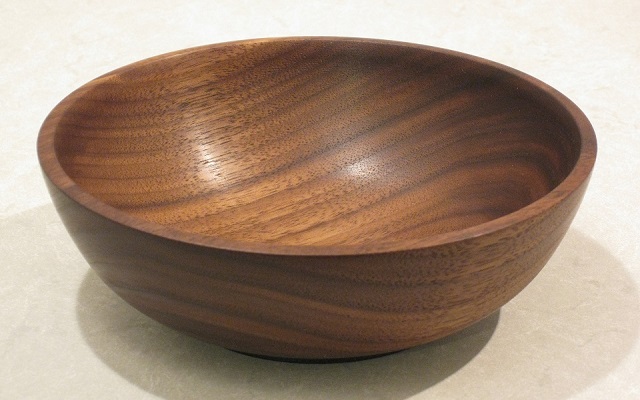 March 22nd, 2024 — The American Black Walnut BlankI feel ready now to tackle bowls that I really don’t want to mess up. First will be the walnut blanks, of which I have four, all six inches across or larger. I’ll begin with the American black walnut in the initial batch of blanks from December, 2023. This cost me $20.46, five times the price of the four-inch blanks. The “Comments” section of Black Walnut’s entry in the Wood Database reads “It would be hard to overstate black walnut’s popularity among woodworkers in the United States. Its good working characteristics, coupled with its rich brown coloration puts the wood in a class by itself among temperate-zone hardwoods. To cap it off, the wood also has good dimensional stability, shock resistance, and strength properties.” Slightly contradicting this, I have read that walnut blunts tools rapidly and I have to agree with this. Sandpaper is spent very quickly. Setting aside the need for frequent tool sharpening, I found this blank as pleasant to work as soft maple (above). In places, I had my usual problem with tool chatter (tool bounce?), but was able to fix it by taking a new cut that ran deeper than the ripples produced by the chatter. I’m slowly getting better at starting my push cuts on corners, but there were still a few times when the gouge zipped off sideways (I think this is called skating). However, a new problem appeared, which was torn grain on the inside close to the top edge. There were two areas, just as you’d expect, where the grain direction was unfavorable. There would be a buzzing sound and I would have rough patches about the size of peppercorns. I made the mistake of thinking that I could correct this by sharpening the gouge and making a very careful final cut. The same thing happened. Now the wall thickness was too small for any experimentation. Scraping with the tools I have was not working and I fell back on sanding (and sanding and sanding). I rescued the bowl’s appearance, but I can feel unevenness in the wall due to it having been defined by sanding and not the tool. Ugh. I have ordered a half-inch round point scraper from Craft Supplies USA. 5¾ inches in diameter by 1⅞ inches tall.
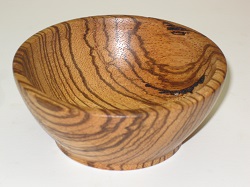
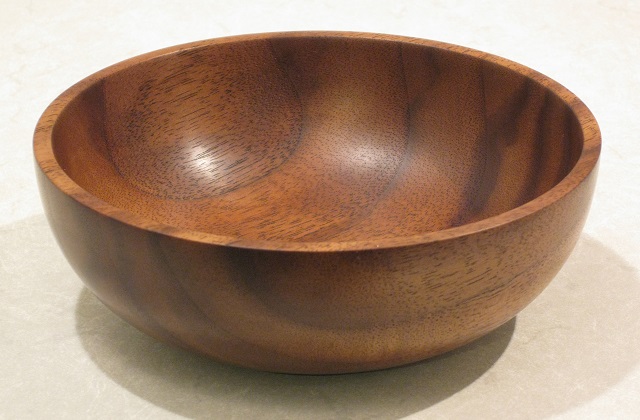 March 25th, 2024 — The Claro Walnut BlankThis blank was in the January 4th, 2024, batch from jekas_9202 on eBay (see above) and cost $38.64, including shipping. It has very wide growth rings and more color difference between spring and summer wood than I’m accustomed to in claro walnut. Turning the outside went well until the final cut. As usual, I was too close to the profile that I wanted to take a good bite and I had patches of tear-out and tool chatter that needed to go. I resorted to scraping and sanding. Scraping this wood dulls the tool edge very, very quickly. I noticed this when using the wings of the bowl gouge but especially when I used the skew chisel. I wish I’d ordered a proper scraper sooner. Sandpaper also only lasts for one pass. It took a long time and a lot of paper to get a smooth finish on the outside. I’m not using hardware store rubbish, either; this is Deerfos zinc stearate coated paper. Should I be sanding at a lower lathe speed (I’m using my turning speed of 1,250 r.p.m.)? Things went better, overall, turning the inside of this bowl as compared to the black walnut (above). Either this particular piece of wood is more friendly or I’ve improved my technique. The gouge seemed to stay sharp longer. I made many long, smooth cuts with a fountain of shavings and no (OK, not much) tool chatter. I still needed to scrape, but not so much. I still had to sand, but I started with 120 grit, not 80 as with the black walnut. I lowered the speed to 500 r.p.m. and this was an improvement.
5¾ inches in diameter by 21⁄16 inches tall.
 March 25th, 2024 — The Curly Claro Walnut BlankThis blank was also in the January 4th, 2024, batch and cost $34.64, including shipping. Turning the outside was about the same as the previous blank, but I made faster progress with the sanding. The paper still wore out on the first pass, but removed more material, so fewer passes were needed. On the inside, things went better again. I’m avoiding tool chatter to some extent by changing how far I open the flute of the bowl gouge. After starting the cut at the rim with the flute closed (3 o’clock), I open to about 1:30 to go down the wall and around the corner but when I reach the bottom I close up a bit to about 2o’clock. Yet again I failed to make a single, clean, final pass. I mostly corrected this with “micro-cuts”, just raising a little dust, to fix each ridge. I was able to sand from 180 grit, so I was really happy with that. The figure and chatoyance are not as strong as I had hoped. Darn. It only shows from one viewing angle, which I have tried to catch in the photograph. Did I chose the wrong side of the blank to be the top. I have no idea. It’s still a very handsome bowl. It’s 5⅞ inches in diameter and 2⅛ inches tall.
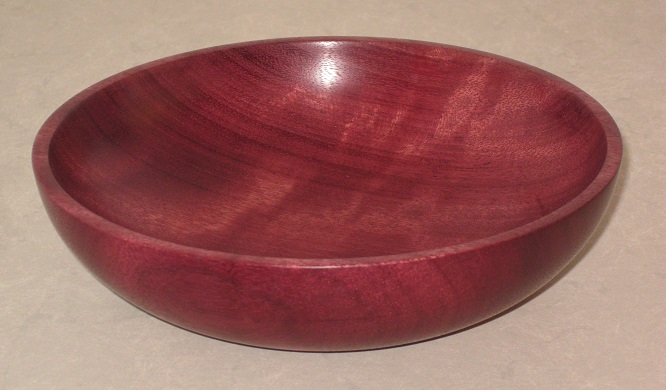 March 26th, 2024 — The Purpleheart BlankI bought this blank with the specific goal of making a gift for a friend. She is very fond of the color purple. Now, purpleheart is 50% denser than black walnut (905 kg/m3 vs 610 kg/m3) and twice to three times as hard (Janka 11,190 N vs. 4,490 N). The Wood Database warns “Working with purpleheart can present some unique challenges” and I’ve found this to be true. But, it finishes to a lovely smooth surface. I feel I’m now ready for this challenge. Turning the outside was similar to the walnut blanks, maybe a bit more prone to tear-out and less prone to tool chatter. Turning the inside was about as difficult as the America black walnut, above. The slightly greater diameter meant that the rim was further from the point of support and the buzzing was more like a screech. I gave up trying to get a smooth surface from the gouge before the wall of the bowl became too thin and switched to scraping. (If I’d known that the scraper I ordered would arrive the next day, I would have held off!) Then, lots of sanding. For this I reduced the speed and it seemed to go better. I’m very, very happy with the result (6⅝” diameter by 1¾” tall). I could see figure in the blank, but I don’t know how to predict whether it will appear in the finished bowl. Well, it did. As it catches light from different directions, the appearance changes (this is called chatoyance).
 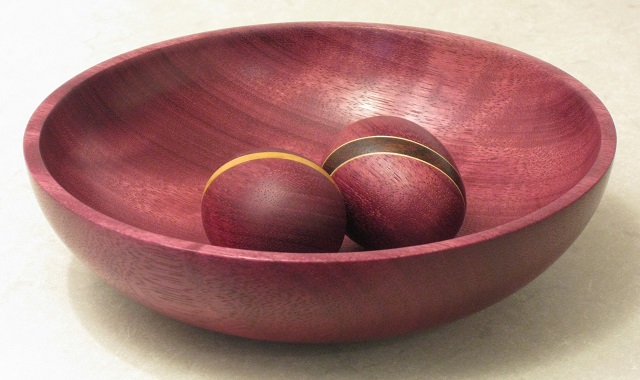 March 27th, 2024 — I Couldn't Throw Away the CornersThe blank for the purpleheart bowl was square. As I describe elsewhere, my first step for square blanks is to saw the corners off to make octagons, which are less scary spinning on the lathe. So I had these little triangles of a nice wood and couldn’t throw them away. My first though was ... wine bottle stoppers! If I glued them together in pairs, they make 1¾” cubes, which are a bit too short. So, I selected some scraps and glued these in as accents to get a length of about 2¼”. Somewhere along the line I decided instead to make them into eggs and to give them along with the bowl. Turning the eggs wasn’t easy, but it was great practice for critical control of a spindle profile and, in retrospect, a bit of fun. The accent woods were olive, granadillo and black maple veneer, chosen for no better reason than being in my scrap pile. The eggs are 1⅞” long by 1½” diameter (as compared to large chicken eggs from the fridge which are 2⅛” long by 1⅝” diameter).
 March 30th, 2024 — The White Oak Blank --- A Lidded Bowl with a Food Safe FinishWatco Butcher Block Oil and Finish. 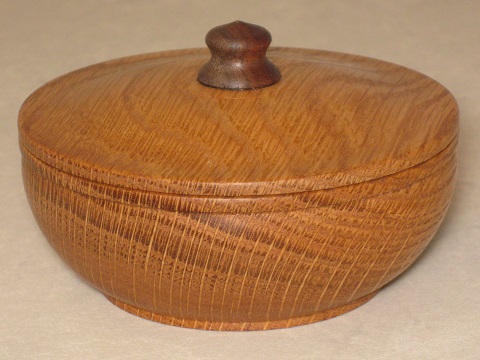 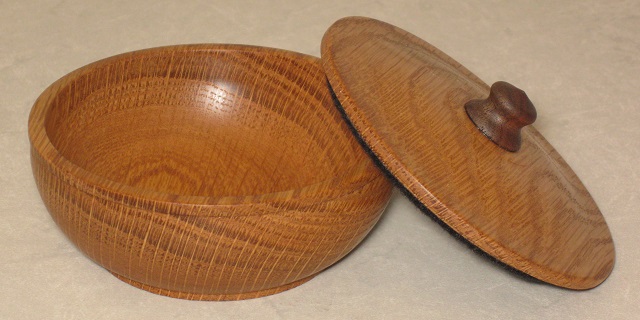 To do.
March 30th, 2024 — The Seven-Inch Walnut BlankThis blank was in the January 4th, 2024, batch and cost $36.64, including shipping. I’ve not started turning it yet.
|